Dialogue Cloud Neo (Unify) onboarding guide
Use this guide to prepare a Microsoft Teams tenant for Dialogue Cloud Neo (Unify) and deploy one or more Unify endpoints.
Choose the correct onboarding path:
-
Use this guide when the deployment uses Microsoft Teams Phone Extensibility with Azure Communication Services. Check Dialogue Cloud Neo (Unify) Feature Availability before choosing this connect model.
-
Use Dialogue Cloud Neo (Connect) prerequisites when the deployment uses Direct Routing through the AnywhereNow SBC, or when an existing customer is upgrading first.
Journeys in this guide: New customers create a service for Dialogue Cloud Neo (Unify) and deploy a new contact center. Existing customers upgrade to Dialogue Cloud Neo (Connect) first and can optionally add Unify endpoints.
Some steps are shared across both journeys (for example Secure Vault and endpoint creation). These are marked as Shared step in the guide.
Before you start
-
Dialogue Cloud Neo enabled Your organization has been enabled for Dialogue Cloud Neo. This will be done by your AnywhereNow representative.
-
Microsoft Teams PowerShell module (recommended: latest; minimum: 7.0). Install/update with:
Install-Module MicrosoftTeams -ForceandUpdate-Module MicrosoftTeams -
Admin roles in the customer’s Microsoft 365 tenant: Teams Administrator and User Access Administrator (or equivalent roles that can create resource accounts, assign numbers, and manage app access).
-
Phone number available for the endpoint (Teams Calling Plan service number, Operator Connect number, or Direct Routing number).
-
For Automatic Deployment with Direct Routing, the phone numbers need to be uploaded to your tenant, see: Get Direct Routing phone numbers in your Teams tenant - Microsoft Teams
-
-
Teams Phone Resource Account license available for the endpoint.
Security note:
For automatic deployment you’ll store admin credentials in the Dialogue Cloud Secure Vault. Use a dedicated service account and time-bound elevation (PIM) where possible.
One-time operation: Grant admin consent
Grant admin consent once per Microsoft 365 tenant before using Dialogue Cloud Neo.
Required role: Global Administrator or Privileged Role Administrator.
You must grant consent for both the front-end and back-end enterprise application for your region.
Note: Select the consent links for your deployment region only: GWC, APAC, or NORA.
Tip: Missing Azure Communication Services Service Principal in your Entra ID Formerly known as Azure Active Directory (or Azure AD, or AAD) tenant?
 Read more
Summary
When accessing an ACS ACS commonly known as the acronym for Azure Communication Services, Microsoft's multichannel communication API in Azure for voice, video, chat, text messaging/SMS, email, and more to applications. Not te be confused with Azure Access Control Services (AACS) a deprecating authentication service of Microsoft, also sometimes abbreviated to ACS.-dependent application, and users receive:
AADSTS650052: The app is trying to access a service (Azure Communication Services) that your organization lacks a service principal for.
Root Cause
The tenant does not have a Service Principal (Enterprise Application) for Azure Communication Services (1fd5118e-2576-4263-8130-9503064c837a). This is normally created automatically via admin consent but in some tenants it does not exist.
Prerequisites
-
Global Admin, Application Admin, or Cloud Application Admin role
-
Microsoft Graph PowerShell module installed
Resolution
Step 1 — Install the Graph PowerShell module (if not already installed)
Install-Module Microsoft.Graph -Scope CurrentUser
Step 2 — Connect to Microsoft Graph
Connect-MgGraph -Scopes "Application.ReadWrite.All"
Sign in with an admin account when prompted.
Step 3 — Create the ACS Service Principal
New-MgServicePrincipal -AppId "1fd5118e-2576-4263-8130-9503064c837a"
Step 4 — Verify creation
Get-MgServicePrincipal -Filter "appId eq '1fd5118e-2576-4263-8130-9503064c837a'" | Format-List DisplayName, AppId, Id
PowerShell
Get-MgServicePrincipal -Filter "appId eq '1fd5118e-2576-4263-8130-9503064c837a'" | Format-List DisplayName, AppId, IdExpected output should show Azure Communication Services with the corresponding App ID and Object ID.
Step 5 — Disconnect
Disconnect-MgGraph
Step 6 — Retry the original login
Re-attempt the application login. The error should now be resolved.
Notes
-
This only needs to be done once per tenant
-
Safe to re-run — if the service principal already exists, the command will return an error indicating it already exists
-
Does not require Teams Enterprise Voice to be enabled
-
Commonly seen in new tenants or tenants with no prior ACS usage
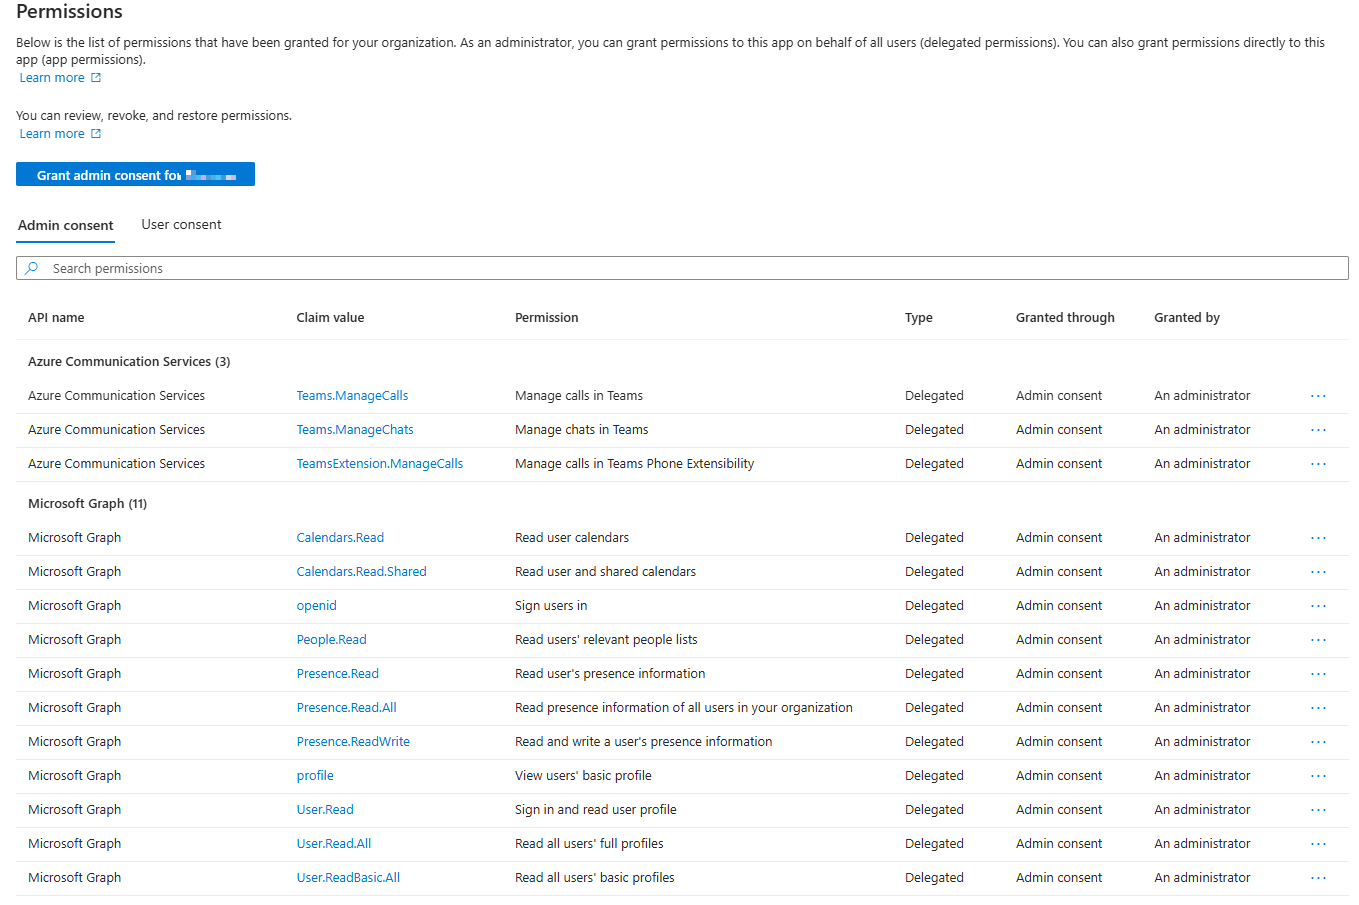
Front-end enterprise application
Used by WebAgent, and Dialogue Workspace.
| Region | Consent link |
|---|---|
| GWC | |
| APAC | |
| NORA |
Permissions
| API/permission | Type |
|---|---|
| Azure Communication Services | |
| Teams.ManageCalls | Delegated |
| Teams.ManageChats | Delegated |
| Teams.Extension.ManageCalls | Delegated |
| Microsoft Graph | |
| Calendars.Read | Delegated |
| Calendars.Read.Shared | Delegated |
| Openid | Delegated |
| People.Read | Delegated |
| Presence.Read | Delegated |
| Presence.Read.All | Delegated |
| Presence.ReadWrite | Delegated |
| Profile | Delegated |
| User.Read | Delegated |
| User.Read.All | Delegated |
| User.ReadBasic.All | Delegated |
Back-end enterprise application
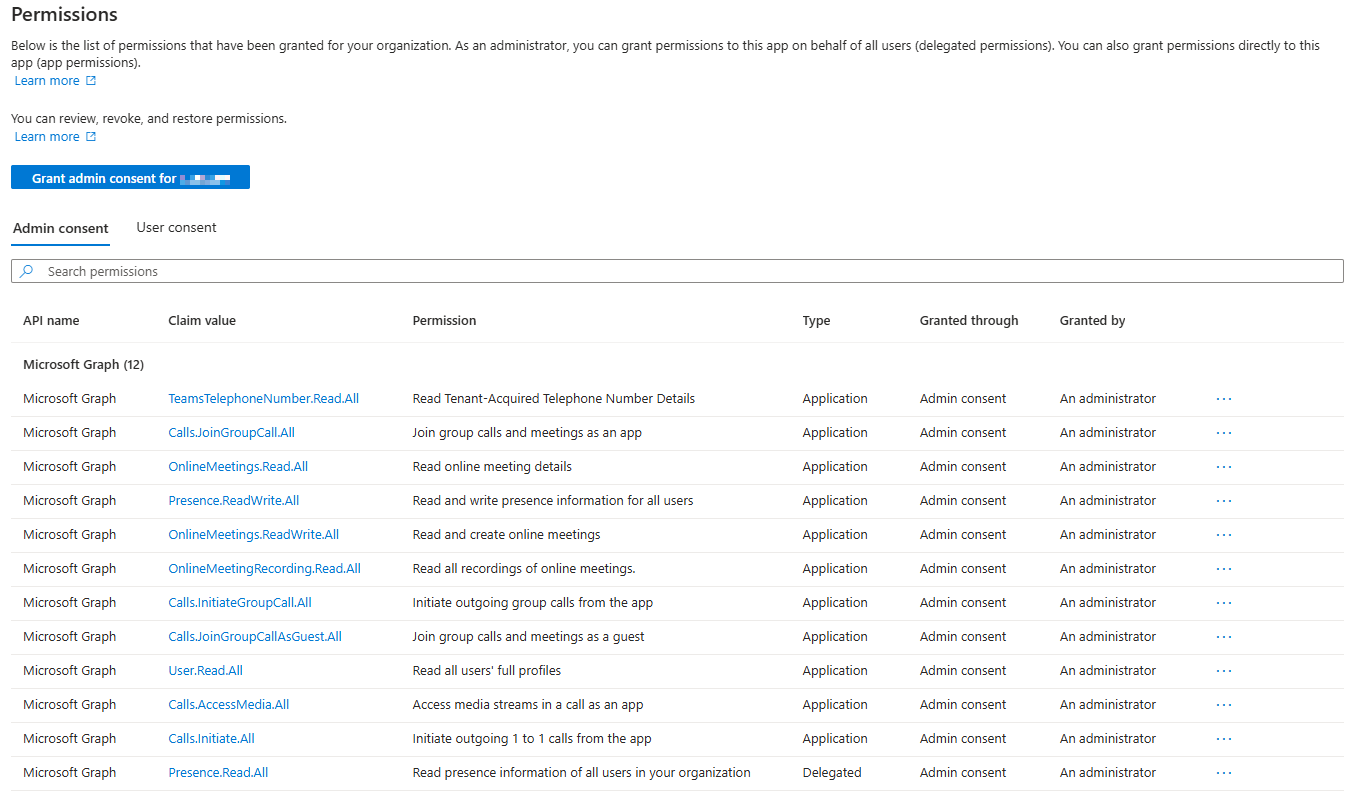
Used by PresenceService.
| Region | Consent link |
|---|---|
| GWC | |
| APAC | |
| NORA |
Permissions
| API/permission | Type |
|---|---|
| Microsoft Graph | |
| Calls.AccessMedia.All | Application |
| Calls.Initiate.All | Application |
| Calls.InitiateGroupCall.All | Application |
| Calls.JoinGroupCall.All | Application |
| Calls.JoinGroupCallAsGuest.All | Application |
| OnlineMeetingRecording.Read.All | Application |
| OnlineMeeting.Read.All | Application |
| OnlineMeetings.ReadWrite.All | Application |
| Presence.ReadWrite.All | Application |
| TeamsTelephoneNumber.Read.All | Application |
| User.Read.All | Application |
New customers
Graph Presence
Dialogue Cloud Neo deployment automation through OnePortal Formerly known as Partner Portal. A redesigned web portal for managing Dialogue Cloud deployments. still requires a customer created MS Entra ID App for some specific Graph presence calls.
Please follow steps on: Microsoft Graph Presence Source (Get) Configuration. with one added permission (see below)
-
You will need the following details during the deployment:
-
Graph application client ID (App ID)
-
Graph application client secret
-
Azure Entra tenant ID
-
-
you will need to add the following Application level Permissions
Permissions
| API/permission | Type |
|---|---|
| Microsoft Graph | |
| Presence.Read.All | Application |
| Domain.Read.All | Application |
| User.Read.All | Application |
| Teams.TelephoneNumber.Read | Application |
Presence.Read.All - Read presence information of all users in your organization
Description: Allows the app to read presence information of all users in the directory without a signed-in user. Presence information includes activity, availability, status note, calendar out-of-office message, timezone and location.
Why is this required? To allow the Graph Presence Source to retrieve current presence from users.
Permission name: Microsoft Graph / Presence.Read.All
Domain.Read.All - Read domains
Description: Allows the app to read all domain properties without a signed-in user.
Why is this required? To allow the Graph Presence Source to retrieve the domains from the tenant.
Permission name: Microsoft Graph / Domain.Read.All
User.Read.All - Read all users' full profiles
Description: Allows the app to read user profiles without a signed in user.
Why is this required? To allow the Graph Presence Source to translate UPN In Windows Active Directory, a User Principal Name (UPN) is the name of a system user in an email address 'like' format. A UPN (for example: john.doe@domain.com) consists of the user name (logon name), separator (the @ symbol), and domain name (UPN suffix). to ID, ID is required to retrieve presence from user.
Permission name: Microsoft Graph / User.Read.All
Teams.TelephoneNumber.Read - Read Tenant-Aquired Telephone Number Details
Description: Allows the app to read telephone numbers assigned to users and other entities in Microsoft Teams without a signed‑in user.
Why is this required?: To allow the Graph Presence Source (or calling/signaling components) to resolve Teams telephone numbers to the corresponding Teams user objects. This enables correct correlation between phone numbers and user identities when processing call events, presence updates, or telephony‑related data.
Permission name: Microsoft Graph / TeamsTelephoneNumber.Read.All
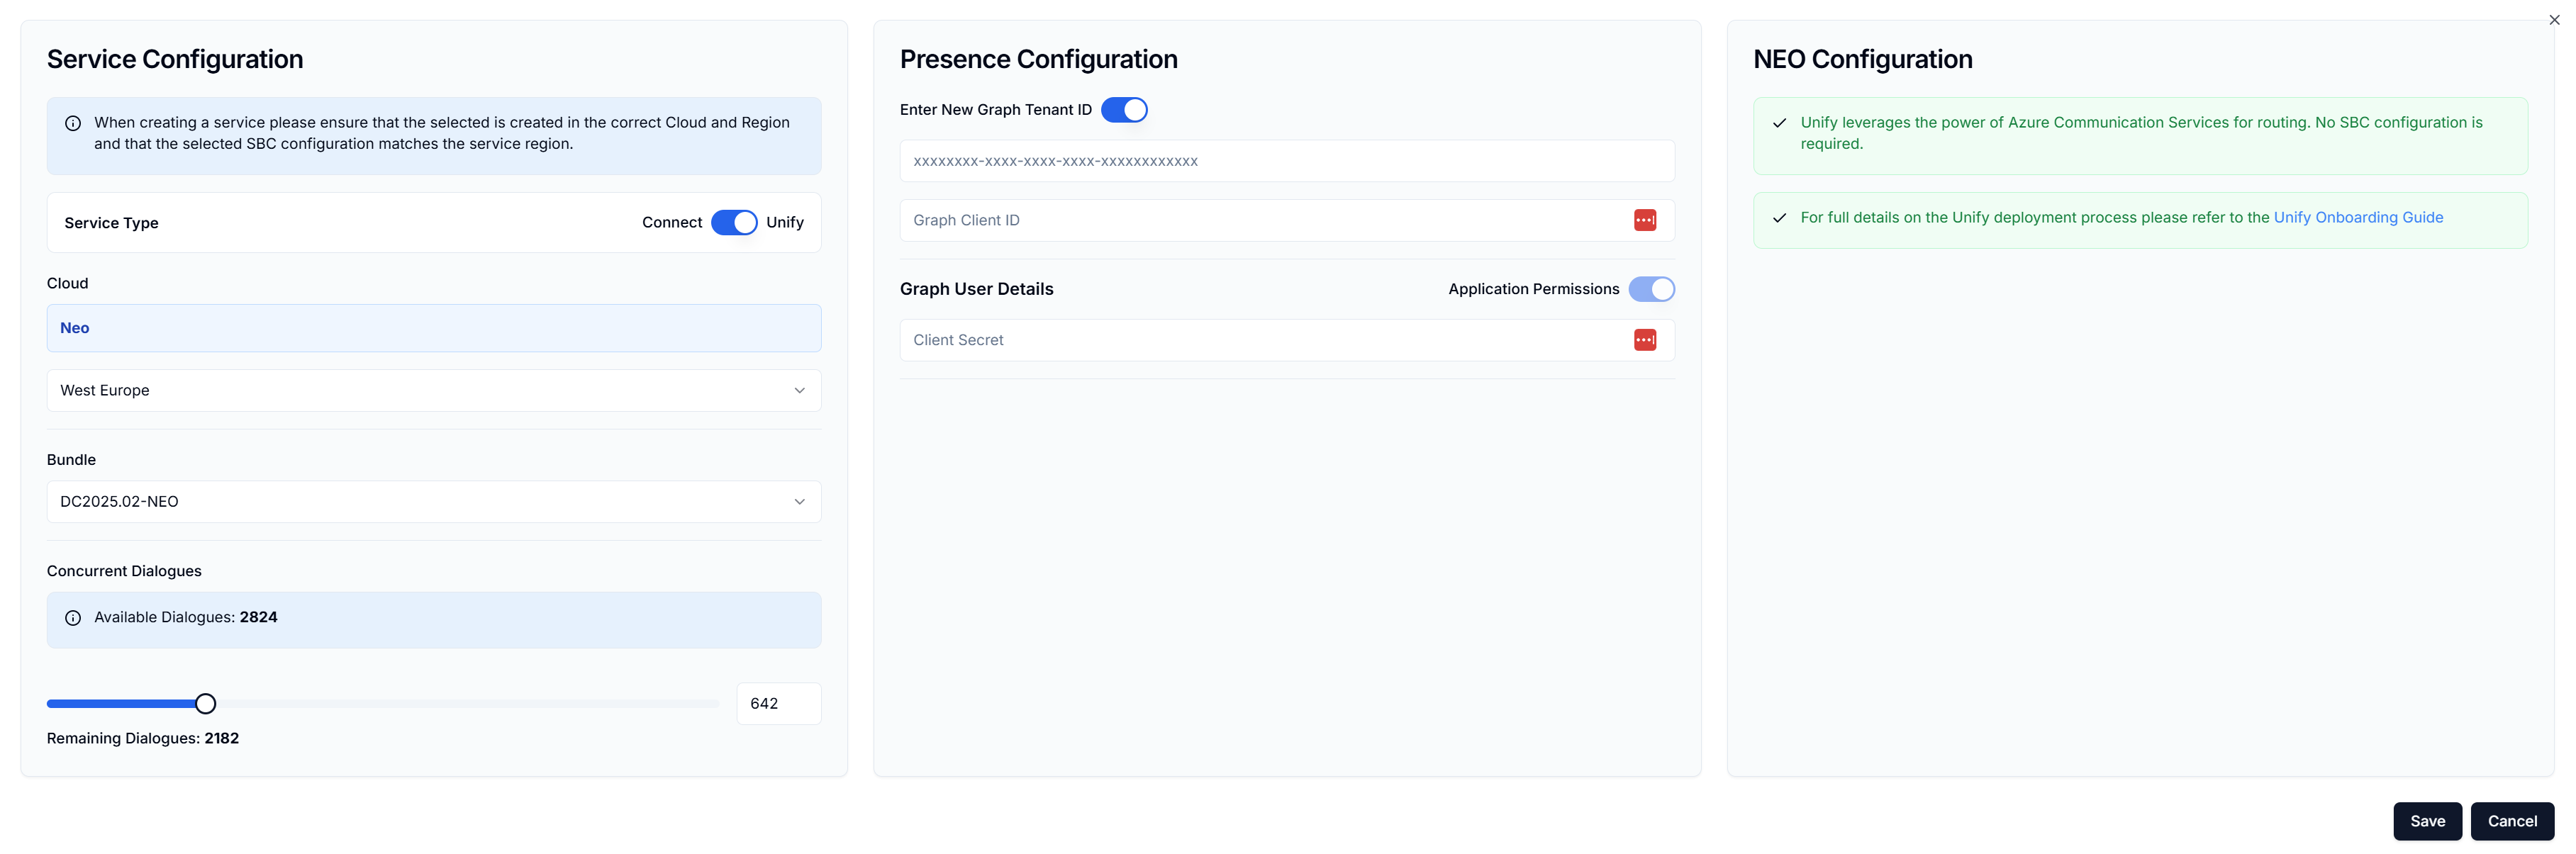
Create service for Dialogue Cloud Neo (Unify)
-
Create a new service in OnePortal and select Unify.
-
Fill in the required information and select Save.
-
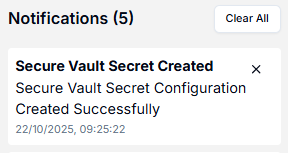
OnePortal creates the service and the required backend components. You’ll receive an in-portal notification when provisioning completes.
Configure Secure Vault
Shared step: This configuration is used for automatic provisioning and applies to both new and existing customers.
-
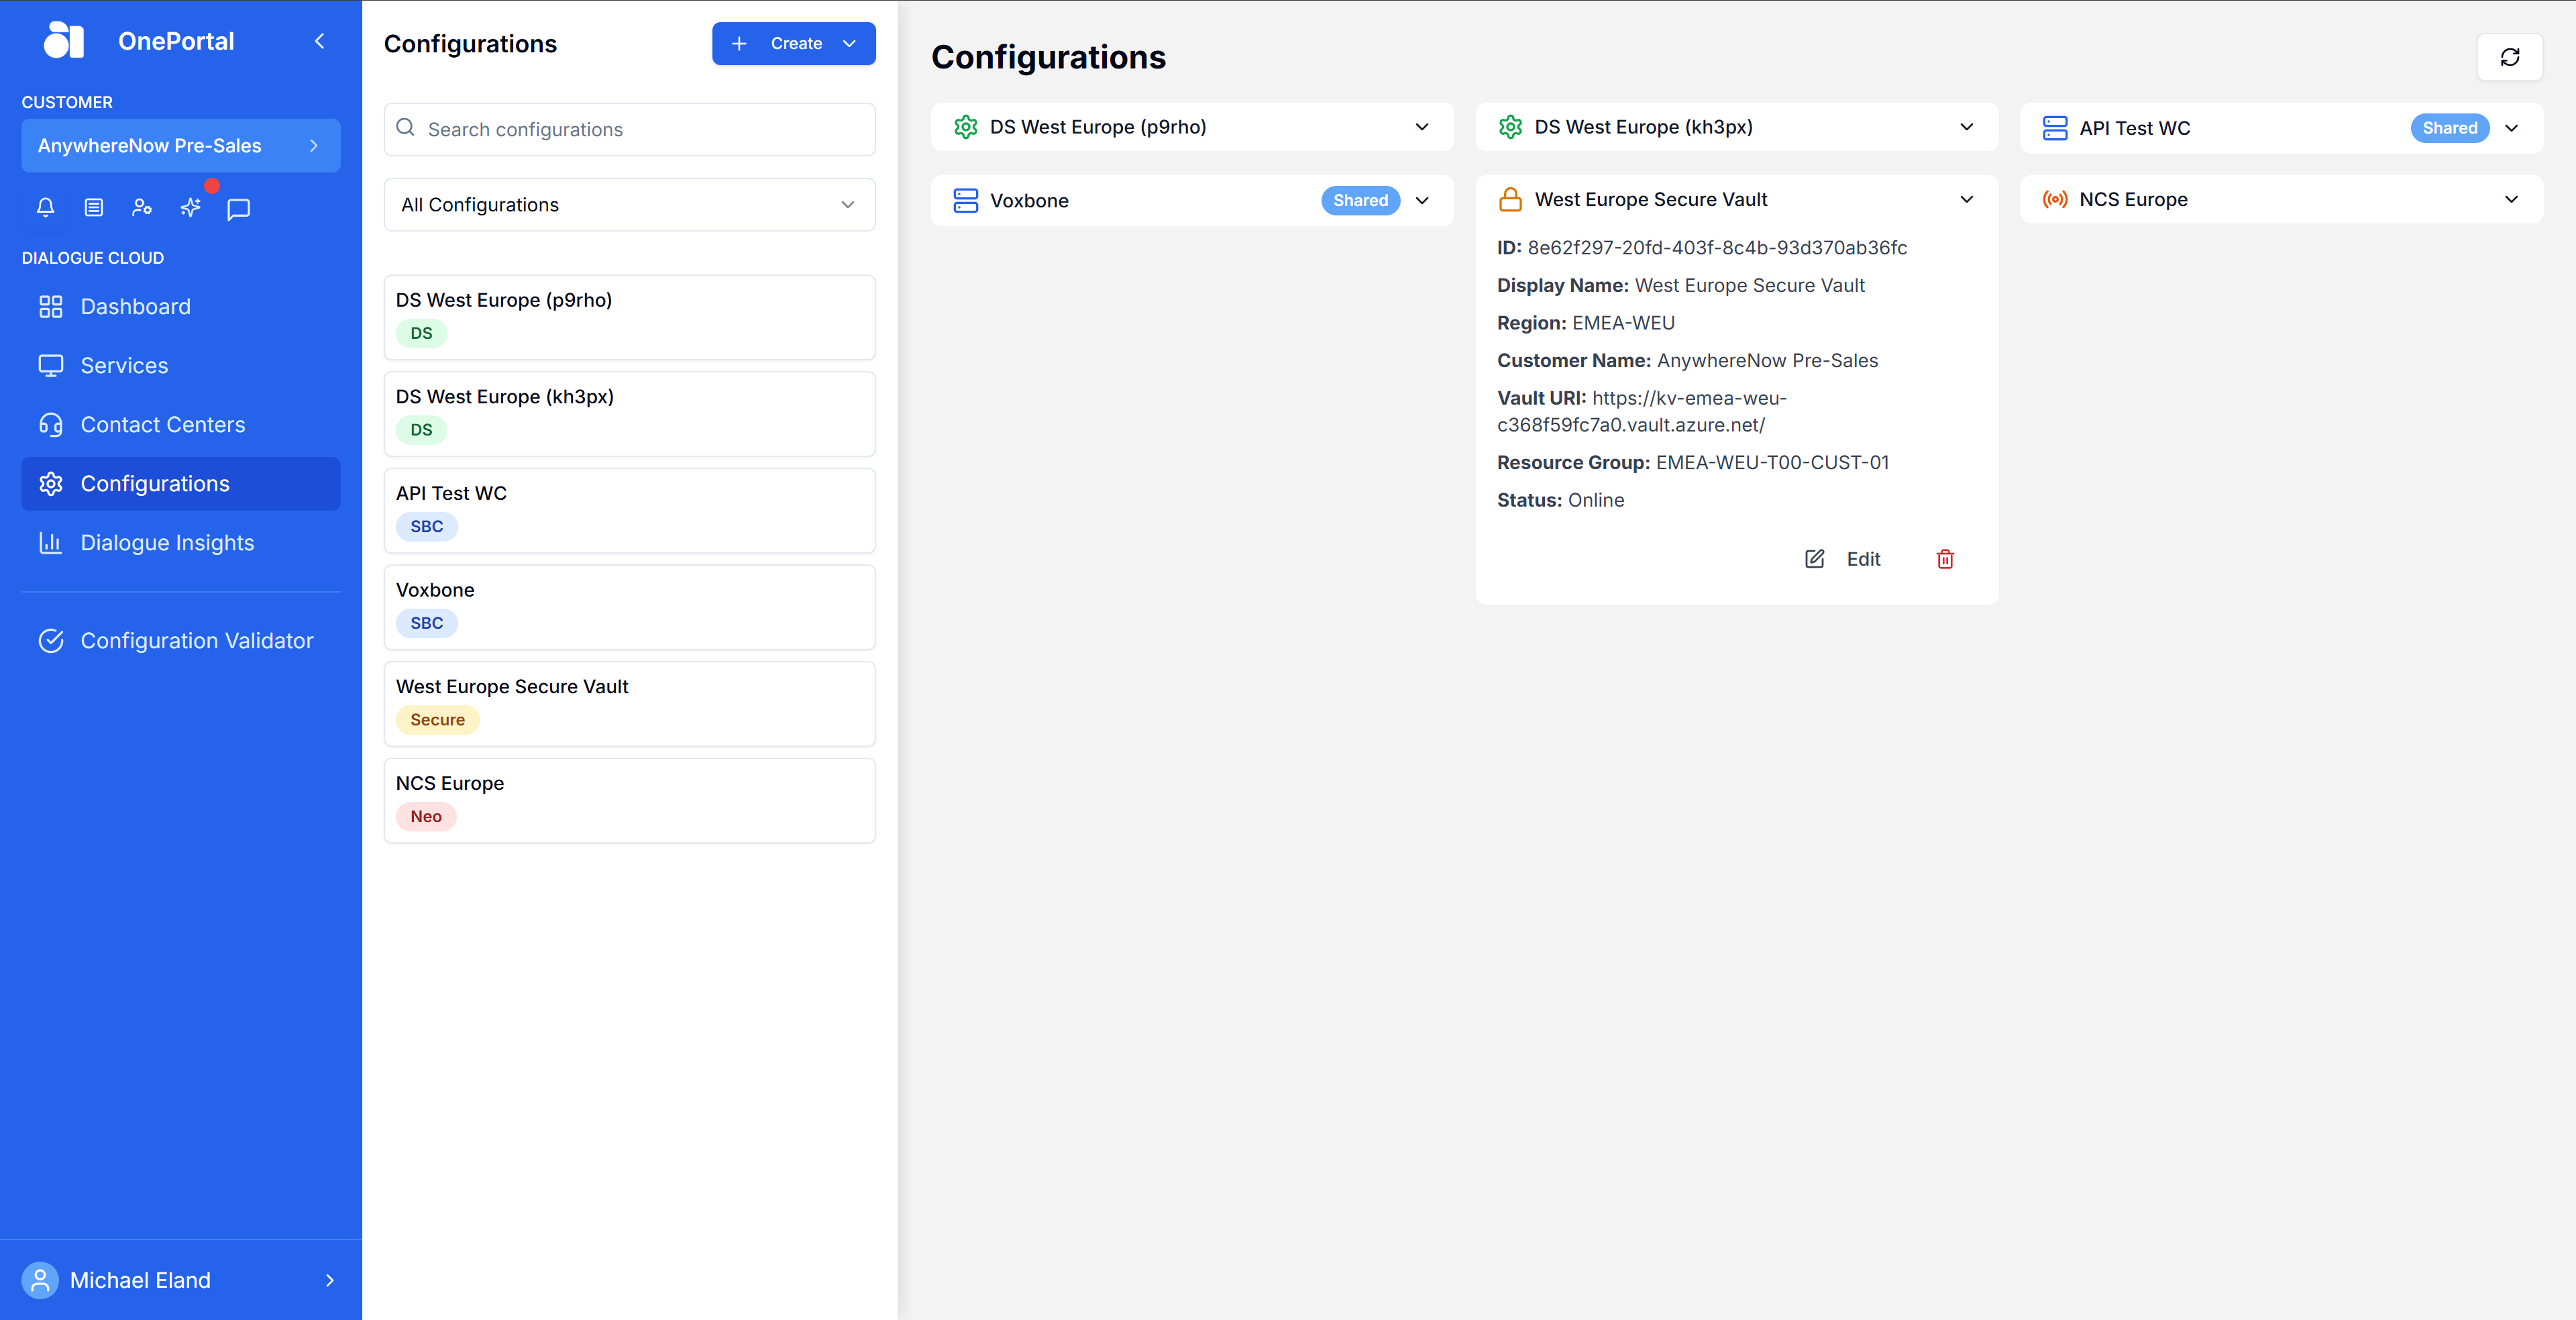
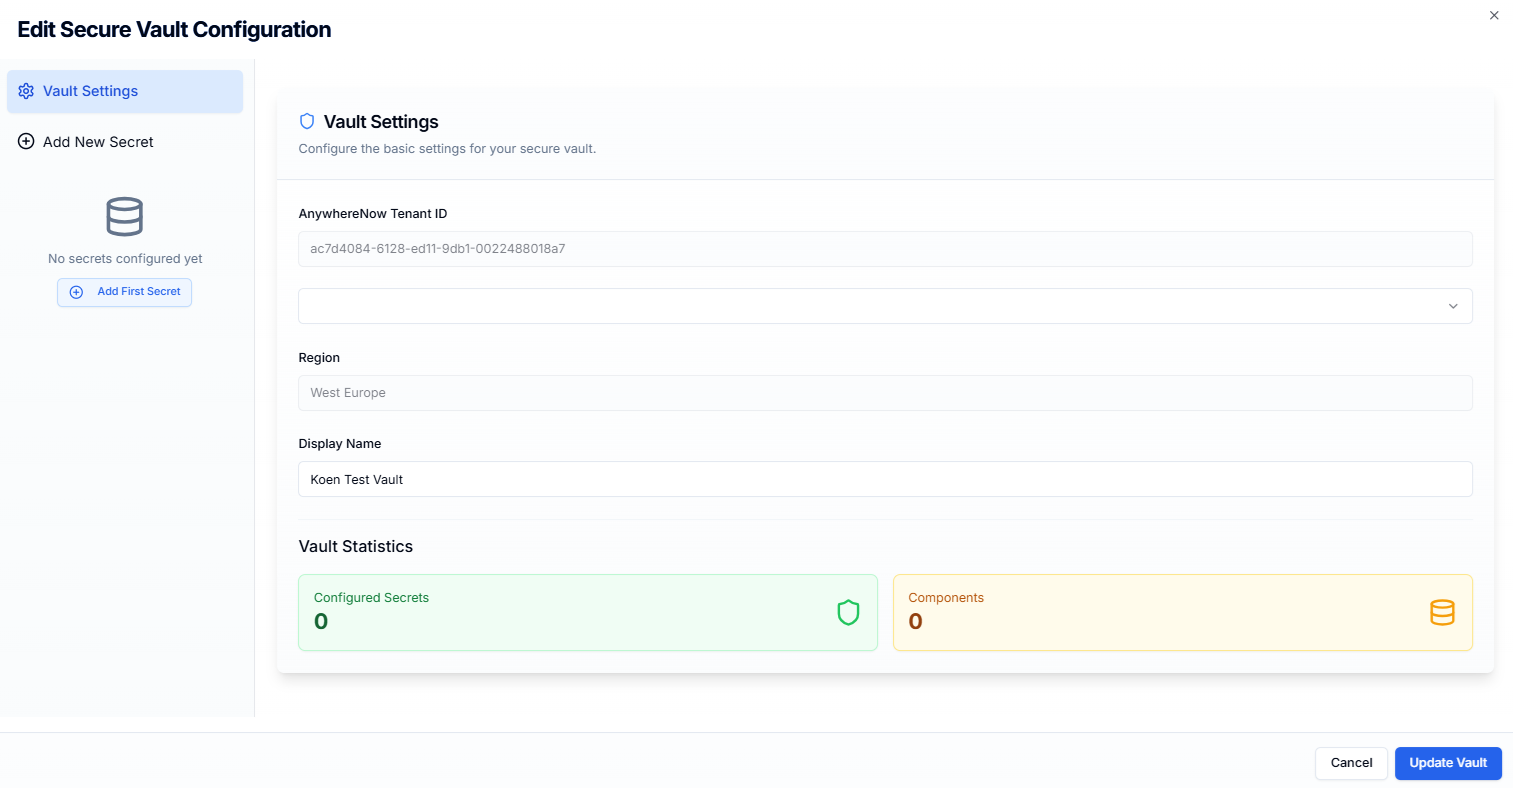
Go to Configurations > Secure Vault Configuration and select Edit.
(See: Secure Vault)
-
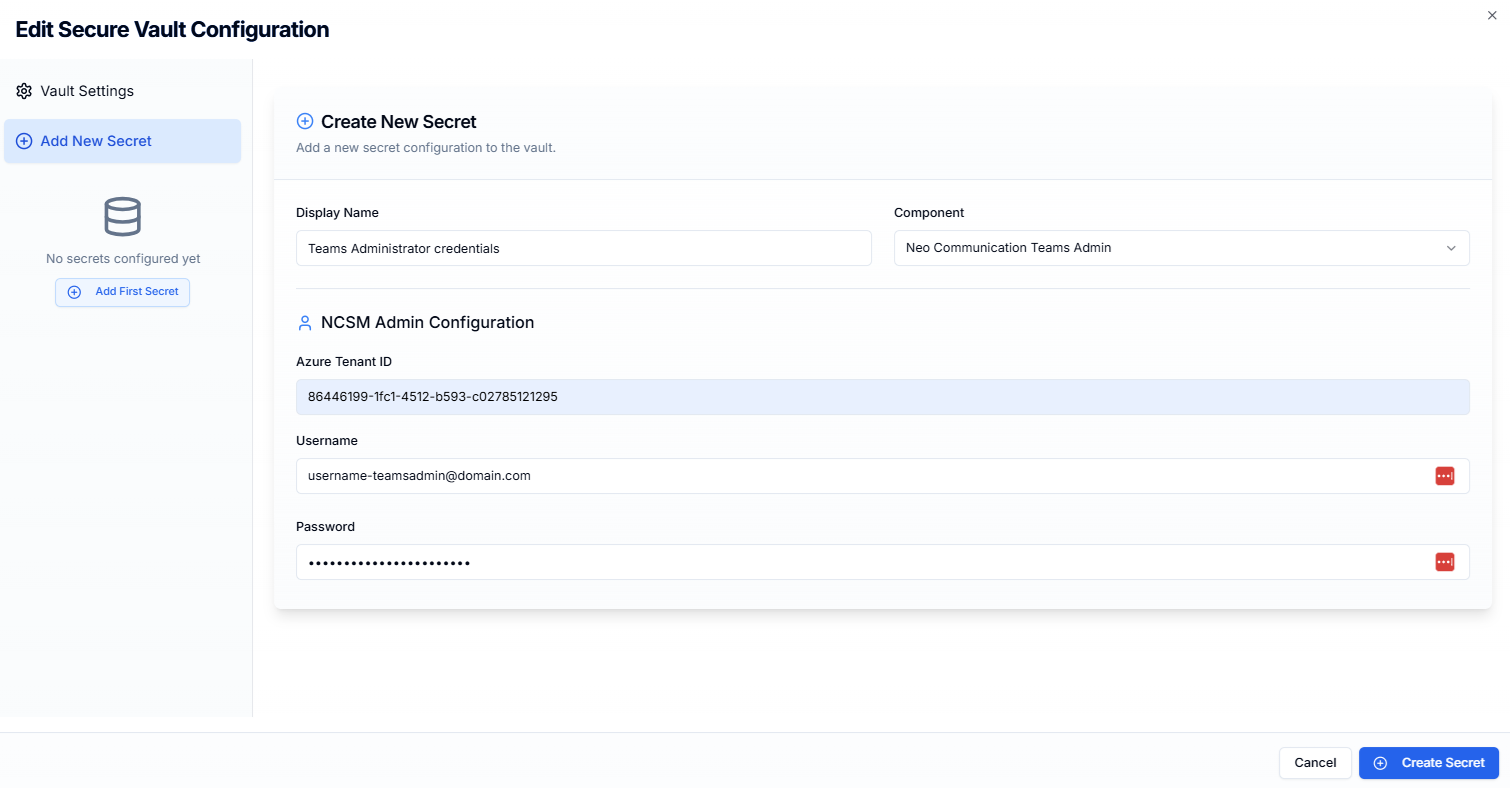
Add a new secret with type Neo Communication Teams Admin.
-
Enter the Azure Entra tenant ID and the username/password for the admin account (Teams Administrator + User Access Administrator).
-
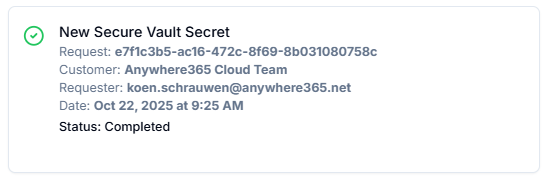
These credentials are used to perform the automatic endpoint provisioning in the customer tenant.
Tip
Elevate the account just-in-time with PIM before provisioning, then let the elevation expire after.
-
-
With credentials stored, you can deploy a contact center and one or more endpoints.
Create a Contact Center
-
Create a SharePoint site per UCC A Unified Contact Center, or UCC, is a queue of interactions (voice, email, IM, etc.) that are handled by Agents. Each UCC has its own settings, IVR menus and Agents. Agents can belong to one or several UCCs and can have multiple skills (competencies). A UCC can be visualized as a contact center “micro service”. Customers can utilize one UCC (e.g. a global helpdesk), a few UCC’s (e.g. for each department or regional office) or hundreds of UCC’s (e.g. for each bed at a hospital). They are interconnected and can all be managed from one central location.
-
The required PowerShell script (Ucc.Site.Creator version.8.4.2.0 or higher) for Dialogue Cloud Neo can be downloaded below:
Using this downloaded script set:
-
Make sure the SPFx ucc-dashboard is uploaded to your Tenant. (If not follow steps on: Deploy UCC Dashboard)
-
For creating a new site, follow instructions on using the script to create a new site on page: Create UCC Sites
-
Grant Dialogue Cloud Neo in your UCC region access to this site:
-
complete Steps 1,2 and 3 on page: Dialogue Cloud Microsoft Entra ID Enterprise Applications
-
-
-
-
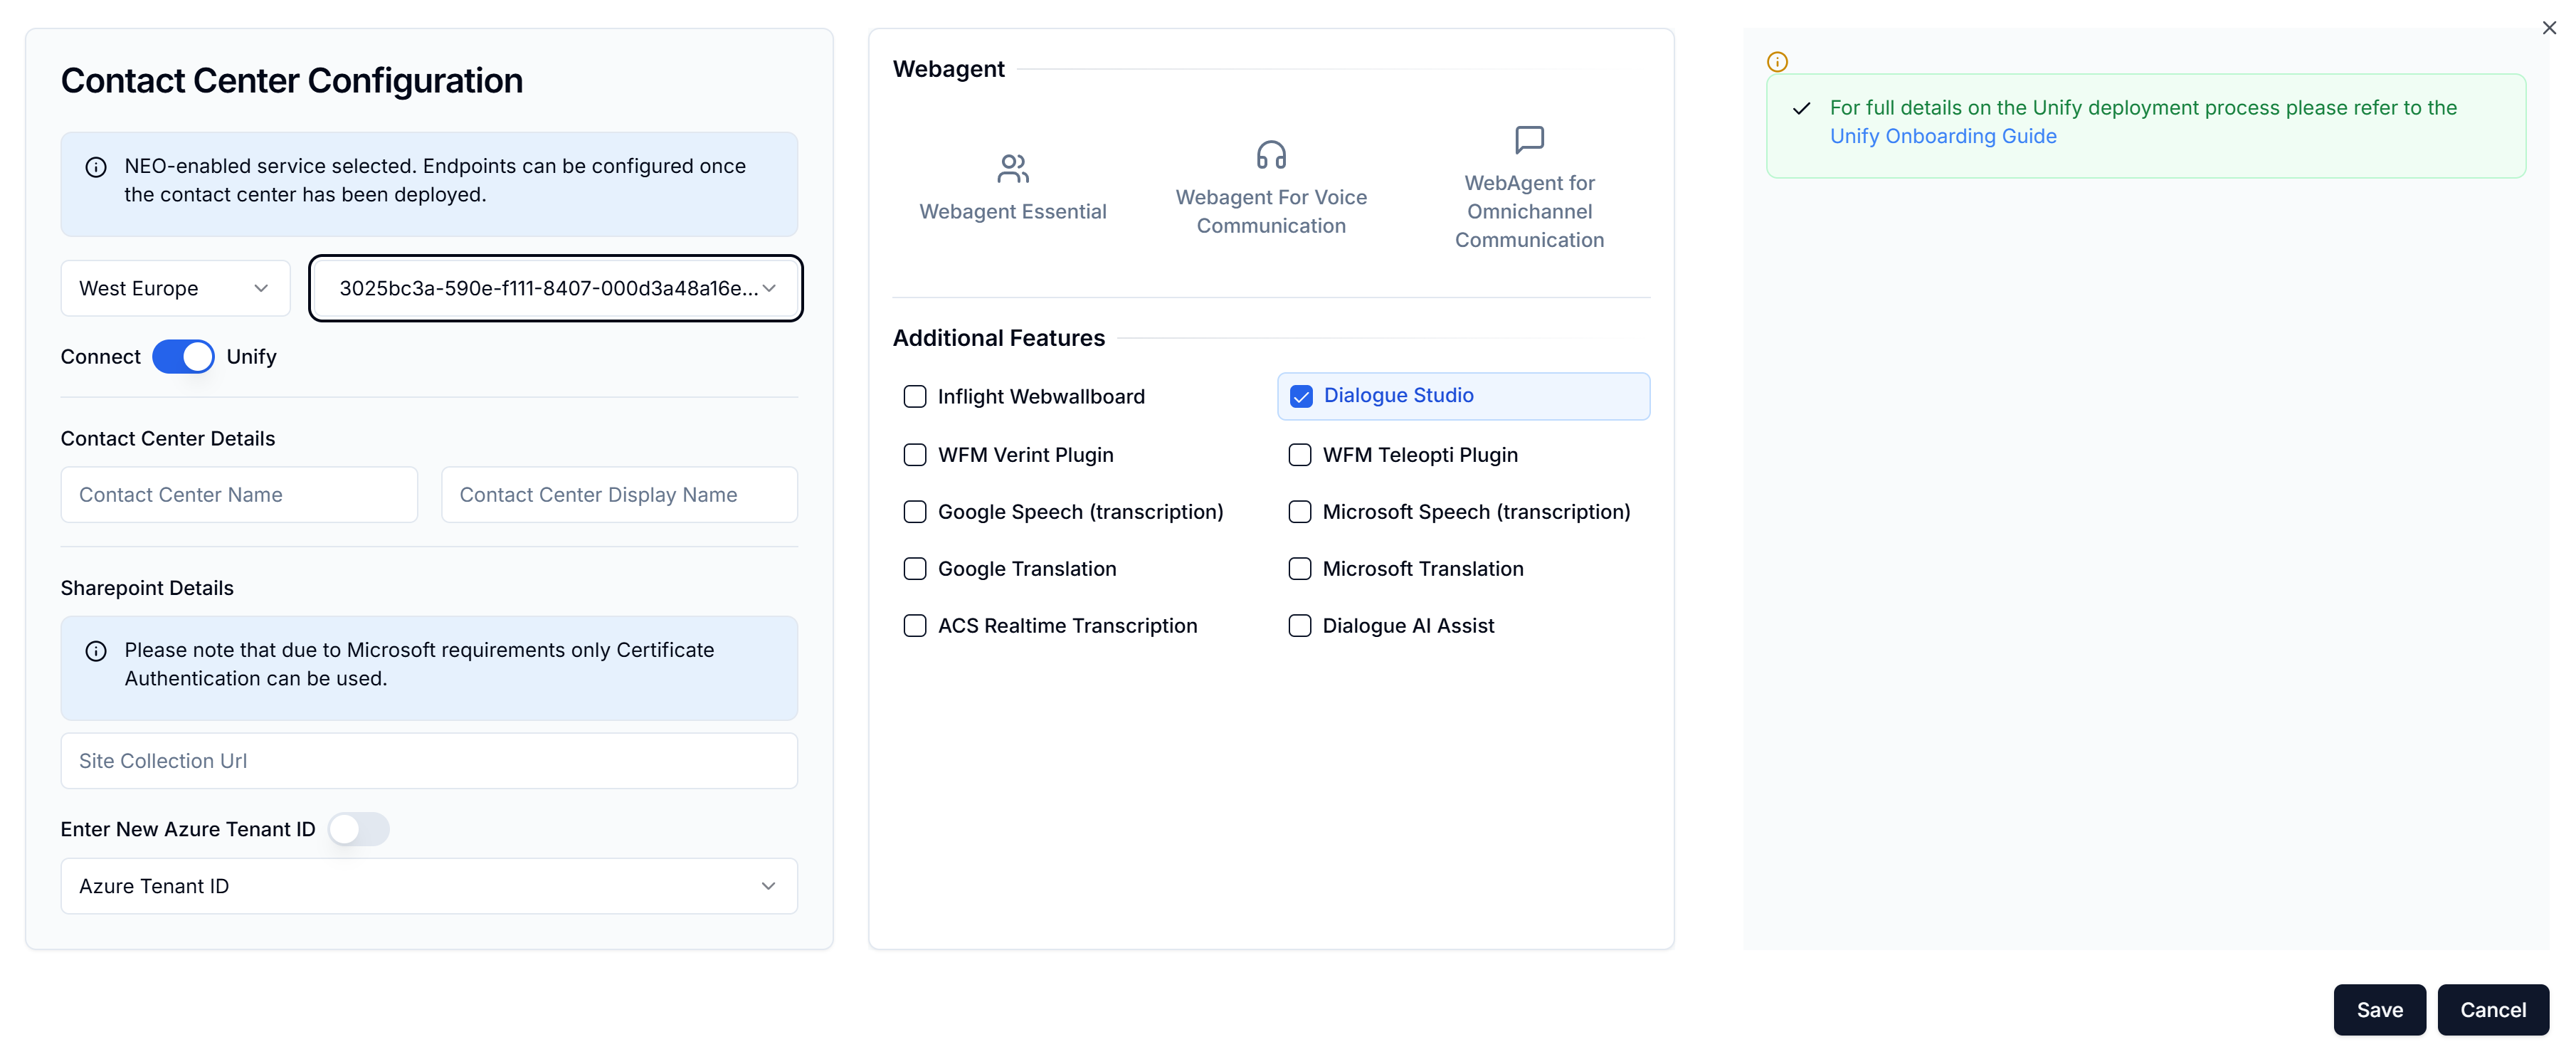
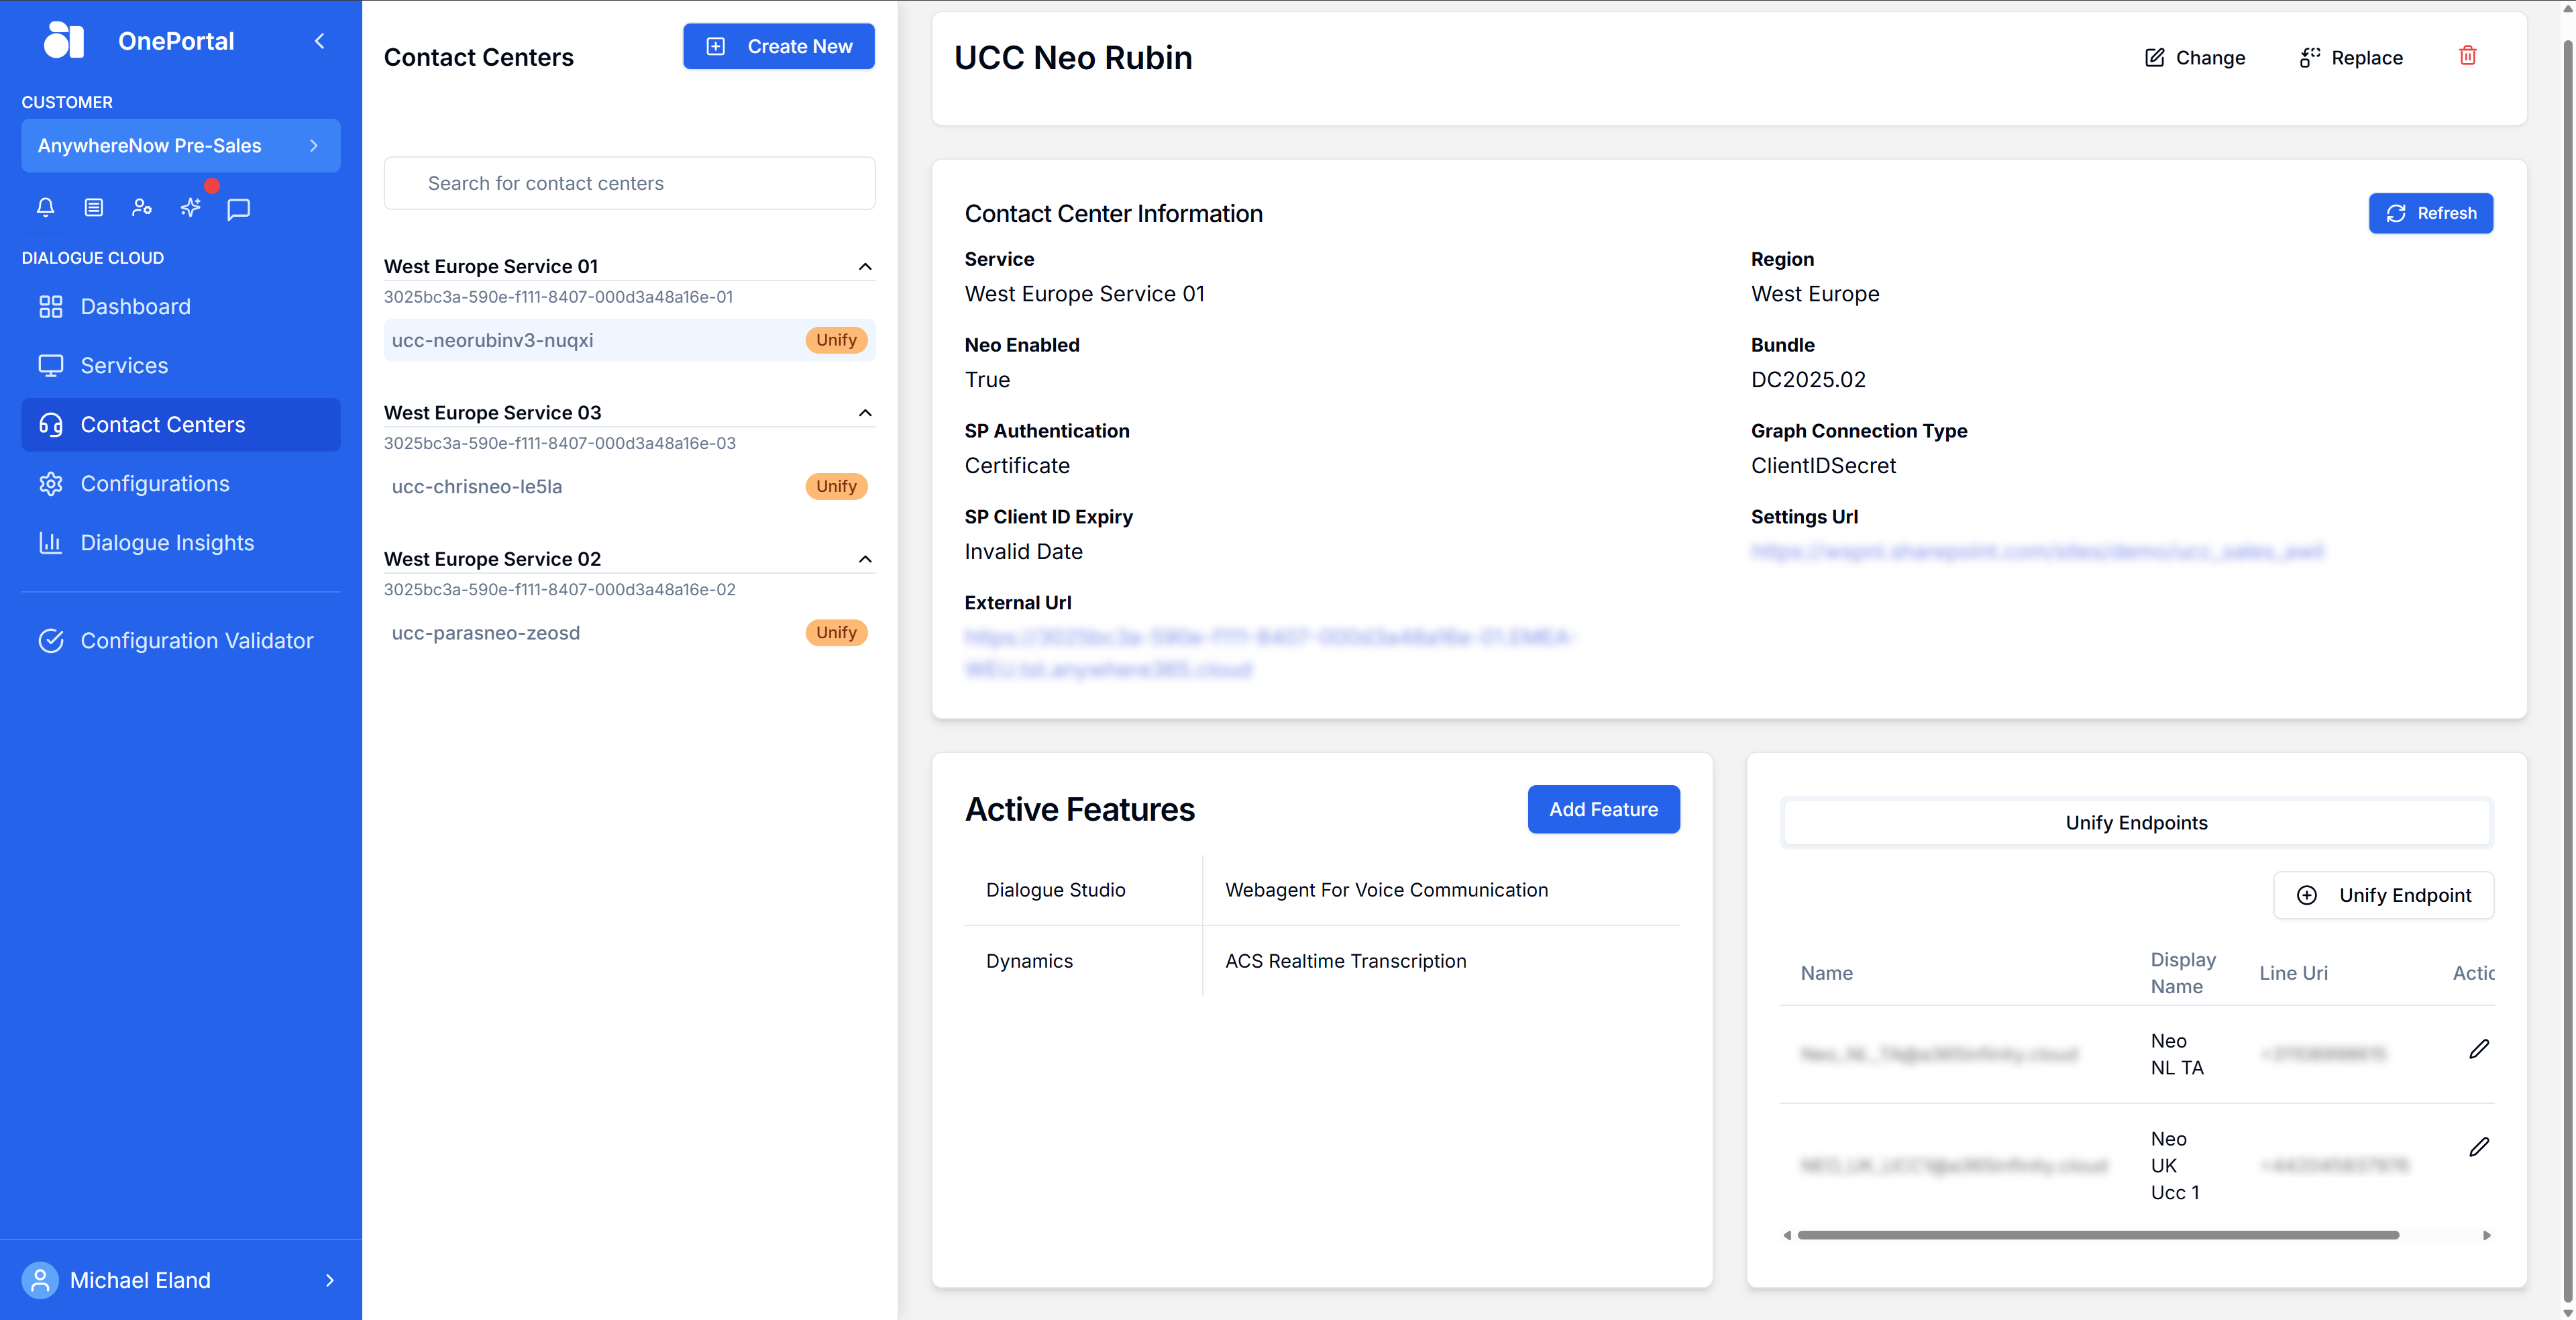
In OnePortal Go to Contact Centers and select Create New.
-
Complete the SharePoint site details (created earlier), choose the desired features, and select Save. You’ll receive an in-portal notification when OnePortal Dialogue Cloud Neo deployment completes.
Configure Dialogue Studio in OnePortal
-
In OnePortal, open Configurations and select the Dialogue Studio Configurations tile.
-
Select Create New, then choose the same region and bundle A bundle is a fixed combination of our software platform elements of very specific versions. These are designed and tested to optimally work together to assure their intended function and interoperability. version as the service/contact center you just deployed.
-
Select the required authentication method:
-
Select Save to create the Dialogue Studio configuration.
Create Unify endpoint
Shared step: Adding a Unify endpoint is the same for new and existing customers. Use these steps after your contact center is ready for Dialogue Cloud Neo (Unify).
Required: Teams Administrator & User Access Administrator
Automatic deployment (recommended)
-
Open the deployed contact center and select Add Unify Endpoint.
-
Choose Automatic deployment.
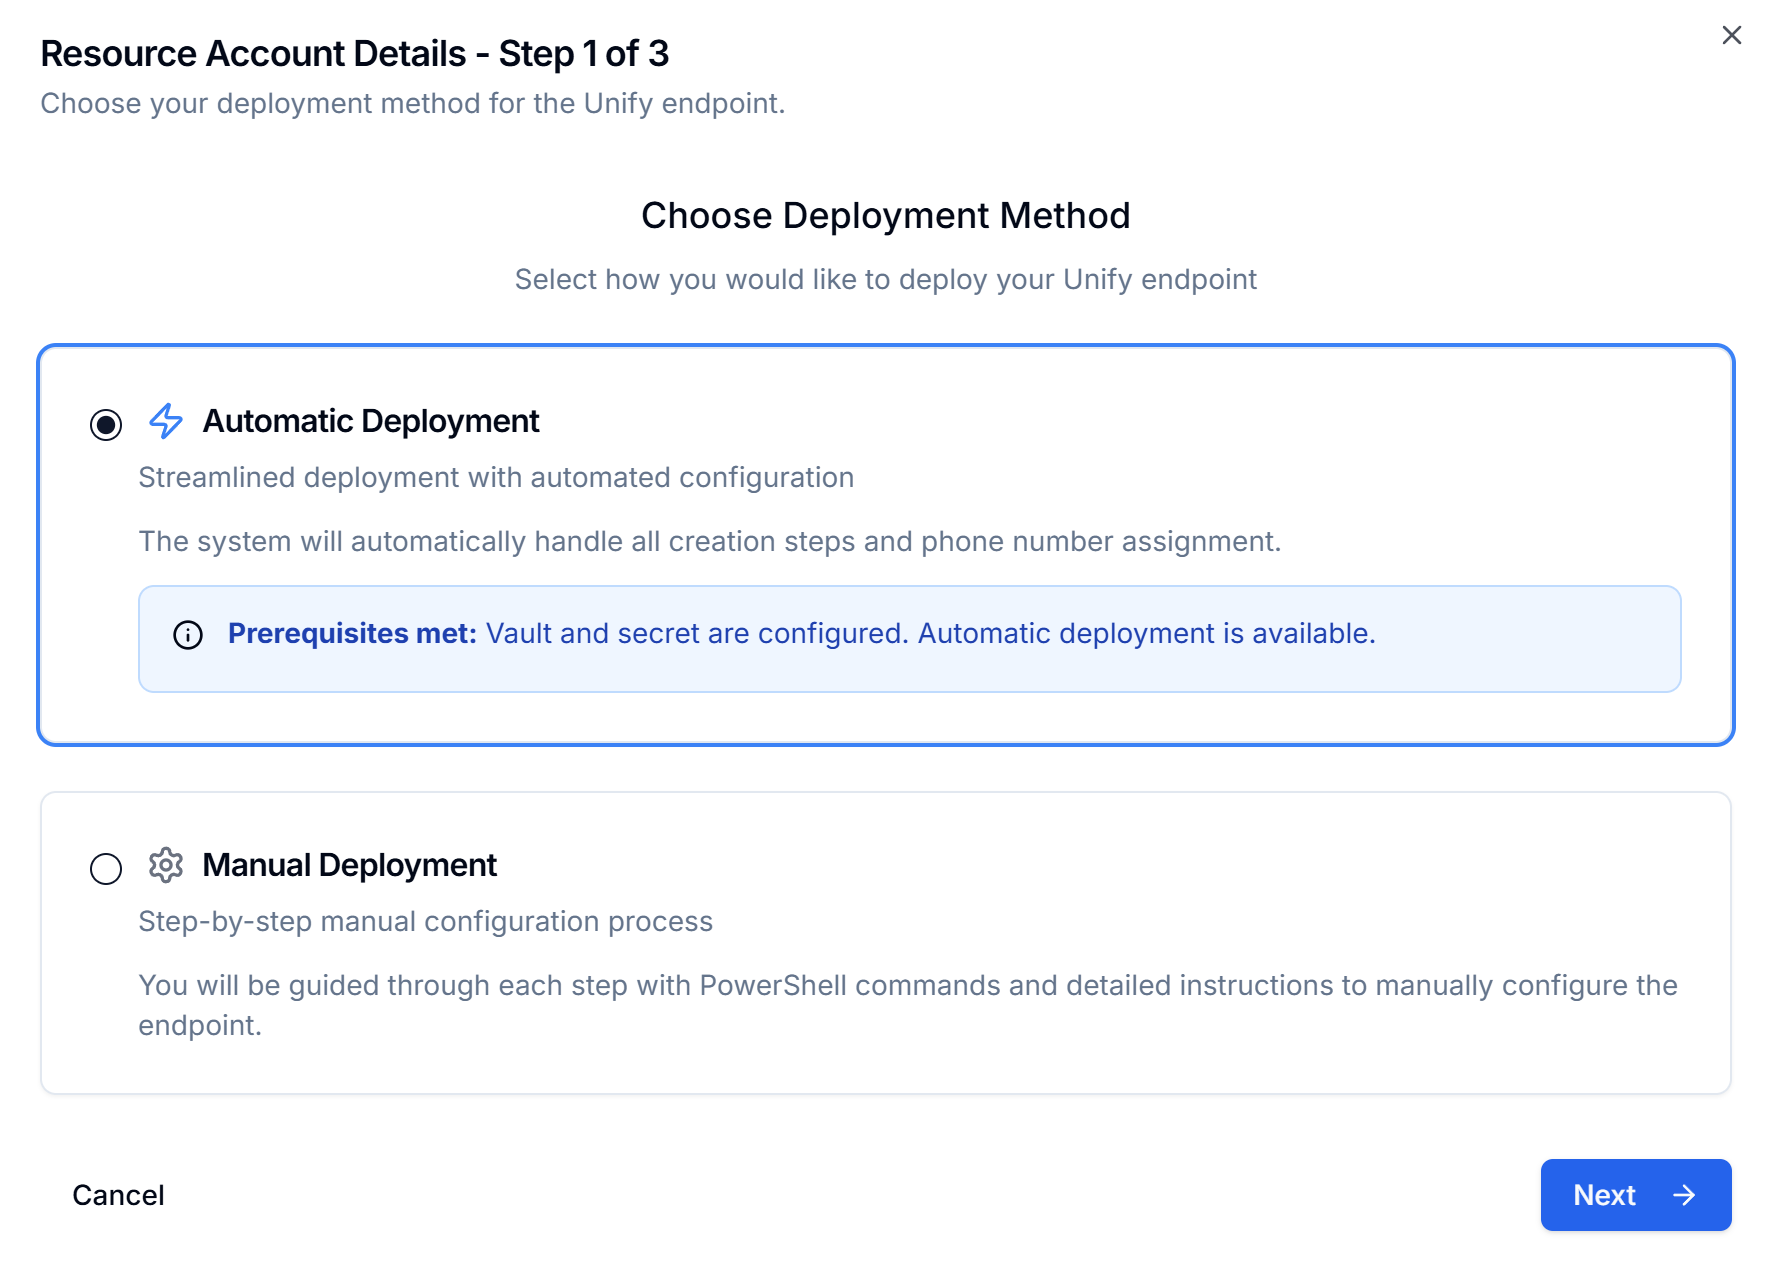
-
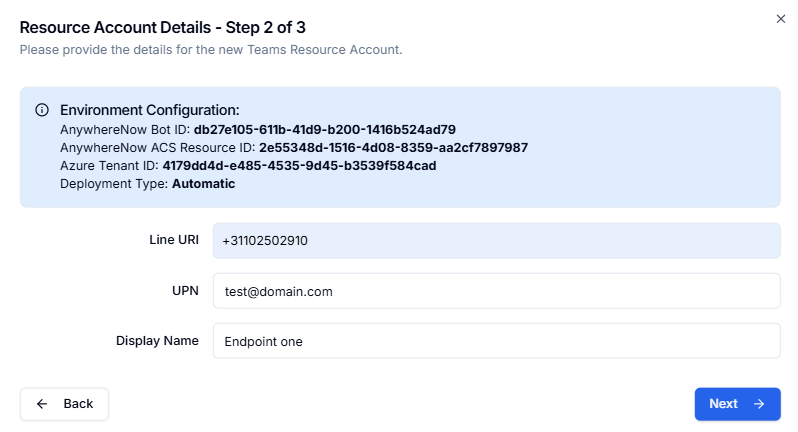
In step 2 of 3, review the Environment Configuration. These values are used to create the required resources in the customer tenant.
-
Enter the endpoint details: Line URI / phone number, UPN, and Display name for the Teams Resource Account that will be created.
-
Verify the configuration and select Submit.
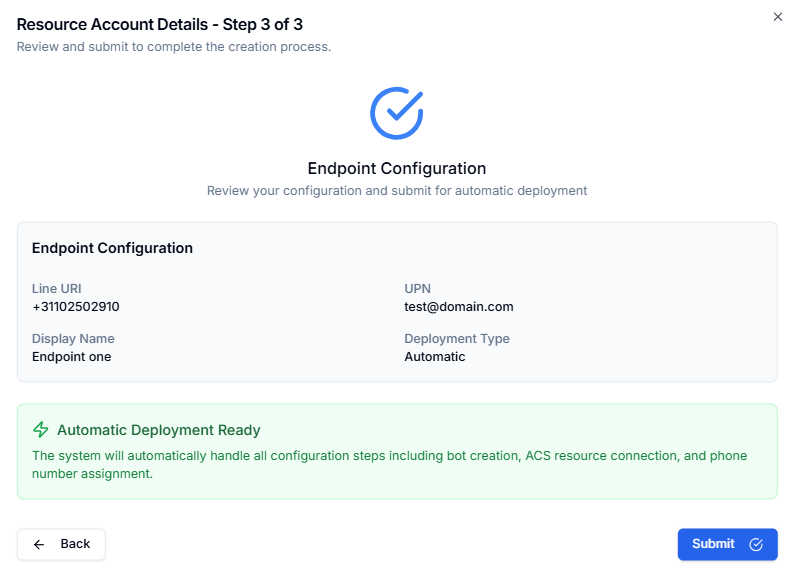
-
The deployment engine provisions the necessary Teams resources. If you want to understand or troubleshoot the exact changes, see Manual deployment.
-
Post-steps:
-
assign a license to the created Resource Account.
-
Go to the Microsoft 365 admin center.
-
Assign the Microsoft Teams Phone Resource Account license to the endpoint Resource Account.
-
-
enable outbound calling to the created Resource Account, see: Optionally, enable for outbound calling
-
Manual deployment
Required: Teams Administrator & User Access Administrator
Collect these values first:
- Resource Account UPN (for example:
neo-ra@contoso.com) - Resource Account display name
- Dialogue Cloud Neo Teams Phone extensibility App ID (Application/Client ID) provided by AnywhereNow OnePortal steps
- Azure Communication Services (ACS) Resource ID provided by AnywhereNow OnePortal steps
- Phone number to assign (E.164 The E.164 phone number format is an international (ITU) standard for dialing telephone numbers on the Public Switched Telephony Network (PSTN).
Loosely formulated, only "+" and upto 15 digits (0-9) are allowed
For example: +4433221100
(For number notation/display and storage see the E.123 standard) format like
+31101234567) and the number type (CallingPlan, OperatorConnect, or DirectRouting)
-
Open the deployed contact center and select Add Unify Endpoint.
-
Choose Manual deployment.
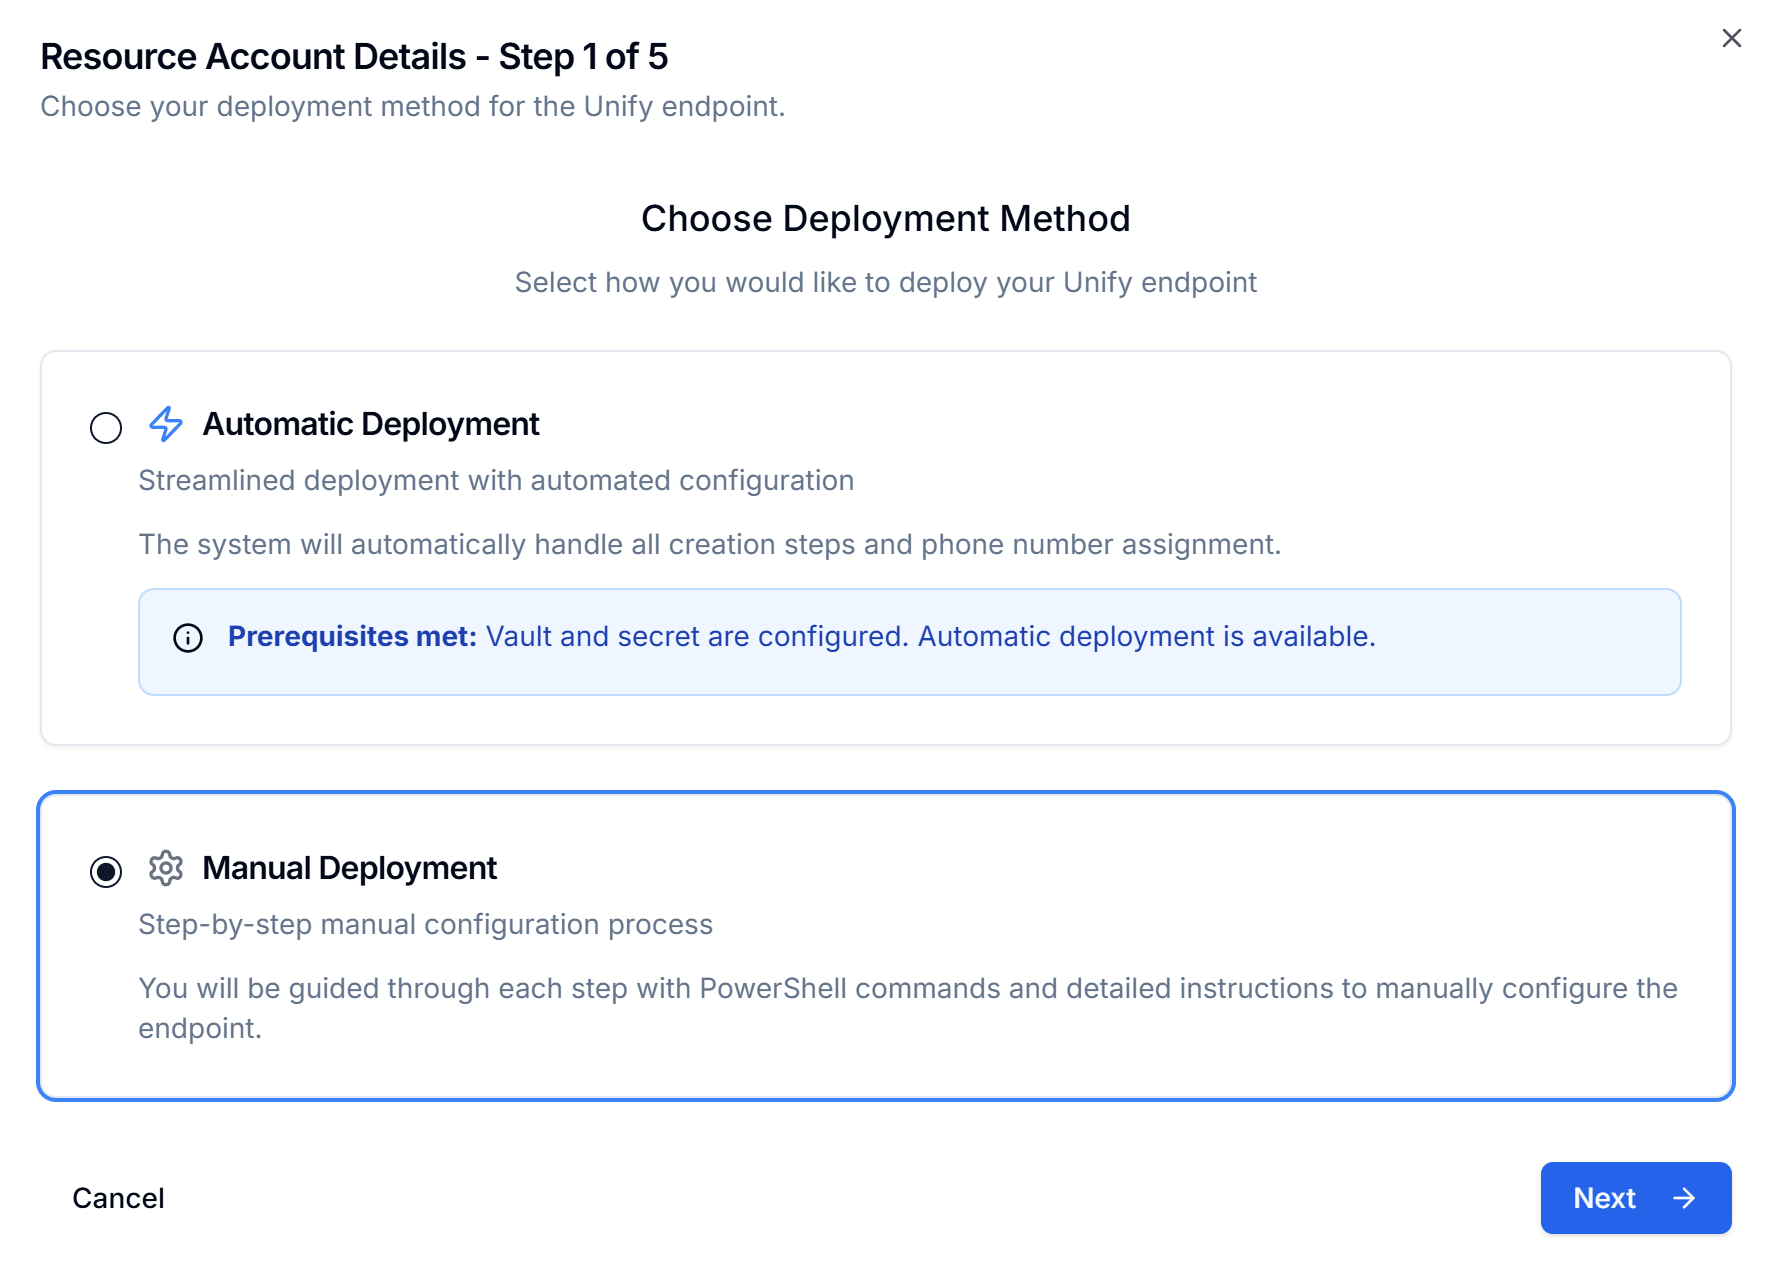
-
Enter the endpoint details: Line URI / phone number, UPN, and Display name for the Teams Resource Account.
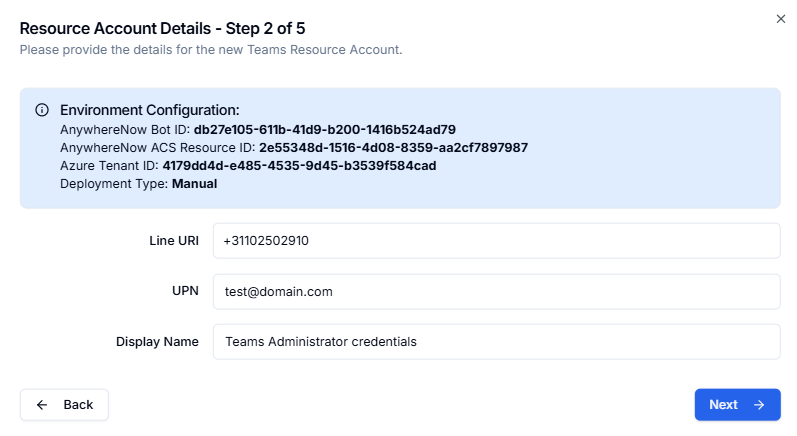
-
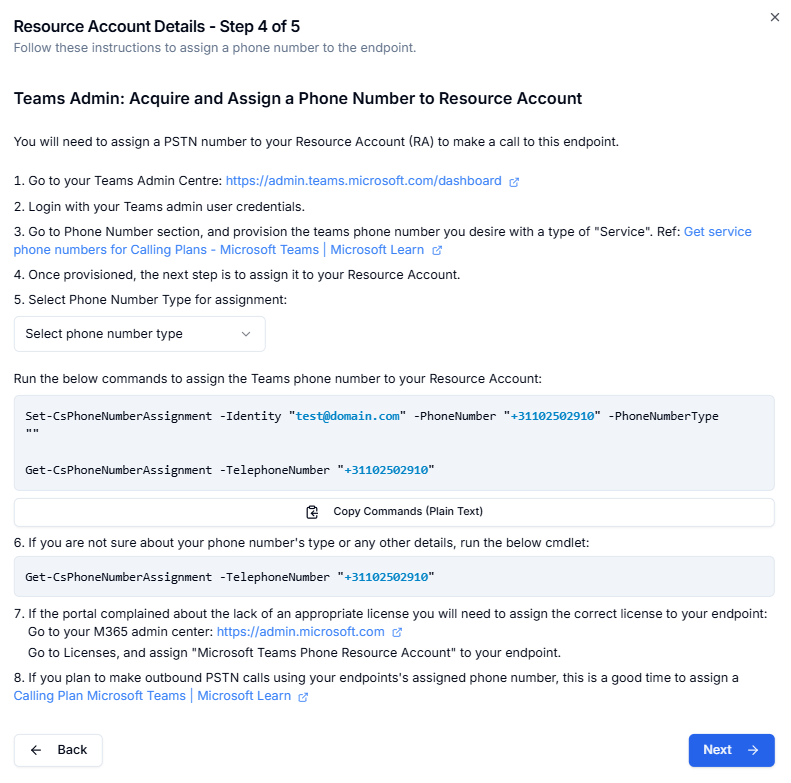
Run the PowerShell shown in Step 3. You can copy it from the OnePortal.
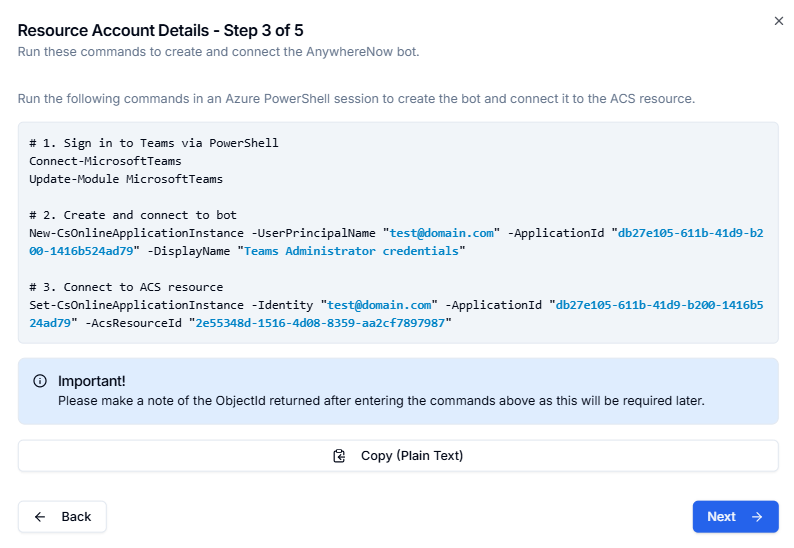
Tip:
If the Resource Account can’t be assigned a number immediately, run
Sync-CsOnlineApplicationInstance -Identity $RaUpnand retry after a short delay.
-
Assign a phone number to the Resource Account
You must assign a PSTN number to the Resource Account to receive calls. Use a Calling Plan, Operator Connect, or Direct Routing number.
-
In the Teams admin center, acquire/provision the number you want (for Calling Plans, acquire a service number).
-
Assign the number using PowerShell (supported values for
-PhoneNumberType:CallingPlan,OperatorConnect,DirectRouting).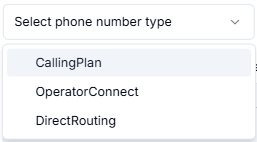 CopyExample PowerShell (replace the phone number)
# Assign a phone number (do not prefix with "tel:")
Set-CsPhoneNumberAssignment -Identity $RaUpn -PhoneNumber "+31102502910" -PhoneNumberType CallingPlan
# Verify the assignment
Get-CsPhoneNumberAssignment -TelephoneNumber "+31102502910" -
If you’re not sure which type the number is, query it with
Get-CsPhoneNumberAssignmentas shown above. -
If the portal indicates the Resource Account isn’t licensed, assign the correct license:
-
Go to the Microsoft 365 admin center.
-
Assign Microsoft Teams Phone Resource Account to the Resource Account.
-
-
If you plan to make outbound PSTN calls “on behalf of” this Resource Account using a Calling Plan number, assign a funded Pay-As-You-Go Calling Plan license to that Resource Account. Depending on the billing agreement, funding is provided through telco overage or Communications Credits.
-
-
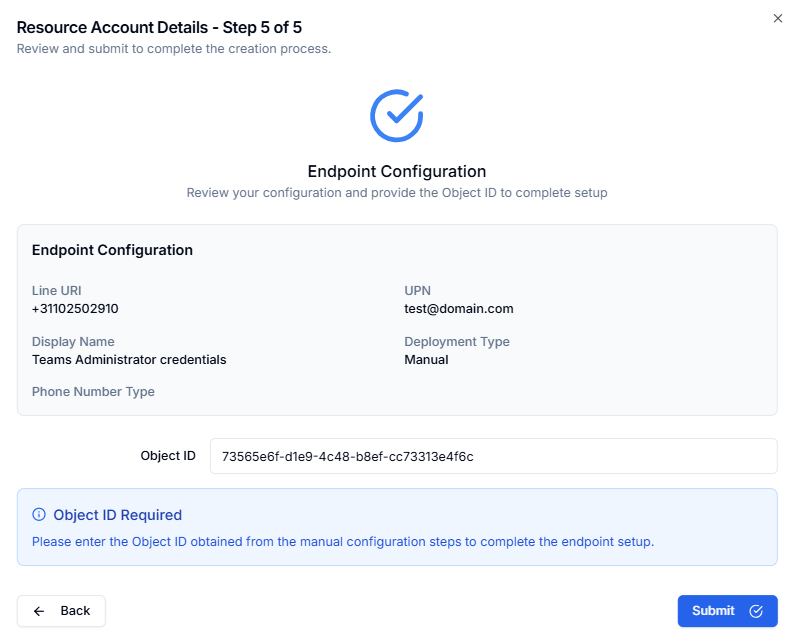
Verify the configuration and select Submit.
Optionally, enable for outbound calling
Using Microsoft Calling Plans
The Resource Account used for outbound calling requires an additional Pay-As-You-Go Calling Plan license. Assign it to the Resource Account in the same way as the Teams Phone Resource Account license.
For this outbound calling scenario, Domestic or International Calling Plan licenses are not sufficient. The Pay-As-You-Go Calling Plan must be funded through telco overage or Communications Credits, depending on the customer's billing agreement.
For more information, see: Cost and connectivity options for Teams Phone extensibility - Outbound calling prerequisites
Using Microsoft Direct Routing or Operator Connect
To use outbound calling with Microsoft Direct Routing or Operator Connect, ensure that proper routing to the PSTN is configured. Typically, the existing Microsoft Teams Phone Resource Account license will suffice.
However, if your organization has restricted the Global Voice Routing Policy or if the resource account requires a specific Voice Routing Policy, these configurations must be made using PowerShell. For detailed instructions, see: Manage call routing policies for Direct Routing - Microsoft Teams
Existing customers
Required: Teams Administrator & User Access Administrator
Graph Presence
Dialogue Cloud Neo deployment automation through OnePortal still requires a customer created MS Entra ID App for some specific Graph presence calls.
Please follow steps on: Microsoft Graph Presence Source (Get) Configuration. with one added permission (see below for details)
-
You will need the following details during the deployment:
-
Graph application client ID (App ID)
-
Graph application client secret
-
Azure Entra tenant ID
-
-
you will need to add the following Application level Permissions
Permissions
| API/permission | Type |
|---|---|
| Microsoft Graph | |
| Presence.Read.All | Application |
| Domain.Read.All | Application |
| User.Read.All | Application |
| Teams.TelephoneNumber.Read | Application |
Presence.Read.All - Read presence information of all users in your organization
Description: Allows the app to read presence information of all users in the directory without a signed-in user. Presence information includes activity, availability, status note, calendar out-of-office message, timezone and location.
Why is this required? To allow the Graph Presence Source to retrieve current presence from users.
Permission name: Microsoft Graph / Presence.Read.All
Domain.Read.All - Read domains
Description: Allows the app to read all domain properties without a signed-in user.
Why is this required? To allow the Graph Presence Source to retrieve the domains from the tenant.
Permission name: Microsoft Graph / Domain.Read.All
User.Read.All - Read all users' full profiles
Description: Allows the app to read user profiles without a signed in user.
Why is this required? To allow the Graph Presence Source to translate UPN to ID, ID is required to retrieve presence from user.
Permission name: Microsoft Graph / User.Read.All
Teams.TelephoneNumber.Read - Read Tenant-Aquired Telephone Number Details
Description: Allows the app to read telephone numbers assigned to users and other entities in Microsoft Teams without a signed‑in user.
Why is this required?: To allow the Graph Presence Source (or calling/signaling components) to resolve Teams telephone numbers to the corresponding Teams user objects. This enables correct correlation between phone numbers and user identities when processing call events, presence updates, or telephony‑related data.
Permission name: Microsoft Graph / TeamsTelephoneNumber.Read.All
Updating to Dialogue Cloud Neo
-
Upgrade your service in OnePortal and select DC2025.02.
(See: View (and edit) - Services)
Configure Secure Vault
Shared step: This configuration is used for automatic provisioning and applies to both new and existing customers.
-
Go to Configurations > Secure Vault Configuration and select Edit.
(See: Secure Vault)
-
Add a new secret with type Neo Communication Teams Admin.
-
Enter the Azure Entra tenant ID and the username/password for the admin account (Teams Administrator + User Access Administrator).
-
These credentials are used to perform the automatic endpoint provisioning in the customer tenant.
Tip
Elevate the account just-in-time with PIM before provisioning, then let the elevation expire after.
-
-
With credentials stored, you can deploy a contact center and one or more endpoints.
Deploying Dialogue Studio
If you are already using Dialogue Studio, you can skip this step.
-
Go to Contact Centers, select a contact center on the updated service, and select Add Feature.
-
Enable Dialogue Studio and click Save Changes
-
Repeat for each contact center.
If this is a new Dialogue Studio deployment for the service, also complete the configuration in OnePortal under Configurations > Dialogue Studio Configurations. Use the same region and bundle version as the service/UCC, choose the required authentication method, and save the configuration. See: Configurations - Configure Dialogue Studios
Note
From this point on you are onboarded on Dialogue Cloud Neo (Connect). You can optionally add Unify endpoints.
Create Unify endpoint
Shared step: Adding a Unify endpoint is the same for new and existing customers. Use these steps after your contact center is ready for Dialogue Cloud Neo (Unify).
Required: Teams Administrator & User Access Administrator
Automatic deployment (recommended)
-
Open the deployed contact center and select Add Unify Endpoint.
-
Choose Automatic deployment.
-
In step 2 of 3, review the Environment Configuration. These values are used to create the required resources in the customer tenant.
-
Enter the endpoint details: Line URI / phone number, UPN, and Display name for the Teams Resource Account that will be created.
-
Verify the configuration and select Submit.
-
The deployment engine provisions the necessary Teams resources. If you want to understand or troubleshoot the exact changes, see Manual deployment.
-
Post-steps:
-
assign a license to the created Resource Account.
-
Go to the Microsoft 365 admin center.
-
Assign the Microsoft Teams Phone Resource Account license to the endpoint Resource Account.
-
-
enable outbound calling to the created Resource Account, see: Optionally, enable for outbound calling
-
Manual deployment
Required: Teams Administrator & User Access Administrator
Collect these values first:
- Resource Account UPN (for example:
neo-ra@contoso.com) - Resource Account display name
- Dialogue Cloud Neo Teams Phone extensibility App ID (Application/Client ID) provided by AnywhereNow OnePortal steps
- Azure Communication Services (ACS) Resource ID provided by AnywhereNow OnePortal steps
- Phone number to assign (E.164 format like
+31101234567) and the number type (CallingPlan, OperatorConnect, or DirectRouting)
-
Open the deployed contact center and select Add Unify Endpoint.
-
Choose Manual deployment.
-
Enter the endpoint details: Line URI / phone number, UPN, and Display name for the Teams Resource Account.
-
Run the PowerShell shown in Step 3. You can copy it from the OnePortal.
Tip:
If the Resource Account can’t be assigned a number immediately, run
Sync-CsOnlineApplicationInstance -Identity $RaUpnand retry after a short delay.
-
Assign a phone number to the Resource Account
You must assign a PSTN number to the Resource Account to receive calls. Use a Calling Plan, Operator Connect, or Direct Routing number.
-
In the Teams admin center, acquire/provision the number you want (for Calling Plans, acquire a service number).
-
Assign the number using PowerShell (supported values for
-PhoneNumberType:CallingPlan,OperatorConnect,DirectRouting).
CopyExample PowerShell (replace the phone number)# Assign a phone number (do not prefix with "tel:")
Set-CsPhoneNumberAssignment -Identity $RaUpn -PhoneNumber "+31102502910" -PhoneNumberType CallingPlan
# Verify the assignment
Get-CsPhoneNumberAssignment -TelephoneNumber "+31102502910" -
If you’re not sure which type the number is, query it with
Get-CsPhoneNumberAssignmentas shown above. -
If the portal indicates the Resource Account isn’t licensed, assign the correct license:
-
Go to the Microsoft 365 admin center.
-
Assign Microsoft Teams Phone Resource Account to the Resource Account.
-
-
If you plan to make outbound PSTN calls “on behalf of” this Resource Account using a Calling Plan number, assign a funded Pay-As-You-Go Calling Plan license to that Resource Account. Depending on the billing agreement, funding is provided through telco overage or Communications Credits.
-
-
Verify the configuration and select Submit.
Optionally, enable for outbound calling
Using Microsoft Calling Plans
The Resource Account used for outbound calling requires an additional Pay-As-You-Go Calling Plan license. Assign it to the Resource Account in the same way as the Teams Phone Resource Account license.
For this outbound calling scenario, Domestic or International Calling Plan licenses are not sufficient. The Pay-As-You-Go Calling Plan must be funded through telco overage or Communications Credits, depending on the customer's billing agreement.
For more information, see: Cost and connectivity options for Teams Phone extensibility - Outbound calling prerequisites
Using Microsoft Direct Routing or Operator Connect
To use outbound calling with Microsoft Direct Routing or Operator Connect, ensure that proper routing to the PSTN is configured. Typically, the existing Microsoft Teams Phone Resource Account license will suffice.
However, if your organization has restricted the Global Voice Routing Policy or if the resource account requires a specific Voice Routing Policy, these configurations must be made using PowerShell. For detailed instructions, see: Manage call routing policies for Direct Routing - Microsoft Teams