Attendant Console for Microsoft Teams Queue Deployment Guide
End-of-Sale Timeline for Attendant Console for Microsoft Teams
(added 14-07-2025) - AnywhereNow is phasing out sale of the Attendant Console for Microsoft Teams by December 31, 2025 as we transition to the more advanced Tendfor solution. This change follows our acquisition of Tendfor and aims to provide partners and customers with a future-ready, feature-rich alternative. For more information see:
https://www.anywhere.now/product/tendfor, or reach out to your regular AnywhereNow contact or Partner.
Existing customers of Attendant Console for Teams can continue to use the product and receive support. License renewal remains available until December 2026.
This page describes two methods to create queue(s) monitored in AnywhereNow Attendant Console for Teams
-
Method 1 (preferred),
using a PowerShell script containing commands from latest MicrosoftTeams and MicrosoftGraph modules.(Time to execute: approx. 5 min)
OR
-
Method 2,
manually using Microsoft portals and a few mandatory PowerShell commands (where no GUI is available).(Time to execute: approx. 30 min)
AnywhereNow Attendant service is available in 3 Azure Region (EMEA/AMER/APAC).
Attendant Console Queue(s) creation
Prerequisites:
With Direct Routing, Calling Plan or Operator Connect
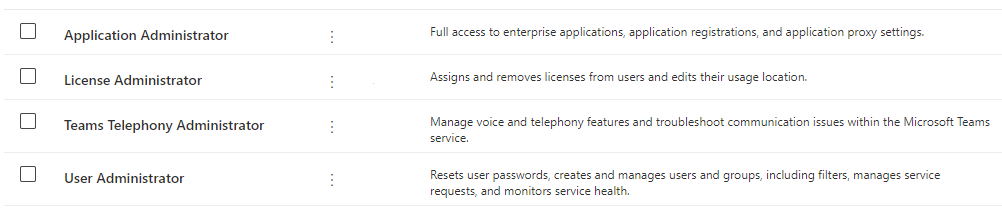
Log with an Microsoft Entra ID Formerly known as Azure Active Directory (or Azure AD, or AAD) account with these Roles
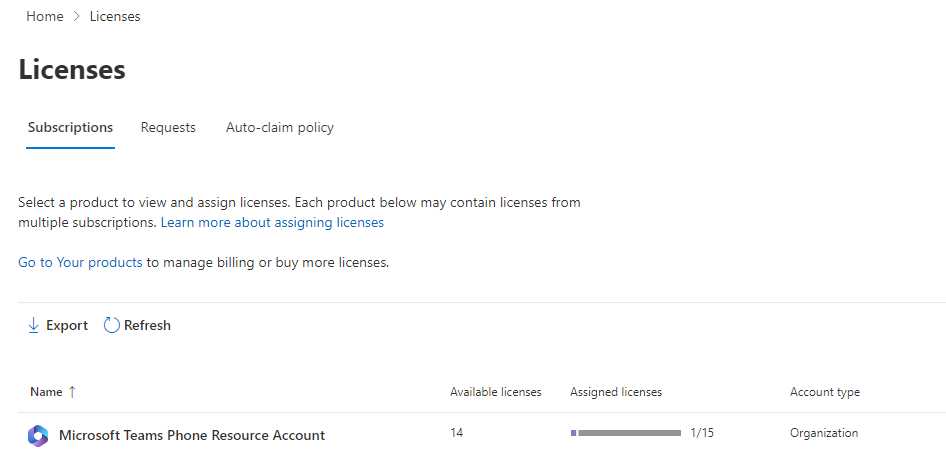
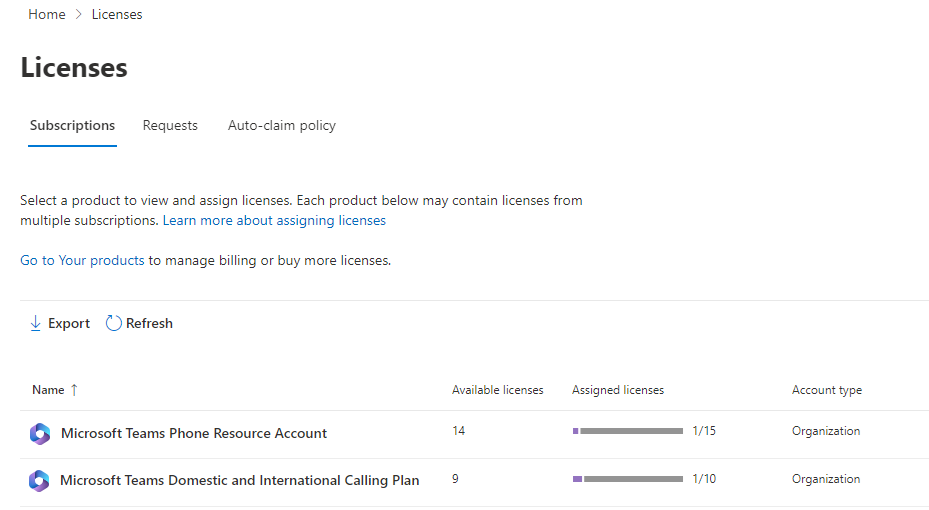
1 (one) Microsoft Teams Phone Resource Account license(Per queue)
Additional with MS Calling Plan or Operator Connect
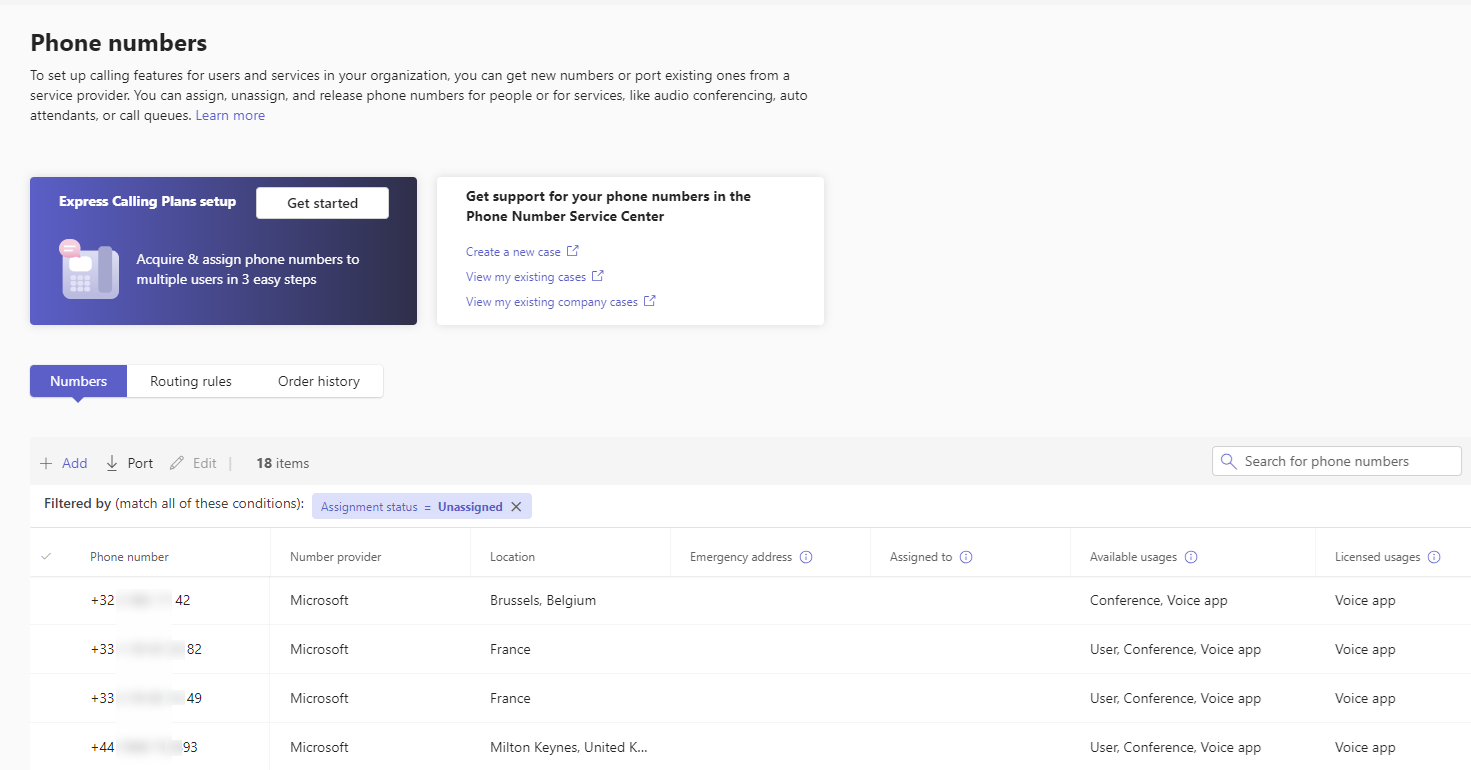
1 (one) Microsoft Phone numbers of type call queue (toll/toll free) Per queue
Time to execute: approx. 5 min.
Warning
The Microsoft Graph PowerShell SDK will be used. See Install the Microsoft Graph PowerShell SDK | Microsoft Learn for the latest prerequisites of Microsoft.
-
Open PowerShell
-
Install the latest Microsoft Graph SDK
-
Install the latest Microsoft Teams module
-
Download the latest PowerShell script
-
Execute the script
- Login to MicrosoftTeams PowerShell with a Microsoft Entra ID Formerly known as Azure Active Directory (or Azure AD, or AAD) account that has either one of these permissions
- Global Administrator;
- Teams Administrator; or
- Teams Communications Administrator
- If requested consent to Microsoft Graph, login with a Microsoft Entra ID account that has either one of these permissions
- Global Administrator; or
- Privileged Role Administrator for granting consent for apps requesting any delegated permission, for any API.
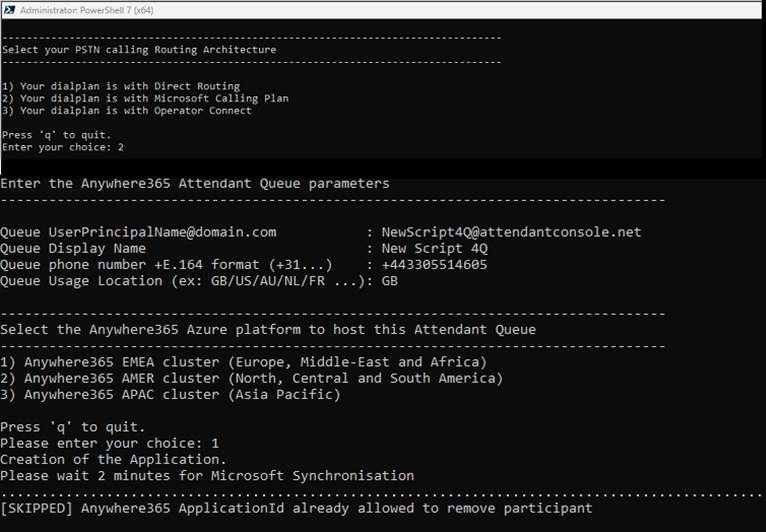
- Select your PSTN calling architecture
- Enter your attendant queue parameters
- Select your preferred AnywhereNow Azure Region
- Login to MicrosoftTeams PowerShell with a Microsoft Entra ID Formerly known as Azure Active Directory (or Azure AD, or AAD) account that has either one of these permissions
(*) if errors, please refer to the appendix
| AnywhereNow Queue Resource Account Parameters | |
|---|---|
| UserPrincipalName | User principal name for the new queue (userprincipalname@teamsdomain.com) If you use ADFS with federation When using AnywhereNow in combination with Federation you can add agents working with a Skype for Business or Teams account to your UCC., you can use the Microsoft Domain. |
| DisplayName | Display name visible when it calls to users in your tenant |
| Queue Phone Number | Queue DID in E.164 The E.164 phone number format is an international (ITU) standard for dialing telephone numbers on the Public Switched Telephony Network (PSTN). Loosely formulated, only "+" and upto 15 digits (0-9) are allowed For example: +4433221100 (For number notation/display and storage see the E.123 standard) format If Direct Routing, this is a on-premises phone number If Calling Plan or Operator Connect, you need to order a “Call Queue” Number type (toll/toll-free) |
| Location | Two alphabetic characters of country code of the Usage Location. This location must match the phone number country code. Example: NL (+31), FR (+33), AU (+61), GB (+44), US (+1), DE (+49)… |
Time to execute: approx. 30 min.
One Time Action
Add AnywhereNow ApplicationId(s) to customer meeting policy add/Remove participant
Each AnywhereNow ApplicationId must be part of the “add/remove participants” from Meetings.
As such, the AnywhereNow Application Ids must be added once to the Application Meeting Configuration policy in your Microsoft Teams environment using the following command:
# If you have not installed the MicrosoftTeams module yet, run Powershell with elevated permissions and run install-module -Name MicrosoftTeams -force

Import-module MicrosoftTeams

# Check if the user is already connected to Microsoft Teams
$connection = Get-CsTenant | Out-Null
if ($?) {
    Write-Host "Already connected to Microsoft Teams"
} else {
    Connect-MicrosoftTeams
}

# Prompt the user to select a region
$region = Read-Host -Prompt "Please enter the region (EMEA, AMER, APAC)"

# Set the ApplicationId based on the selected region
switch ($region.ToUpper()) {
    "EMEA" { $ApplicationId = "01b9161a-881b-4ab0-8ee2-15e9141e95c6" }
    "AMER" { $ApplicationId = "23ab1d0b-1447-4f30-b374-5520bc715f98" }
    "APAC" { $ApplicationId = "9bbab3e5-d1ea-40de-be7d-0bf5697f4b5d" }
    default { Write-Host "Invalid region selected"; exit }
}

# Apply the region-specific ApplicationId to the resource account
Set-CsApplicationMeetingConfiguration -AllowRemoveParticipantAppIds @{Add=$ApplicationId}
Repetitive actions
A resource account is defined and correspond to an AnywhereNow Attendant Queue.
Repeat the steps according to the number of Attendant Console Queues required.
Create a resource account with a Phone Number using Microsoft Portals
-
From Teams Admin Center – Voice – Resource Accounts, click Add to create a resource account (Choose Auto Attendant(1))
-
From Microsoft 365 Admin Center – Active Users, assign a Microsoft Teams Phone Resource Account License
-
From Teams Admin Center – Voice – Resource Accounts, Assign to set a Phone Number on the resource account
-
From Azure Portal, search the Users – Properties and enter the +E.164 Phone Number in the Business Phone field
Note
(1) Auto Attendant or Call Queue does not matter as this will be changed to an AnywhereNow queue type
Move the Resource Account (of type AutoAttendant) to Anywhere 365 ApplicationId
To move the resource account from auto attendant to AnywhereNow queue, identify the AnywhereNow Azure Region cluster (EMEA, AMER or APAC) and set the ApplicationId accordingly.
This can be done with the following PowerShell:
# If you have not installed the MicrosoftTeams module yet, run Powershell with elevated permissions and run install-module -Name MicrosoftTeams -force

Import-module MicrosoftTeams

# Check if the user is already connected to Microsoft Teams
$connection = Get-CsTenant | Out-Null
if ($?) {
    Write-Host "Already connected to Microsoft Teams"
} else {
    Connect-MicrosoftTeams
}

# Prompt the user to enter the identity
$identity = Read-Host -Prompt "Please enter the identity (e.g., yourAttendantConsoleQueue@yourdomain.com)"

# Prompt the user to select a region
$region = Read-Host -Prompt "Please enter the region (EMEA, AMER, APAC)"

# Set the ApplicationId based on the selected region
switch ($region.ToUpper()) {
    "EMEA" { $ApplicationId = "01b9161a-881b-4ab0-8ee2-15e9141e95c6" }
    "AMER" { $ApplicationId = "23ab1d0b-1447-4f30-b374-5520bc715f98" }
    "APAC" { $ApplicationId = "9bbab3e5-d1ea-40de-be7d-0bf5697f4b5d" }
    default { Write-Host "Invalid region selected"; exit }
}

# Retrieve the objectId using the Get-CsOnlineApplicationInstance command
$objectId = (Get-CsOnlineApplicationInstance -Identity $identity).ObjectId

Set-CsOnlineApplicationInstance -Identity $identity -ApplicationID $ApplicationId
Sync-CsOnlineApplicationInstance -ObjectId $objectId -ApplicationID $ApplicationId
Verification
You can verify if the Resource Account is correctly linked via this PowerShell:
# If you have not installed the MicrosoftTeams module yet, run Powershell with elevated permissions and run install-module -Name MicrosoftTeams -force

Import-module MicrosoftTeams

# Check if the user is already connected to Microsoft Teams
$connection = Get-CsTenant | Out-Null
if ($?) {
    Write-Host "Already connected to Microsoft Teams"
} else {
    Connect-MicrosoftTeams
}

# Prompt the user to enter the identity
$identity = Read-Host -Prompt "Please enter the identity (e.g., yourAttendantConsoleQueue@yourdomain.com)"
Get-CsOnlineApplicationInstance -Identity $identity | fl
.png)
In this example, this resource account is linked to AnywhereNow EMEA Region (01b...) and the queue can be called via +4433221100
PSTN Dial-Out settings
Use the E.164 phone number format to dial-out from the Attendant Console.
With Operator Connect
A routing profile should have been assigned to the queue Phone Number when provisioned by the Operator. Check with your operator.
With MS Calling Plan
Note
To enable outbound calling using Calling Plan the License “Microsoft 365 Domestic and International Calling Plan” needs to be assigned to the Resource account created for the Attendant Console queue. Learn more - Microsoft
-
Check the Resource Account creation using PowerShell:
CopyPowerShell# If you have not installed the MicrosoftTeams module yet, run Powershell with elevated permissions and run install-module -Name MicrosoftTeams -force
Import-module MicrosoftTeams
# Check if the user is already connected to Microsoft Teams
$connection = Get-CsTenant | Out-Null
if ($?) {
Write-Host "Already connected to Microsoft Teams"
} else {
Connect-MicrosoftTeams
}
# Prompt the user to enter the identity
$identity = Read-Host -Prompt "Please enter the identity (e.g., yourAttendantConsoleQueue@yourdomain.com)"
Get-CsOnlineApplicationInstance -Identity $identity
With Direct Routing
Validate your Direct Routing Policy is applied on every account (user or resource) to be routed outside in a National or International dialing plan.
-
Open Windows PowerShell or PowerShell (no Elevated Permissions are needed)
Make sure to use 64-bit version of PowerShell
-
Run the following PowerShell command to login to Microsoft Teams
-
Login with a Microsoft User Account that has either one of these permissions
- Global Administrator;
- Teams Administrator; or
- Teams Communications Administrator
-
Run the following PowerShell command to verify which the Online Voice Routing Policy is assigned
-
Provide the correct identity
CopyPowerShell$identity = Read-Host -Prompt "Enter the identity (e.g., user@domain.com)"
Get-CsOnlineUser -Identity $identity | Select-Object UserPrincipalName, OnlineVoiceRoutingPolicy -
In the case the right VoiceRoutingPolicy has not been assigned, you need to perform these additional steps:
-
Run the following PowerShell command to assign a phone number to the resource account
-
Select the correct Online Voice Routing Policy (voice-routing-policy)
Note
If there is only a Global OnlineVoiceRoutingPolicy then the script will stop and no further actions are needed.
-
Provide the correct identity
CopyPowerShell# Get all OnlineVoiceRoutingPolicies except "Global"
$policies = Get-CsOnlineVoiceRoutingPolicy | Where-Object { $_.Identity -ne "Global" }
# Check if there are any policies available
if ($policies.Count -eq 0) {
Write-Host "No available voice routing policies found."
} else {
# Display policies with numbers
for ($i = 0; $i -lt $policies.Count; $i++) {
Write-Host "$($i + 1). $($policies[$i].Identity)"
}
# Prompt user to enter the identity
$identity = Read-Host "Enter the identity (e.g., yourAttendantConsoleQueue@yourdomain.com)"
# Prompt user to select a policy
$selection = Read-Host "Select a voice routing policy by number"
# Validate selection
if ($selection -gt 0 -and $selection -le $policies.Count) {
$selectedPolicy = $policies[$selection - 1].Identity
# Grant the selected policy to the identity
Grant-CsOnlineVoiceRoutingPolicy -Identity $identity -PolicyName $selectedPolicy
Write-Host "Granted policy $selectedPolicy to $identity"
} else {
Write-Host "Invalid selection. Please run the script again and select a valid number."
}
} -
-
Run the following PowerShell command to verify if the Online Voice Routing Policy is assigned successfully.
-
Provide the correct identity
CopyPowerShell$identity = Read-Host -Prompt "Enter the identity (e.g., user@domain.com)"
Get-CsOnlineUser -Identity $identity | Select-Object UserPrincipalName, OnlineVoiceRoutingPolicy -
Validate your SBC configuration in case of caller’s number policy verification that may require an AD account for the queue.
Licensing
You can contact your Sales representative, AnywhereNow Backoffice, or directly order Attendant Console for Microsoft Teams licenses from the Microsoft AppSource.
One license is required for each operator and is automatically associated to your teams UPN In Windows Active Directory, a User Principal Name (UPN) is the name of a system user in an email address 'like' format. A UPN (for example: john.doe@domain.com) consists of the user name (logon name), separator (the @ symbol), and domain name (UPN suffix). (no license file, it's processed online).
Click here --> to purchase a license from Microsoft AppSource
When you request a license, you must specify on which Azure Region your license will be generated on.
This Azure Region must be the same as the one selected for attendant queue(s).
Attendant Console Settings
Prerequisites
Attendant only supported in conjunction with the Microsoft Teams Desktop application
The web version of Microsoft Teams has some limitations regarding calling. Because of this, the Attendant is currently only supported in combination with the Microsoft Teams Desktop client, not the client that is running in a web browser.
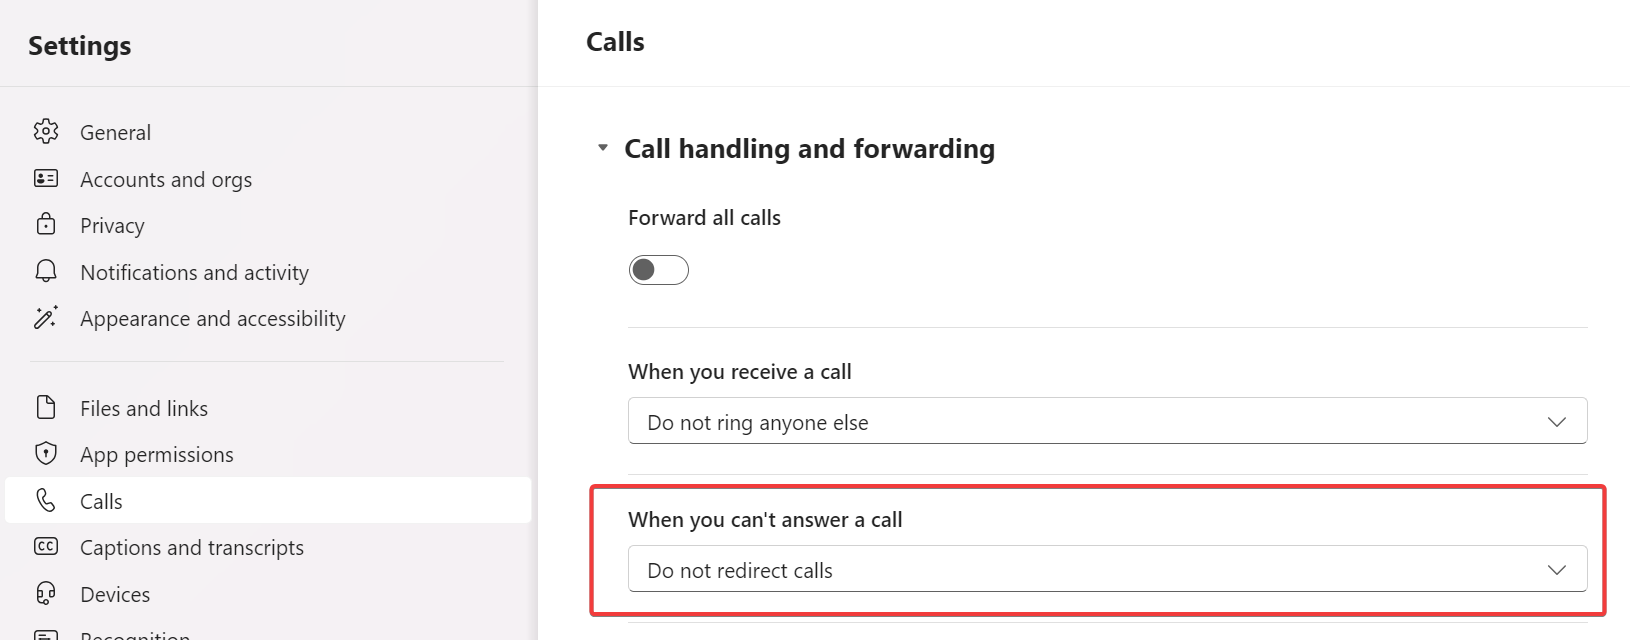
Attendant user must disable transfer to voicemail in Teams client.
The Attendant user must disable the option to transfer the call to an alternate destination if unanswered.
This option can be found in the Teams client under Settings, Calls tab.
Busy on Busy must be disabled on the operator account
To be able to use consultative transfer, busy on busy must be disabled on the calling policy assigned to the operator user.

Using the App in your Teams Client
-
Search the App Attendant by AnywhereNow
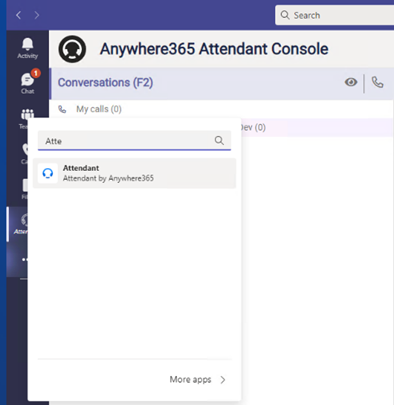
If the Attendant App is not available in the catalog, contact your Teams Administrator to upload the App in Teams Admin Center (step 4 of Golive configuration page)
Right-click on the icon in the left bar and select Pin.

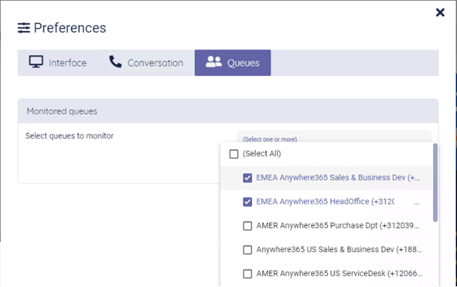
-
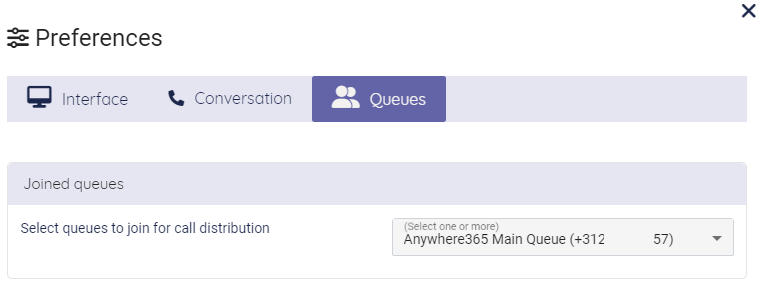
In Attendant Preferences - Queue Tab
Select the queue(s) to monitor
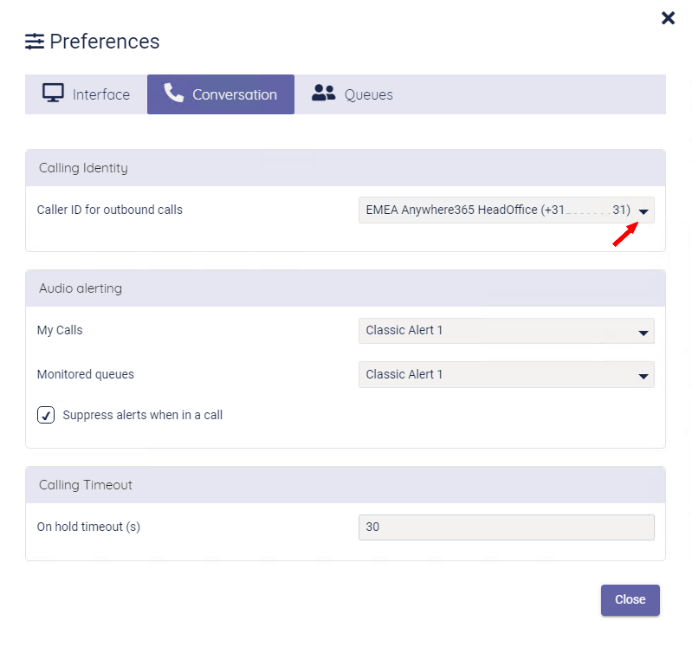
-
In Attendant Preferences - Conversation Tab
Select the queue used to dial-out (pstn)
Using the Attendant in a Web Browser
Configure the same preferences as when using the Teams App.
You can access AnywhereNow Attendant Console with browsing those URLs:
EMEA
https://attendant1.anywhere365.io
AMER
https://attendant2.anywhere365.io
APAC
https://attendant3.anywhere365.io
Appendix
The script only contains Microsoft PowerShell commands from Microsoft Entra ID and Microsoft Teams modules.
Install the latest Microsoft PowerShell modules.
Here are some classic errors that may occur:
-
Your PowerShell execution policy does not allow to run scripts.
Please check it via Get-ExecutionPolicy and change it to unrestricted using Set-ExecutionPolicy
-
Virtual license failed not available
Verify you have Teams virtual-user license available. If not, order new ones at MS.
-
The phone number assignment step return errors.
To assign a phone number, a variable synchronization delay is required by Microsoft before being able to invoke the Set-CsPhoneNumberAssignment command.
The script waits 5 minutes, but it can be necessary to wait more. The script will continue anyway.
To check the queue definition, run
# If you have not installed the MicrosoftTeams module yet, run Powershell with elevated permissions and run install-module -Name MicrosoftTeams -force

Import-module MicrosoftTeams

# Check if the user is already connected to Microsoft Teams
$connection = Get-CsTenant | Out-Null
if ($?) {
    Write-Host "Already connected to Microsoft Teams"
} else {
    Connect-MicrosoftTeams
}

# Prompt the user to enter the identity
$identity = Read-Host -Prompt "Please enter the identity (e.g., yourAttendantConsoleQueue@yourdomain.com)"

Get-CsOnlineApplicationInstance -Identity $identity | flIf no phone number is assigned, you can assign it manually later with the following command