WebChat Adaptive Cards
Known issue — Adaptive Card–initiated WebChat (DC2024.02b & DC2025.01)
When a WebChat is started with an Adaptive Card, the platform writes WebChatSipUri where standard.customerUri should be. As a result, standard.customerUri and standard.customerName are not honored and sender/provider attribution are reversed and inaccurate.
- Impact (examples): Power BI customer dimension; PluginFlow
SenderUri; WebAgent Queue attribution; WebAgent CRM Customer Relationship Management, or CRM, is (usually) a software-based, data management method to deal with interactions with customers and potential customers. Service & CTI searches. - Who is affected: conversations started by Adaptive Card. Not affected: conversations started by a standard message.
- Workaround: start WebChat with an initial message (not an Adaptive Card).
Adaptive Cards Adaptive Cards are preformatted boilerplate messages that can be selected by an agent to be sent to a client. They are written using an open card exchange format that allows the developers to 'write once' and share with any compliant host application can be used as UI components for WebChat. This article describes how Adaptive Cards are used with AnywhereNow's WebChat service.
Note
An Enterprise license or higher is required to access these features.
Adaptive Cards support varies by bundle A bundle is a fixed combination of our software platform elements of very specific versions. These are designed and tested to optimally work together to assure their intended function and interoperability.:
- DC2025.01 and later — features up to version 1.4 are supported.
- DC2024.02 and earlier — limited to version 1.0.
For a full feature matrix, see the Adaptive Cards release notes.
Building Adaptive Cards
Adaptive cards are portable code snippets that can be used to enhance the UI.
Useful URLs
-
Various examples of Adaptive Cards can be found here: https://adaptivecards.io/samples/
-
An intuitive designer tool you can use to create your own Adaptive Cards can be found here: https://adaptivecards.io/designer/
Important
By default, the Microsoft Adaptive Cards designer site creates version 1.6 adaptive cards. This can be set to version 1.4 by selection the desired version in Target Version, this way you can only select supported features.
Key value pairs
Important
These key value pairs can only be used in the Adaptive card (or chained Adaptive cards) that begins a conversation, not in Adaptive Cards used during or after the conversation with the Agent.
The WebChatDialogueProvider2 will react to specific values, so they will be used as features. Currently the following key value pairs are available:
-
standard.customerName = This name will be shown to the Agent
Tip
This can also be done using a command, see: Setting User Data
-
standard.customerUri = This URI will be used on the conversation. This will value will be visible and used in:
- Reporting = Conversation will be registered on the entered URI in the database. This information will be used in the PowerBI Template.
- Queue = Conversation will be visible in the queue on the entered URI.
- Text Search = Conversation will be search-able in the Text Search with the entered URI.
- Timeline = Timeline information will be retrieved based on the entered URI.
- CRM Service = If the CRM Service is configured, this URI will be used to look up the contact based on email address.
- CTI Plugin = If the CTI Plugin is used, this URI will be used to look up the contact based on email address.
Important
The
standard.customerUrimust be in an email address format (e.g.,example@domain.com). If the provided URI does not follow this format, it will default to the generic placeholder URI.Tip
This can also be done using a command. Setting User Data
-
standard.subject = This value can be used in the PluginFlowSettings (Learn More) to better route the customer.
Building a Response
Important
Every Adaptive Card needs a response for being able loaded in the Webchat.
The response is build up as a JSON, this enabled a lot of flexibility. For example a unique response or Target URI per SubmitID (I.e. Button in the responsive card).
Useful links
-
Validate your JSON: https://jsonformatter.curiousconcept.com/
Warning
An incorrect JSON will cause the Adaptive Card to not be loaded.
How to build JSON Scripts
Below we have an example of a Response:
{
  "Actions": [
    {
      "Id": "Submit",
      "TargetUris": [
        "https://prod-114.westeurope.logic.azure.com:443/workflows/"
      ],
      "Response": {
        "Content": "One of our Agent will reach out during business hours on {standard.customerUri}",
        "Type": "Message"
      }
    }
  ]
}-
Actions (Object) = In this object the actions are stored that can be performed by the Adaptive Card response
-
Array = In this array one or more actions (object) can be stored.
Note
Each object needs to be comma separated
-
Id (name/value pair) = In this string matched the
SubmitIdthat is created in the Adaptive Card -
TargetUri (Object) = In this object one or more strings can be stored. All the submitted values from the Adaptive Card will be posted to the
TargetUriNote
Each object needs to be comma separated
-
Response (Array) = In this array the response can be defined.
-
Content (name/value pair) = In this string will be send as a response to the customer after submitting.
Tip
You can use brackets {} to replace content with submitted data.
-
Type (name/value pair) = In this string you can define the response type. For now only "Message" is used.
-
-
-
Storing Adaptive Cards
Before Adaptive Cards can be loaded into the WebChat 2 they needs to be added to SharePoint first, Learn More
Configuration
An Adaptive Card can be used as the first message (before the chat is initiation), during a conversation (send by the agent), or as a post-conversation (after the webchat session has been completed)
As First Message
This tease message can be configured with the following settings:
interface TeaseMessageSettings {
    message: string,
    showAsMessage: boolean,
    onScrollPercentage: number,
    onTimeout: number
}
These values can be set as follows:
-
Adaptive card id = The ID of the Adaptive Card that is configured on SharePoint.
-
Adaptive card disable input = If enabled the chat input will be disabled until the Adaptive Card has been submitted. This is to ensure the customer completes the Adaptive Card before starting the conversation.
Example
Below an example script that can be loaded into your website's html. In this example we loaded a webchat with a tease message:
<script type="text/javascript" src="webchat.bootstrap.js"></script>
<script>
window.onload = function() {
const config = {
available: {
state: 'Enabled',
adaptivecard: {
id: 'QuestionForm',
disableInput: false
}
},
away: {
state: 'ChatInteractionDisabled',
adaptivecard: {
id: 'ContactForm',
disableInput: true
}
},
offline: {
state: 'Hidden'
}
};
WebChat.load(config);
};
</script>As Agent Message
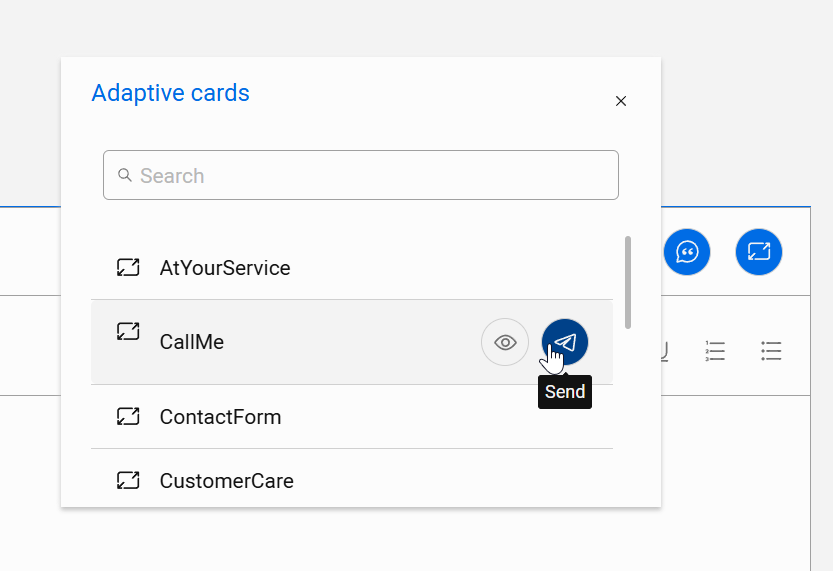
Agents can insert an Adaptive Card from the reply toolbar in WebAgent. They can search, preview, and send any card configured in the current UCC A Unified Contact Center, or UCC, is a queue of interactions (voice, email, IM, etc.) that are handled by Agents. Each UCC has its own settings, IVR menus and Agents. Agents can belong to one or several UCCs and can have multiple skills (competencies). A UCC can be visualized as a contact center “micro service”. Customers can utilize one UCC (e.g. a global helpdesk), a few UCC’s (e.g. for each department or regional office) or hundreds of UCC’s (e.g. for each bed at a hospital). They are interconnected and can all be managed from one central location..
As Post Message
In order to send an Adaptive Card after the dialogue is finished, the WebChat config in the WebChat frontend has to be extended with an Adaptive Card ID, see example below.
An example of the complete file would look something like this:
<script type="text/javascript" src="webchat.bootstrap.js"></script>
<script>
window.onload = function() {
    const config = {
        available: {
            teaseMessageSettings: {
                showAsMessage: true,
                showAsTeaser: true,
                onTimeout: 5000,
                message: {
                    en: ' Hi Can we help you?',
                    nl: ' Hoi Hoe kunnen we u helpen?'
                }
            },
            state: 'Enabled'
        },
        postDialogue: {
            adaptivecard: {
                id: 'AdaptiveCardId'
            }
        }
    };
    WebChat.load(config);
};
</script>
Adaptive Cards Examples
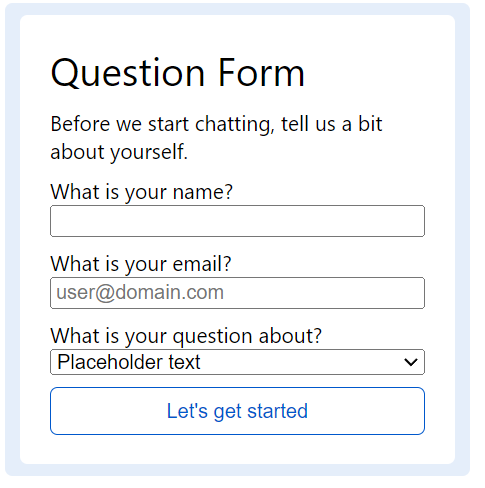
Question Form
This card will ask the customer some questions. The entered fields will be used by the WebChatDialogueProvider2.
Adaptive Card Payload:
- DC2024.02 and earlier
- DC2025.01 and later
{
    "type": "AdaptiveCard",
    "$schema": "http://adaptivecards.io/schemas/adaptive-card.json",
    "version": "1.0",
    "body": [
        {
            "type": "TextBlock",
            "text": "Question Form",
            "wrap": true,
            "size": "ExtraLarge"
        },
        {
            "type": "TextBlock",
            "text": "Before we start chatting, tell us a bit about yourself.",
            "wrap": true
        },
        {
            "type": "TextBlock",
            "text": "What is your name?",
            "wrap": true
        },
        {
            "type": "Input.Text",
            "id": "standard.customerName",
            "spacing": "None"
        },
        {
            "type": "TextBlock",
            "text": "What is your email?",
            "wrap": true
        },
        {
            "type": "Input.Text",
            "placeholder": "user@domain.com",
            "id": "standard.customerUri",
            "spacing": "None"
        },
        {
            "type": "TextBlock",
            "text": "What is your question about?",
            "wrap": true
        },
        {
            "type": "Input.ChoiceSet",
            "choices": [
                {
                    "title": "Support",
                    "value": "Support"
                },
                {
                    "title": "Sales",
                    "value": "Sales"
                },
                {
                    "title": "Other",
                    "value": "Other"
                }
            ],
            "placeholder": "Placeholder text",
            "id": "standard.subject",
            "spacing": "None"
        }
    ],
    "actions": [
        {
            "type": "Action.Submit",
            "title": "Let's get started",
            "id": "submit"
        }
    ]
}{
"type": "AdaptiveCard",
"$schema": "http://adaptivecards.io/schemas/adaptive-card.json",
"version": "1.4",
"body": [
{
"type": "TextBlock",
"text": "Question Form",
"wrap": true,
"size": "ExtraLarge"
},
{
"type": "TextBlock",
"text": "Before we start chatting, tell us a bit about yourself.",
"wrap": true
},
{
"type": "Input.Text",
"label": "What is your name?",
"id": "standard.customerName"
},
{
"type": "Input.Text",
"placeholder": "user@domain.com",
"label": "What is your email?",
"id": "standard.customerUri"
},
{
"type": "Input.ChoiceSet",
"choices": [
{
"title": "Support",
"value": "Support"
},
{
"title": "Sales",
"value": "Sales"
},
{
"title": "Other",
"value": "Other"
}
],
"placeholder": "Placeholder text",
"label": "What is your question about?",
"id": "standard.subject"
},
{
"type": "ActionSet",
"actions": [
{
"type": "Action.Submit",
"title": "Let's get started",
"id": "submit",
"style": "positive"
}
]
}
]
}Response:
{
  "Actions": [
    {
      "Id": "submit",
      "TargetUris": [],
      "Response": {
        "Content": "Thanks {standard.customerName} for sharing, let's look for an agent.",
        "Type": "Message"
      }
    }
  ]
}
Contact Form
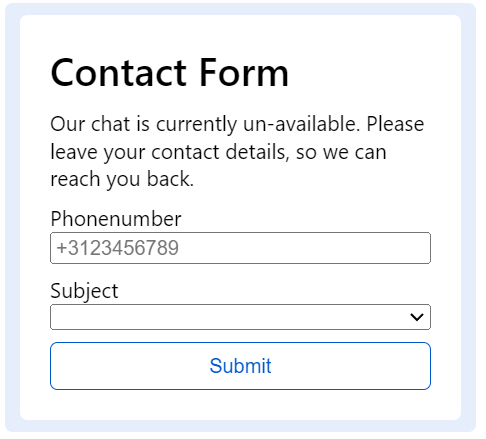
This card can be used when the WebChat is outside business hours, so the Agent received the request the next work day and can directly call the customer.
Adaptive Card Payload:
- DC2024.02 and earlier
- DC2025.01 and later
{
    "type": "AdaptiveCard",
    "$schema": "http://adaptivecards.io/schemas/adaptive-card.json",
    "version": "1.0",
    "body": [
        {
            "type": "TextBlock",
            "text": "Contact Form",
            "wrap": true,
            "size": "ExtraLarge",
            "weight": "Bolder"
        },
        {
            "type": "TextBlock",
            "text": "Our chat is currently un-available. Please leave your contact details, so we can reach you back.",
            "wrap": true
        },
        {
            "type": "TextBlock",
            "text": "Phonenumber",
            "wrap": true
        },
        {
            "type": "Input.Text",
            "placeholder": "+3123456789",
            "id": "standard.customerUri",
            "spacing": "None"
        },
        {
            "type": "TextBlock",
            "text": "Subject",
            "wrap": true
        },
        {
            "type": "Input.ChoiceSet",
            "choices": [
                {
                    "title": "Support",
                    "value": "Support"
                },
                {
                    "title": "QuickSupport",
                    "value": "QuickSupport"
                }
            ],
            "id": "Skill",
            "spacing": "None"
        }
    ],
    "actions": [
        {
            "type": "Action.Submit",
            "title": "Submit",
            "id": "submit"
        }
    ]
}{
"type": "AdaptiveCard",
"$schema": "http://adaptivecards.io/schemas/adaptive-card.json",
"version": "1.4",
"body": [
{
"type": "TextBlock",
"text": "Contact Form",
"wrap": true,
"size": "ExtraLarge",
"weight": "Bolder"
},
{
"type": "TextBlock",
"text": "Our chat is currently un-available. Please leave your contact details, so we can reach you back.",
"wrap": true
},
{
"type": "Input.Text",
"placeholder": "+3123456789",
"label": "Phonenumber",
"id": "standard.customerUri"
},
{
"type": "Input.ChoiceSet",
"choices": [
{
"title": "Support",
"value": "Support"
},
{
"title": "QuickSupport",
"value": "QuickSupport"
}
],
"label": "Subject",
"id": "Skill"
},
{
"type": "ActionSet",
"actions": [
{
"type": "Action.Submit",
"title": "Submit",
"style": "positive",
"id": "submit"
}
]
}
]
}Response:
{
  "Actions": [
    {
      "Id": "submit",
      "TargetUris": [
        "https://prod-114.westeurope.logic.azure.com:443/workflows/"
      ],
      "Response": {
        "Content": "One of our Agent will reach out during business hours on {standard.customerUri}",
        "Type": "Message"
      }
    }
  ]
}
WebAgent Transcripts
Scope
Transcript download via Adaptive Cards is supported for WebChat only.
Looking for voice speech-to-text during calls? SeeHow to configure UCC speech to text transcription .
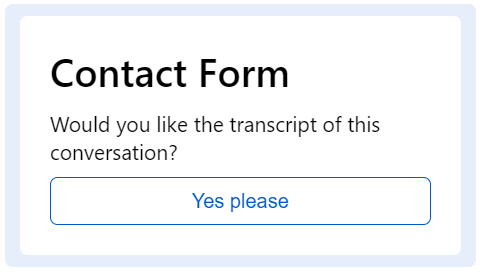
A transcript is created by sending a PostDialogue Adaptive Card that includes a button
Action.Submit with id standard.transcript, and a response action using the same id.
When clicked, WCDP2 appends a download link to the response message.
The agent sends a new PostDialogue Adaptive Card every time the conversation is handled. If the customer decides to continue the conversation after the agent ended it, the transcript will be replaced in the database by the new transcript and will be sent to the customer the same way as the first transcript.
How to enable WebChat Transcripts
The following SharePoint settings are mandatory: (if not set this will cause an exception with the message 'connection string not found')
| Name | Scope | Value | Description |
|---|---|---|---|
| Uri | WebChatDialogueProvider2 |
http://{DOMAIN}/webchatDialogueProvider2 Note If your transcript download button returns a 404 or file not found error (depending on browser), the Uri set for WebChatDialogueProvider2 is not public accessible and needs to be changed. |
The public accessible location of the WebChatDialogueProvider2 |
| Uri | DialogueManager | http://{DOMAIN}/DialogueManager | The location of the DialogueManager (Probably already created for the DialogueManager itself) |
Example of a PostDialogue Adaptive Card with transcript functionality
- DC2024.02 and earlier
- DC2025.01 and later
{
    "type": "AdaptiveCard",
    "$schema": "http://adaptivecards.io/schemas/adaptive-card.json",
    "version": "1.0",
    "body": [
        {
            "type": "TextBlock",
            "text": "Contact Form",
            "wrap": true,
            "size": "ExtraLarge",
            "weight": "Bolder"
        },
        {
            "type": "TextBlock",
            "text": "Would you like the transcript of this conversation?",
            "wrap": true,
            "color": "Dark"
        }
    ],
    "actions": [
        {
            "type": "Action.Submit",
            "title": "Yes please",
            "id": "standard.transcript"
        }
    ]
}{
"type": "AdaptiveCard",
"$schema": "http://adaptivecards.io/schemas/adaptive-card.json",
"version": "1.4",
"body": [
{
"type": "TextBlock",
"text": "Contact Form",
"wrap": true,
"size": "ExtraLarge",
"weight": "Bolder"
},
{
"type": "TextBlock",
"text": "Would you like the transcript of this conversation?",
"wrap": true,
"color": "Dark"
},
{
"type": "ActionSet",
"actions": [
{
"type": "Action.Submit",
"title": "Yes please",
"style": "positive",
"id": "standard.transcript"
}
]
}
]
}Example of Adaptive Card response
{
    "Actions": [{
        "Id": "standard.transcript",
        "TargetUris": [],
        "Response": {
            "Content": "<b>Your transcript is ready!</b>",
            "Type": "Message"
        }
    }]
}