AnywhereNow Authentication Migration Guide
Background
Some customers have had intermittent issues with the AnywhereNow Authentication Service (an example is when the login page sometimes erroneously tells the agent, that they are already logged in).
This has been resolved in deployment of a newer Microsoft Authentication Services backend and newer components in bundle A bundle is a fixed combination of our software platform elements of very specific versions. These are designed and tested to optimally work together to assure their intended function and interoperability. DC2024.01f and higher.
This document will describe the steps needed to be done by the customer/partner (and/or Cloud team) to move the customers to the new authentication platform.
It is advised to perform these steps after the bundle upgrade to DC2024.01f or higher has succesfully completed. These bundles will still work with the old authentication platform, but we strongly encourage customers to migrate to the new authentication platform as soon as possible after the bundle upgrade, by following the steps below.
The preferred method (Method 1) is where the customer/partner do all the steps themselves. They will have full control when to perform this migration. Method 2 entails coordinated steps, to be planned with both the customer and the AnywhereNow Cloud Support team to execute the changes, some which will (still) have to be done by the customer and some by the Dialogue Cloud support team, in that order.
Method 1 (preferred)
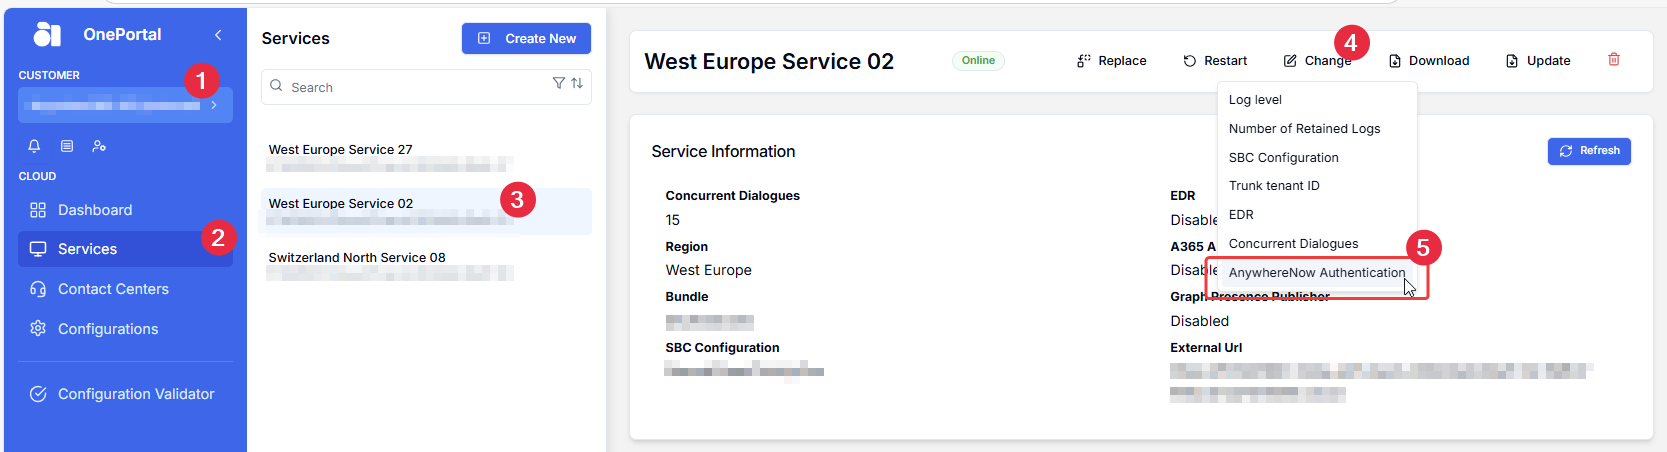
The first method of this migration is one fully done by the customer/partner themselves (with access to the OnePortal Formerly known as Partner Portal. A redesigned web portal for managing Dialogue Cloud deployments.):
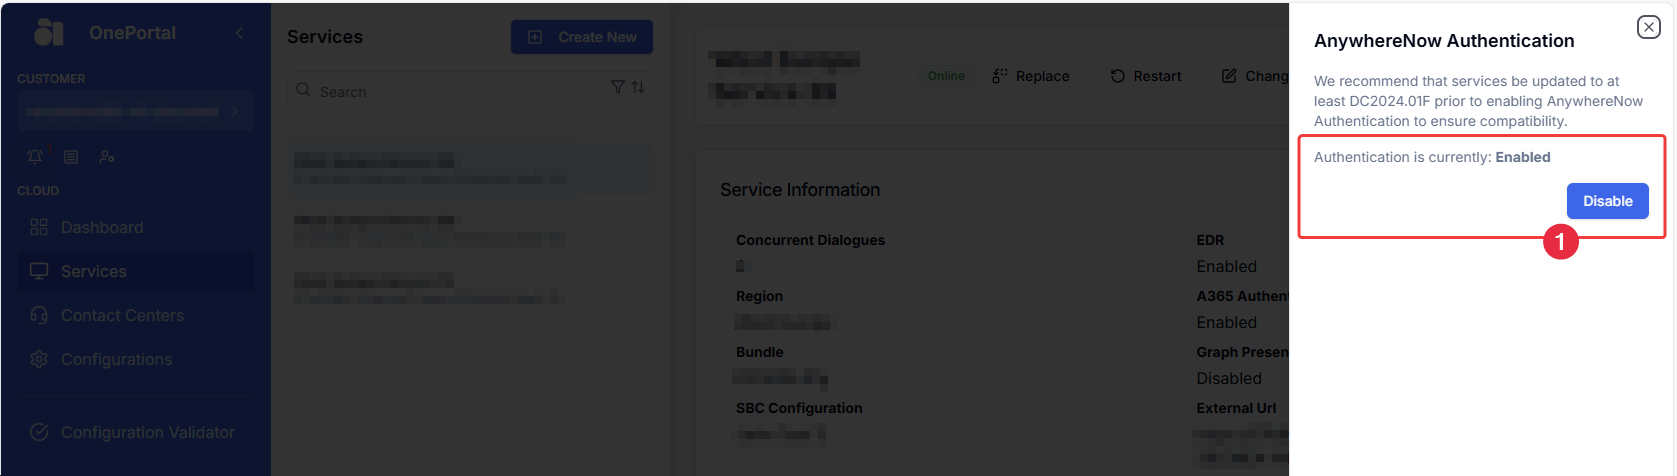
1. Disable the AnywhereNow Authentication service for the customer in the Services menu of the partner portal
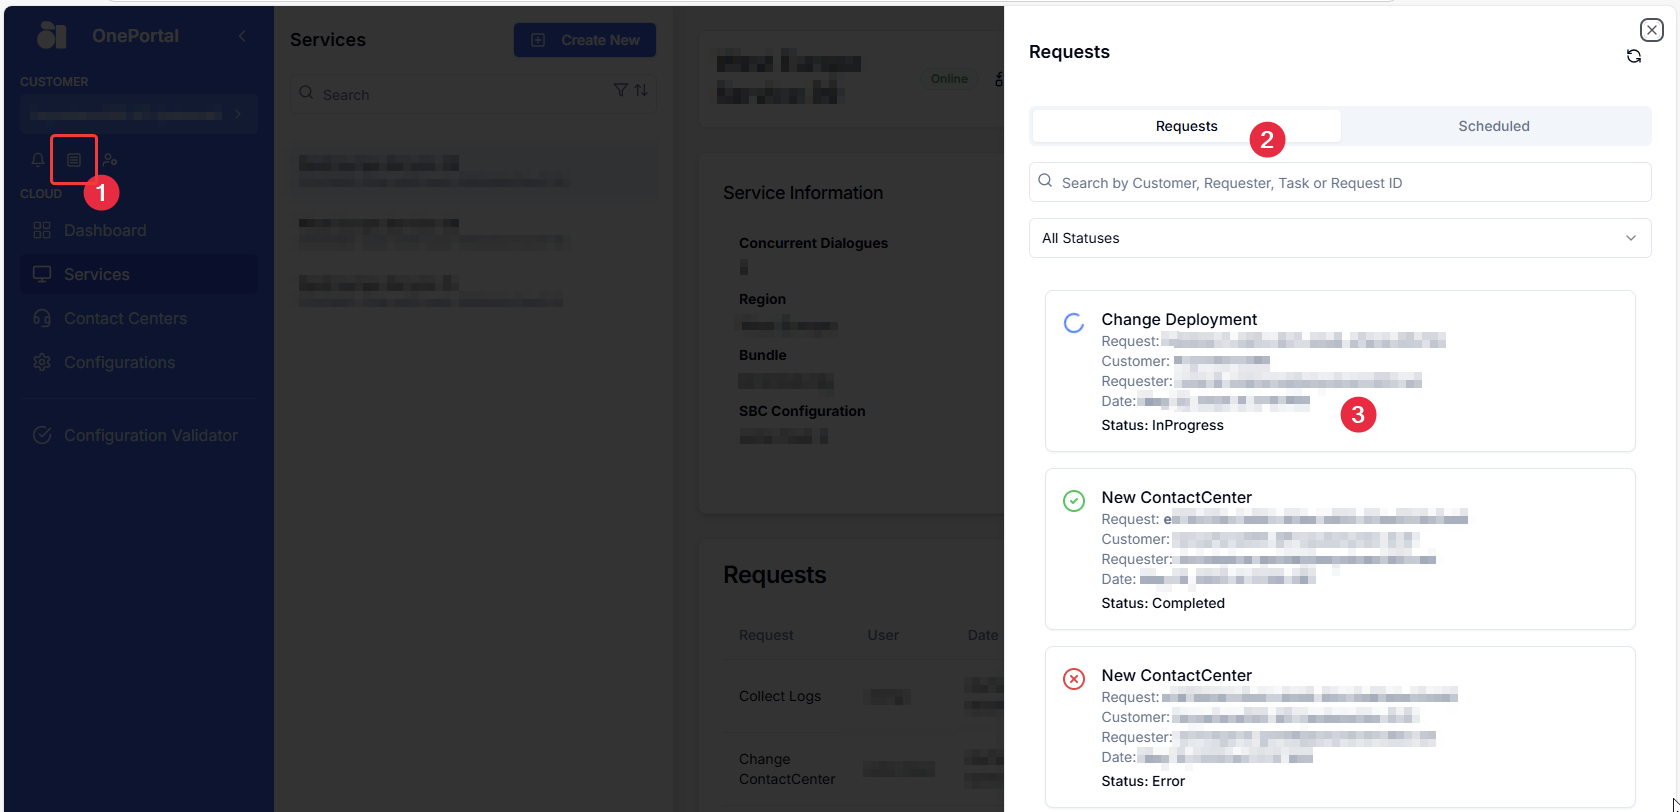
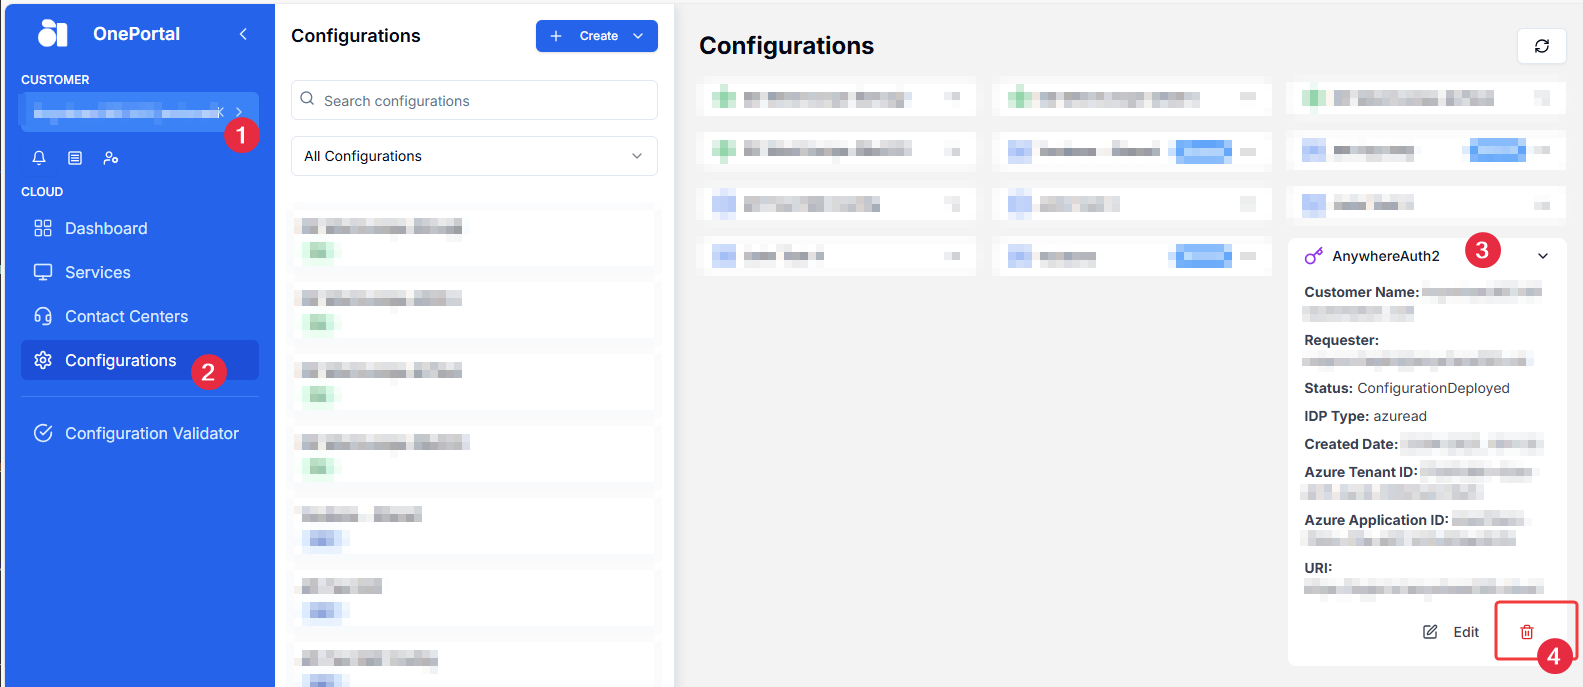
2. After the Authentication has been disabled and confirmed on the services (i.e. status Completed in the Request menu), the authentication configuration needs to be removed from the config in the OnePortal
3. Once the deletion is done, the customer/partner must change the broker (redirect) URL in Azure. For this, the customer/partner follows the Create Azure App for Authentication. The only steps needed to be followed is the “Add Redirect URL”, as the current URL needs to be replaced with the new one. See: Select Add Uri and set the following new Redirect URL
4. Once the broker URL has been changed, the customer/partner can create the new Authentication Profile
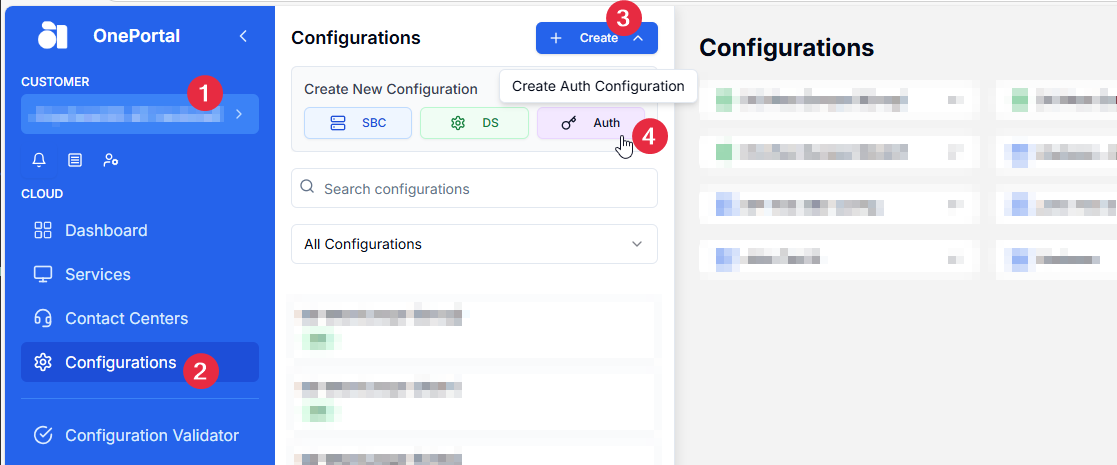
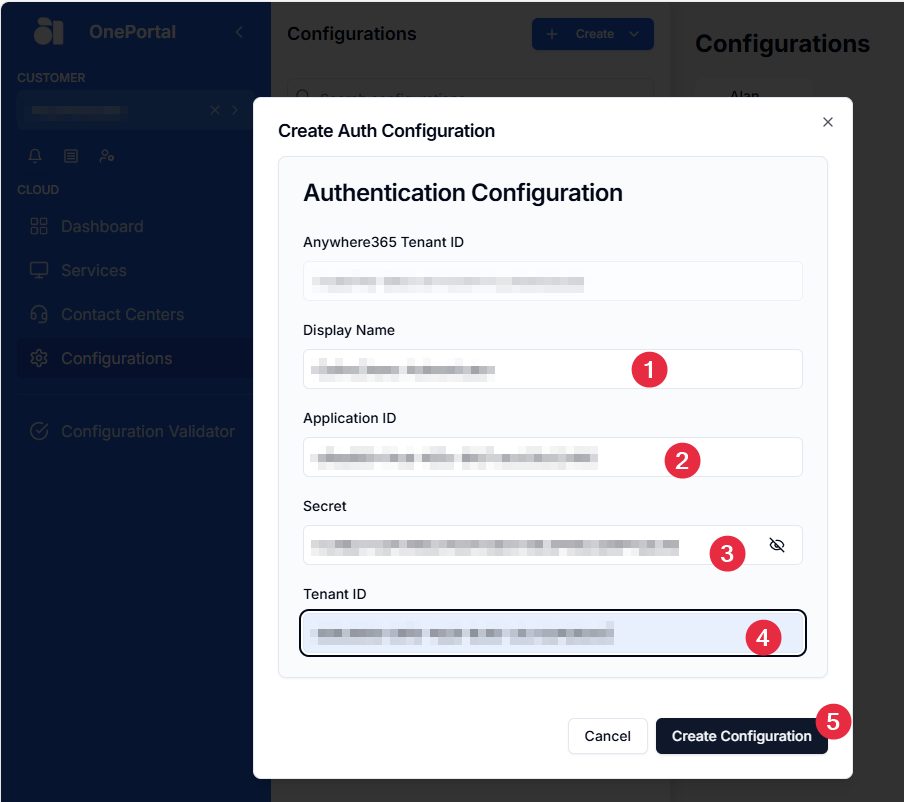
5. The creation of the new Authentication is instant and automatically enabled on the new environment for all affected web applications.
6. (optional) For local client applications, local config or settings changes may need to be made as well. See What Next? below.
Method 2
This method assumes the customer/partner already has the new broker URL in their Azure platform (See: Select Add Uri and set the following new Redirect URL). Dialogue Cloud support can then run a custom script which moves over the customer's Authentication profile from the old to the new authentication platform.
1. The customer/partner raises a request to the Support team.
2. The support team creates a ticket (change request) to the Cloud Team for the change
3. The customer/partner, Support team and Cloud team agrees on a time/date to make this change.
Note
Because of the custom nature these changes cannot be done in the weekends. Only CET business hours
4. Customer/partner prepares the Azure broker URL to the new environment.
The only steps needed to be followed is the “Add Redirect URL”, as the current URL needs to be replaced with the new one. See: Select Add Uri and set the following new Redirect URL
5. The Cloud Team will start the custom Move Script on the agreed time
6. After the move is complete, the customer/partner removes the old broker URL from azure.
Note
If the move script can be run outside of customer business hours this can change of Azure URL could be done in advance.
7. Customer is now over to the new platform automatically enabled on the new environment for affected web application.
8. (optional) For local client applications, local config or setting changes may need to be made as well. See What Next? below.
What Next?
Dialogue Studio, WebWallboard and Generic Dialogue Provider (GDP)
For the Dialogue Studio instance, WebWallboard and possibly Generic Dialogue Provider, no manual configurations are done on the background for the redirect URL. Once the above migration steps have been taken these applications should work with the new Redirect URL.
Snapper
The redirect URL in each Snapper will have to be updated to point to the new "login.anywhere365.cloud" URL for the application to be forwarded to the new authentication URL:

Also see instruction page on: To enable Snapper to use AnywhereNow Authentication do the following:
Inflight Wallboard
The redirect URL in each Inflight Wallboard's config.xml file will have to be updated to point to the new "login.anywhere365.cloud" URL for the application to be forwarded to the new authentication URL:
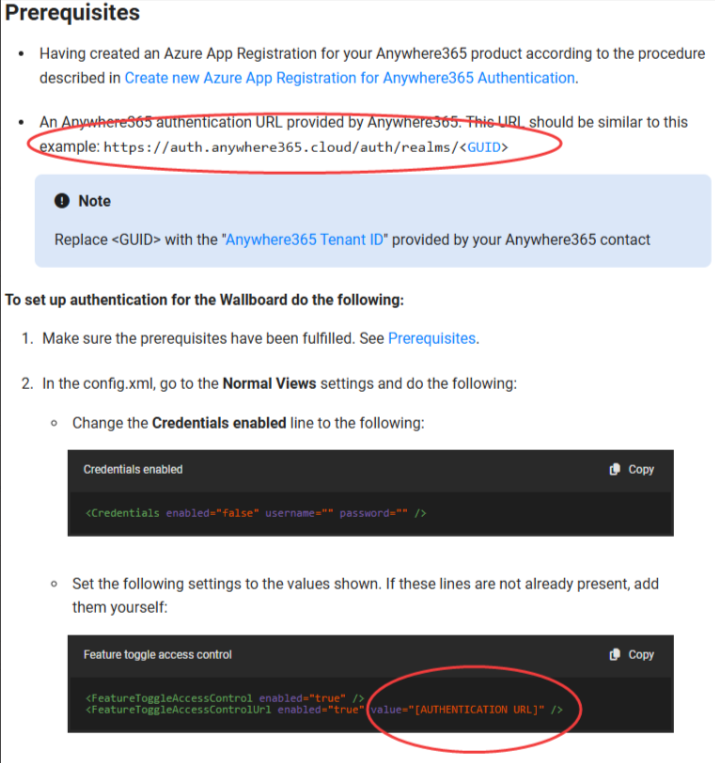
Also see instruction page on: To set up Inflight Wallboard to use AnywhereNow Authentication do the following: