Creating a OneUCC Site using PnP.PowerShell
The information on this page has been surpassed by our modernized SharePoint instructions.
See: UCC Site Creator (Modernized) - Overview & Prerequisites
Important (added 29-10-2025)
We want to bring your attention to an announcement recently published by Microsoft. Please read study carefully and assess whether this is applicable to your tenant. In an effort to move customers off of classic site and publishing features Microsoft has terminated some SharePoint publishing functionality starting September 15th 2025, used by our current UCC.Creator scripts.
A method to temporarily delay this until March 15th 2026 is mentioned. More information can be found in Microsoft Message Center article: MC1117115.
(Text copied below for readers without access to Microsoft Message Center)
** (Unfortunately The method below can only be run with Microsoft SPO-Management Shell. The required commands do not all have an alternative in the PnP.Powershell suite - see Link GitHub issue)
** (Text copied below for readers without access to Microsoft Message Center)
Updated September 2, 2025: Upcoming SharePoint Online changes may impact your organization. Please review the below.
We are implementing the following changes to custom scripting and classic publishing in SharePoint Online.
1. Disablement of custom scripting
Custom scripting will be disabled by default (setting DenyAddAndCustomizePages to 1 or $true) for sites created with the following templates:
BLANKINTERNETCONTAINER#0 = Classic Publishing Portal Site
CMSPUBLISHING#0 = Classic Publishing Site
BLANKINTERNET#0 = Classic Publishing Site Blank
CSPCONTAINER#0 = SharePoint Embedded Site
NOTE:
Existing classic publishing sites created with the templates listed above will have custom scripting disabled by default.
Disabling custom scripting does not affect the execution of scripts that have already been added to a site or page.
Refer to this documentation to learn more about the security considerations of ungoverned scripting.
2. Ability to set site property bag valued without requiring custom scripting enablement.
Users no longer need to set DenyAddAndCustomizePages to $false or 0 (i.e. enable custom scripting) in a site to manage site property bag values. We have introduced a new AllowWebPropertyBagUpdateWhenDenyAddAndCustomizePagesIsEnabled setting at the site level and at the tenant level to allow adding/managing site property bag values. Please see documentation here for tenant level setting and here for the site level setting.
3. Classic publishing sites creation and feature activation changes
Users will no longer be able to create new classic publishing related site collections or activate publishing features in existing site collections. This applies to both UX and API interactions.
Sites collections with the following templates cannot be created:
BLANKINTERNETCONTAINER#0 = Publishing Portal Site
CMSPUBLISHING#0 = Publishing Site
BLANKINTERNET#0 = Publishing Site Blank
ENTERWIKI#0 = Enterprise Wiki
SRCHCEN#0 = Enterprise Search Center
SPSSITES#0 = Site Directory
SPSNHOME#0 = News Home Site
PRODUCTCATALOG#0 = Product Catalog
SPSREPORTCENTER#0 = Report Center
SPSTOPIC#0 = Topic Area Template
Existing classic publishing enabled site collections are unaffected and can continue regular usage, including creation of sub sites.
When this will happen
Both changes, the extended custom scripting governance and the new classic publishing restrictions, will take effect starting September 15, 2025.
How this will affect your organization
When custom scripting is disabled in classic publishing sites, users will no longer be able to use script editor web parts, create custom master pages or page layouts, and utilize several other features. More details on features affected when custom scripting is disabled can be viewed in this documentation.
With the change to stop the creation of new classic publishing site collections and publishing feature activation, SharePoint admins will no longer be able to create new classic publishing enabled site collections or enable publishing features at site collection level.
What you need to do to prepare
We recommend taking the following actions to prepare for these upcoming changes.
1. Inform owners of the classic publishing sites in your organization of these upcoming changes. Promote switching to use of Modern sites. Refer to this guide.
2. To temporarily opt out of the custom scripting enforcement in classic publishing sites for your tenant until March 15, 2026, use the following PowerShell command:
Set-SPOTenant -DelayDenyAddAndCustomizePagesEnforcementOnClassicPublishingSites $true
3. To temporarily opt out of custom scripting enforcement for a specific site (with any template) with tenant admin approval (effective for 24 hours), use the following PowerShell command:
Set-SPOSite <SiteURL> -DenyAddAndCustomizePages $false
4. If you need to allow the creation of new classic publishing site collections or enable publishing feature activations, use the following PowerShell command set the flag to allow.
Set-SPOTenant -AllowClassicPublishingSiteCreation $true
NOTE:
You need to install the latest (16.0.26211.12010 or higher) SharePoint Online Management Shell in order to run the commands above.
The DelayDenyAddAndCustomizePagesEnforcementOnClassicPublishingSites command is scheduled to end starting on March 15, 2026, while all other commands are expected to remain functional beyond that date.
Compliance considerations
There is no impact or change to compliance.
Referenced content
Security considerations of allowing custom script - SharePoint in Microsoft 365 | Microsoft Learn
Allow or prevent custom script - SharePoint in Microsoft 365 | Microsoft Learn
SharePoint modernization guidance | Microsoft Learn
Introduction
This is the preferred method for creating sites for new UCC's or when an update from an older version of the Ucc.creator template is required.
This is the new instruction for a complete OneUCC Available since UCC.Creator v8.2.0.7. The model (preferred by Microsoft) in SharePoint on Microsoft 365 where no subsites are allowed. In this model each UCC will need its own separate SharePoint site (formerly known as site collection). This does allows for more granular user access and template updates per UCC. site installation with more up-to-date technology to create sites authorization methods. Specifically:
-
App-only + certificate access (easy to manage but very secure)
-
Using PnP.PowerShell instead of SPO_ManagementShell (these are 2 distinctly different products)
-
No manual creation of apps, permissions and sites through SharePoint Admin portal (more steps can be done as sequential Powershell tasks)
-
NoClientSecrets are created or needed in this install scenario (client secrets can still be added and used for legacy tasks, but Microsoft is retiring their use, see Supplemental Announcement 2 (late 2023): Microsoft SharePoint Azure-ACS retirement:).
Use this method for:
-
The OneUCC deployment model which is required for your UCC SharePoint sites (will also work with subsites, but they are increasingly discouraged by Microsoft), and
-
To leverage the more up-to-date PnP PowerShell (Learn More - GitHub) instead of the legacy SPO-ManagementShell , and
-
To use an App and self-signed certificate (no purchase involved) for Microsoft Entra ID Formerly known as Azure Active Directory (or Azure AD, or AAD)App-only access to create and update all your UCC SharePoint sites, and
-
To grant the App-only permission to Sites.Selected in your tenant (added as a newer permission type to SharePoint in Microsoft 365) instead of the previous only option Sites.FullControl.All.
In short, the below instruction is a procedure to create and build UCC SharePoint sites with no interaction to the SharePoint-admin portal, minimal access to the Microsoft Entra ID Formerly known as Azure Active Directory (or Azure AD, or AAD) App portal and most interactions via PnP.PowerShell.
Prerequisites
-
Latest PowerShell 7, see: https://learn.microsoft.com/en-us/powershell/scripting/install/installing-powershell-on-windows
-
Latest PnP PowerShell module, see: https://pnp.github.io/powershell/articles/installation.html
-
A Microsoft 365 Administrator user/account with permissions to create an App Registration in your Microsoft Entra ID, goto - https://entra.microsoft.com/
-
A Microsoft Entra Id Application created to allow PnP.PowerShell access to Microsoft 365, see: https://pnp.github.io/powershell/index.html
-
Latest Bundle A bundle is a fixed combination of our software platform elements of very specific versions. These are designed and tested to optimally work together to assure their intended function and interoperability. Ucc.Creator template scripts, see - Bundle Release Notes
Note
Installation files can be obtained from AnywhereNow or an authorized Partner.
1. Generate Certificate
Time to execute: approx. 10 min.
Follow Microsoft's instructions on generating a private certificate (no cost involved, just PowerShell) for your Entra ID App-only access, Learn More - Microsoft
In summary:
-
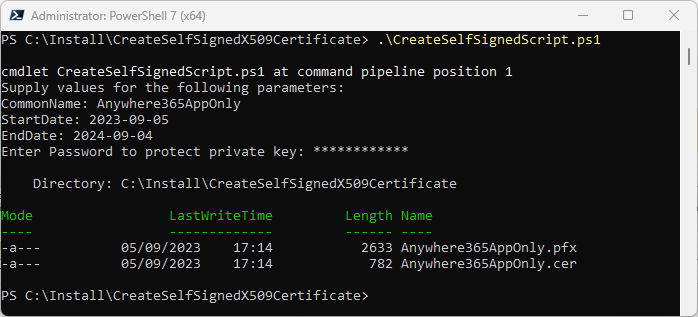
Copy and Run the Microsoft provided PowerShell script to generate your private X.509 certificate. When asked for:
-
CommonName (we suggest "AnywhereNowAppOnly", or adhere to your IT naming conventions)
-
StartDate (we suggest your current date)
-
EndDate (we suggest you adhere to your IT policy for certificate renewal dates)
-
Password (we suggest you adhere to your IT policy for password formats)
Output should be similar to (but could be different if you run the script with parameters for these values)
-
2. Create New PnP.PowerShell Application
Time to execute: approx. 1 min.
Announcement (September 2024)
PnP PowerShell has changed security restrictions as of September 9th 2024. This affects the Connect-PnPOnline step mentioned below from this moment on when you want to create new sites. For more communication by the PnP team see: https://pnp.github.io/powershell/index.html
This should return an AppId which you can use in the updated Connect-PnPOnline - Interactive step.
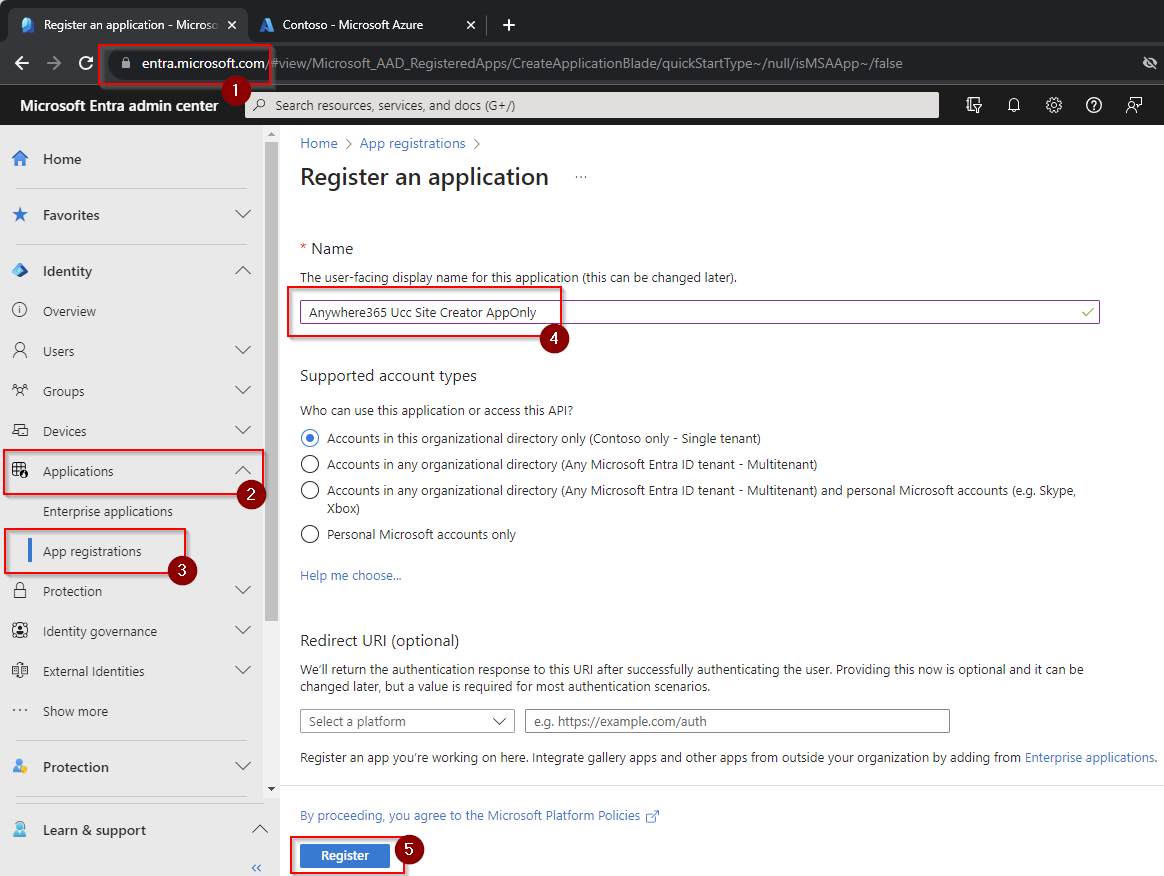
Run the following command (adapted from: https://pnp.github.io/powershell/articles/registerapplication.html) and populate the <your-tenant> variable:
PnP.PowerShell
Register-PnPEntraIDAppForInteractiveLogin -ApplicationName "AnywhereNow-OneUCC-PnPApp" -Tenant <your-tenant>.onmicrosoft.com -Interactive3. Update App Permissions to "Sites.Selected" only
Time to execute: approx. 5 min.
Tip
You can also use the now required App needed and created above for the PnP.Powershell add-in to include the Application permission requested below and use that app as your Microsoft Entra Id Application for creating your UCC sites.
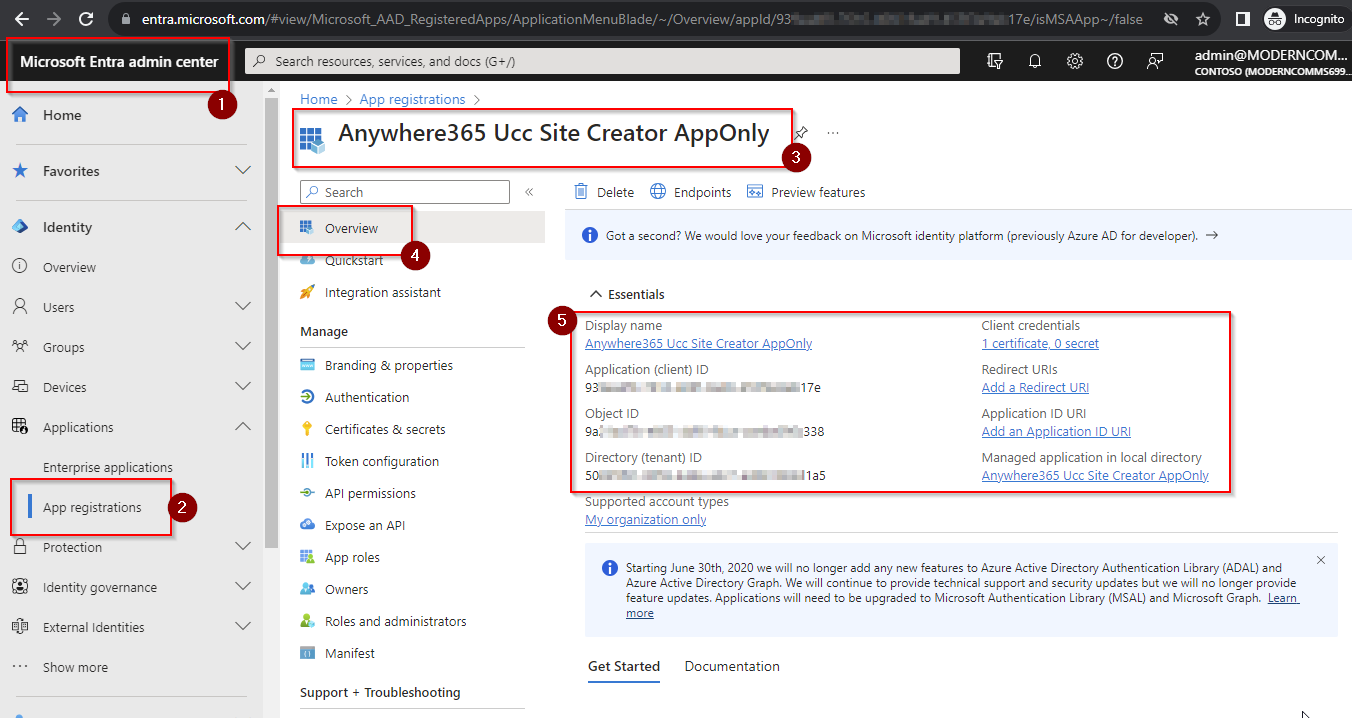
Update the App Registration in your Microsoft Entra admin center, visit - https://entra.microsoft.com/
-
Find Application with name "AnywhereNow-OneUCC-PnP-App"
-
Select Application with name "AnywhereNow-OneUCC-PnP-App"
 or
or 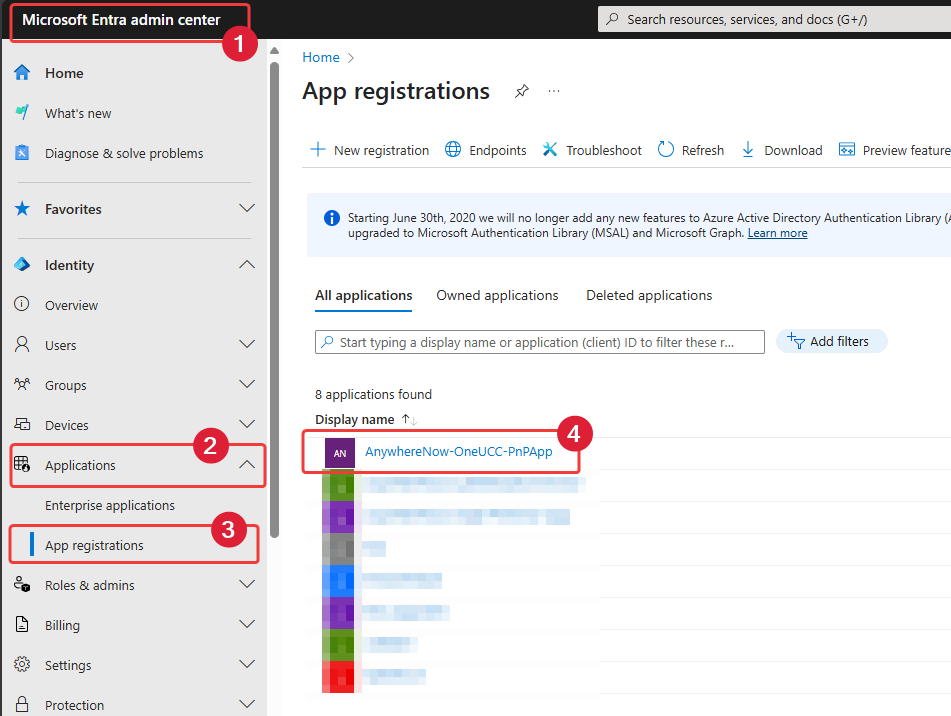
-
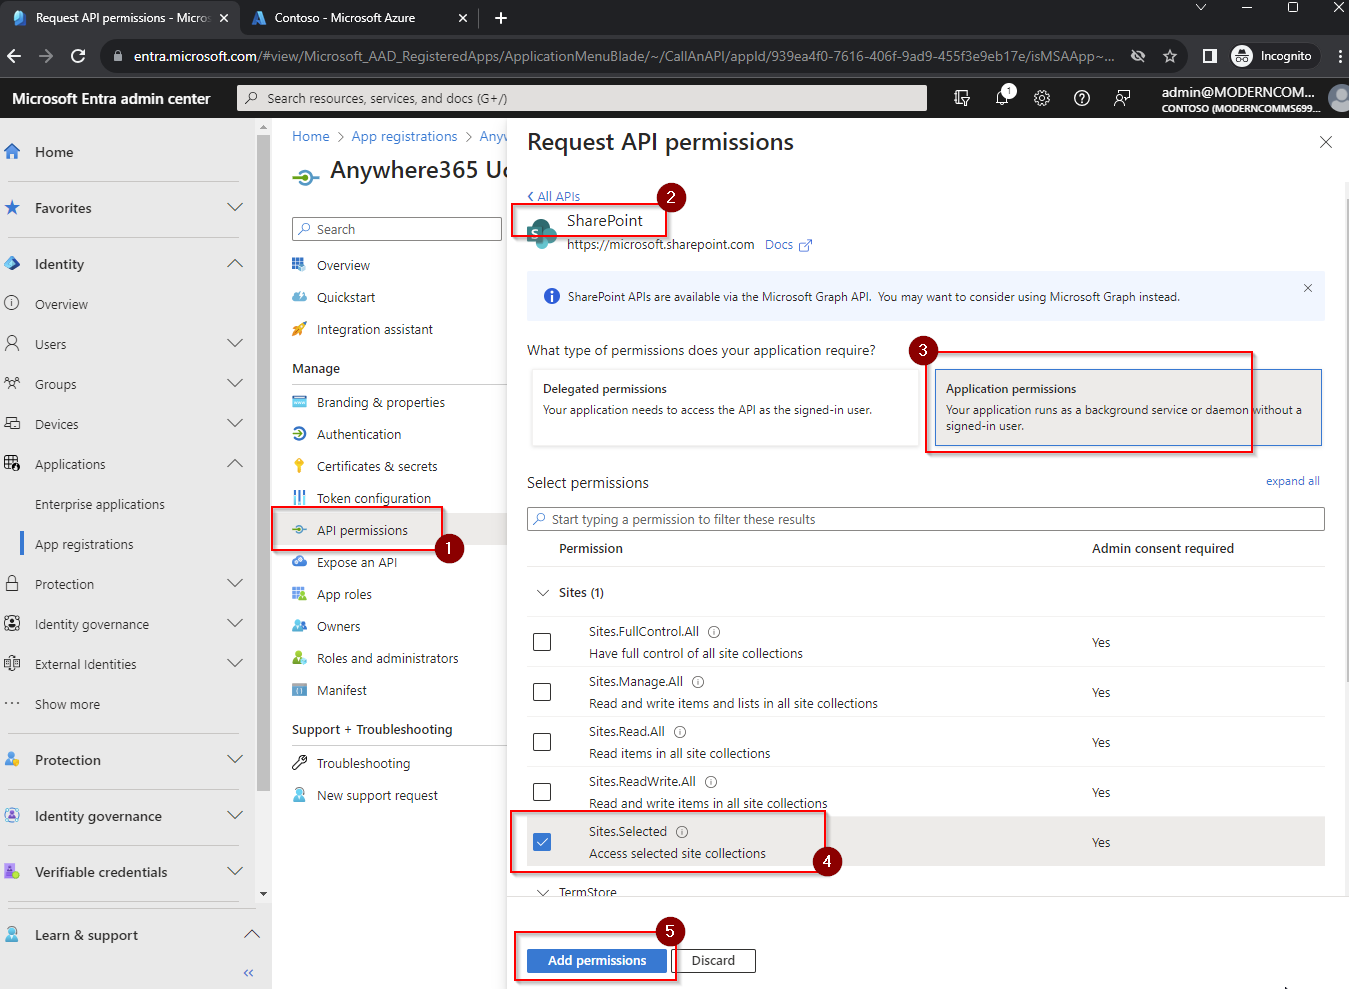
Goto API permissions -> Add a Permission -> SharePoint -> Application permissions -> Sites.Selected -> Add permissions
 or
or 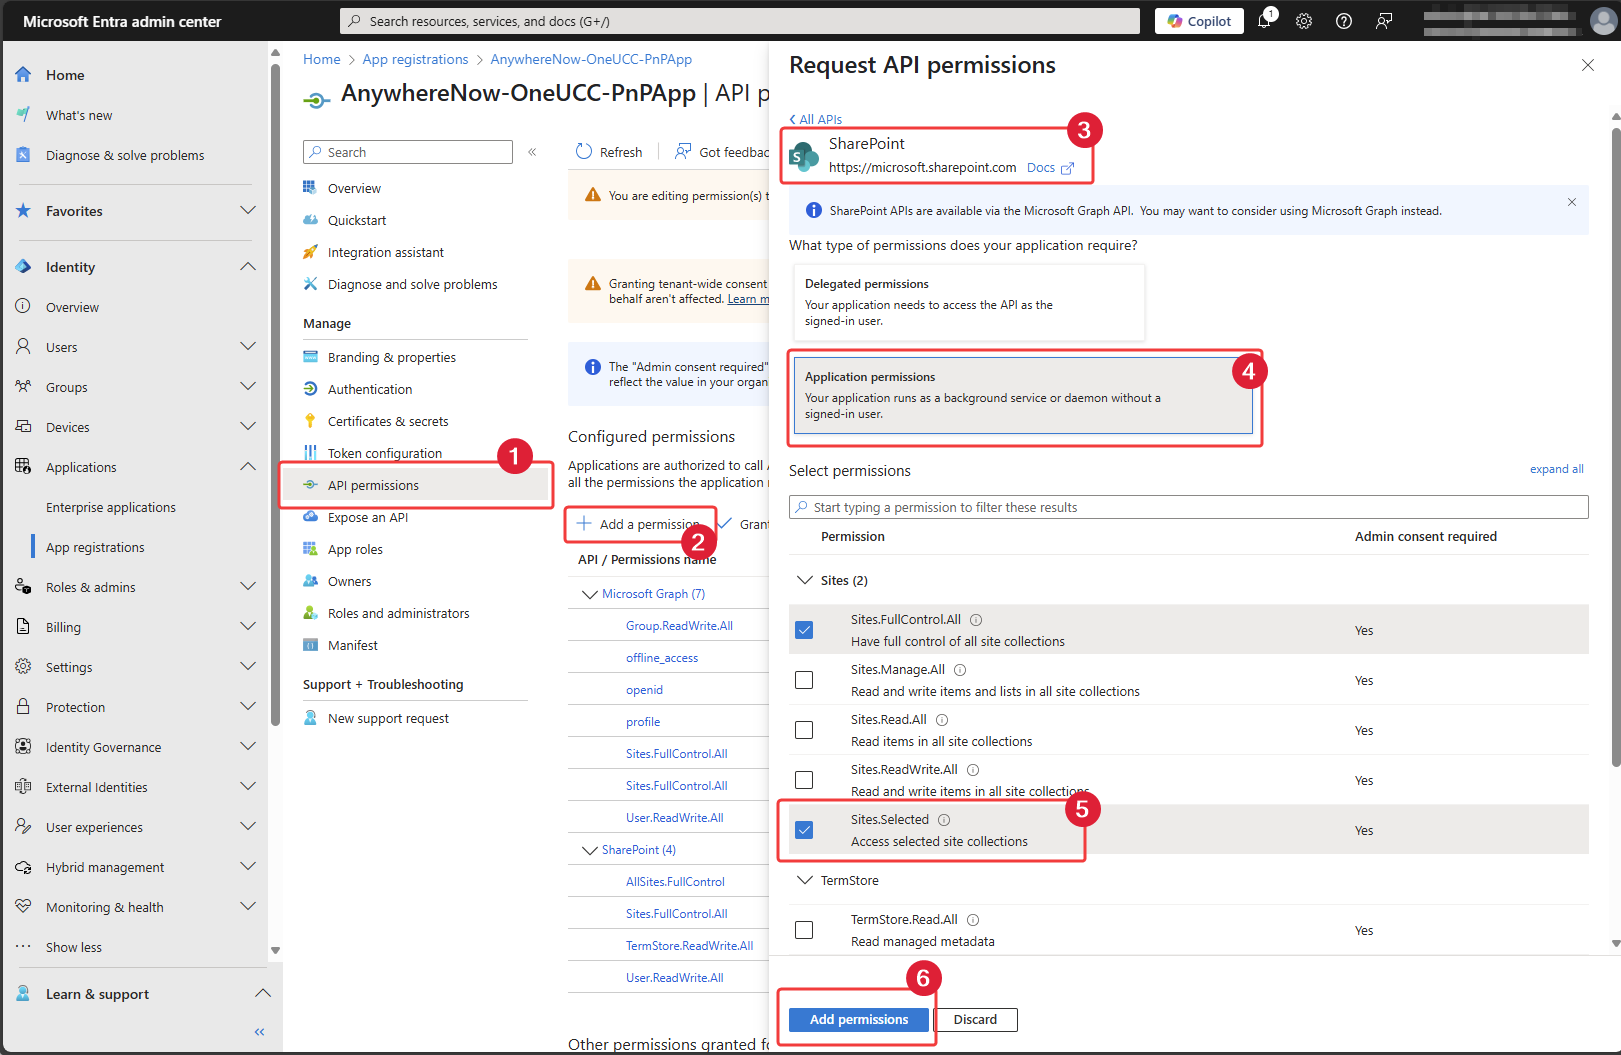
Note
You may have noticed the permissions requested in this step differ from the permissions requested in the legacy Ucc.Creator installation method. This is correct and deliberate. The permissions requested on this page only work with the installation instruction provided on this page. The permissions requested on the legacy Ucc.Creator installation page only work with the installation instruction provided on the legacy Ucc.Creator installation page.
-
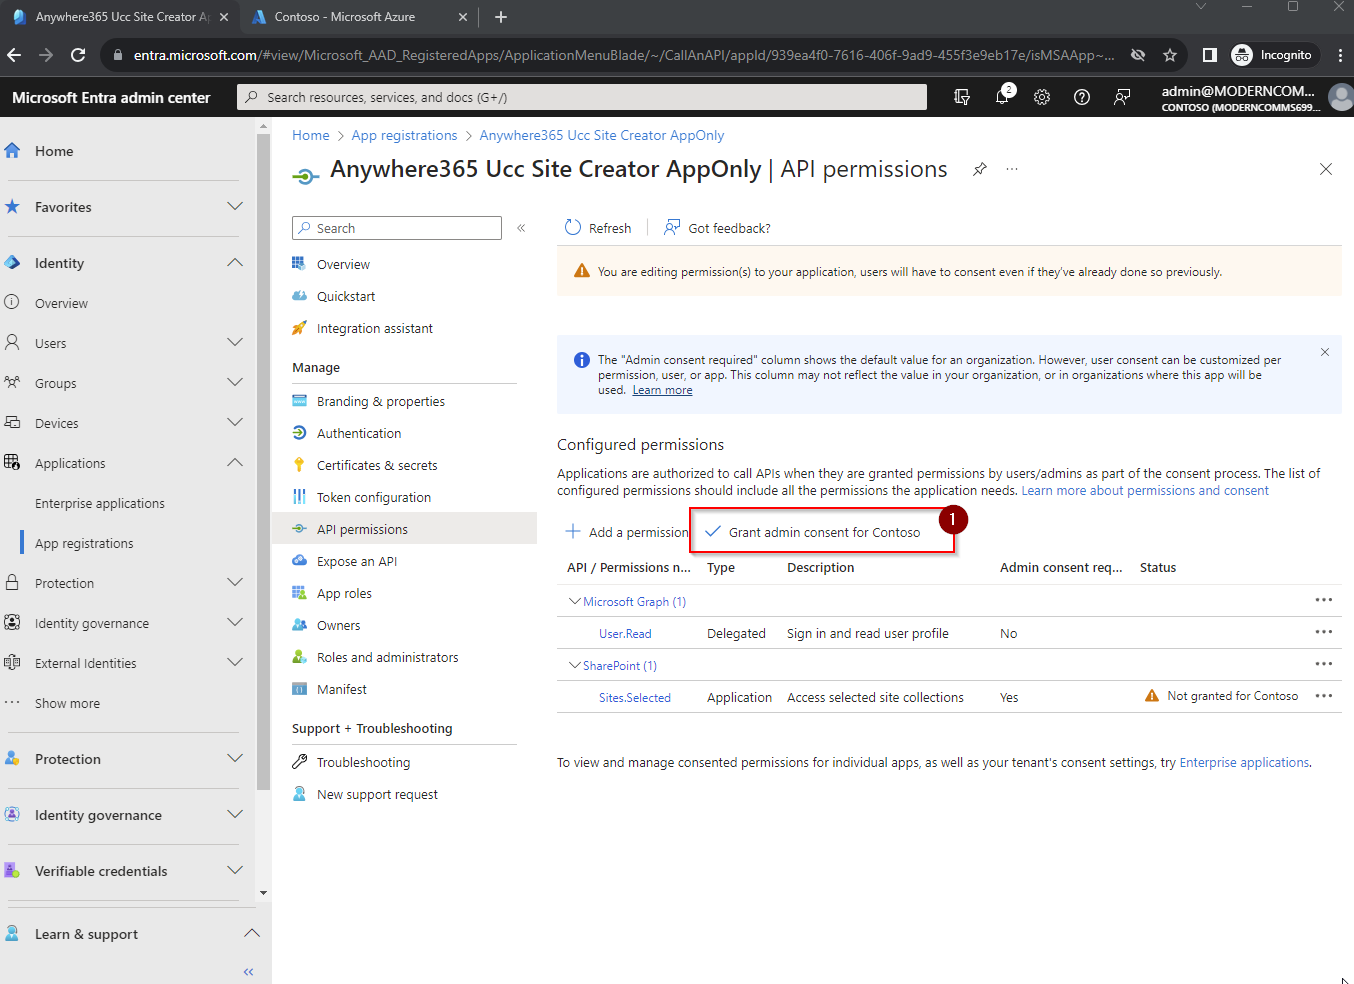
click Grant admin consent for <tenant-name>
 or
or 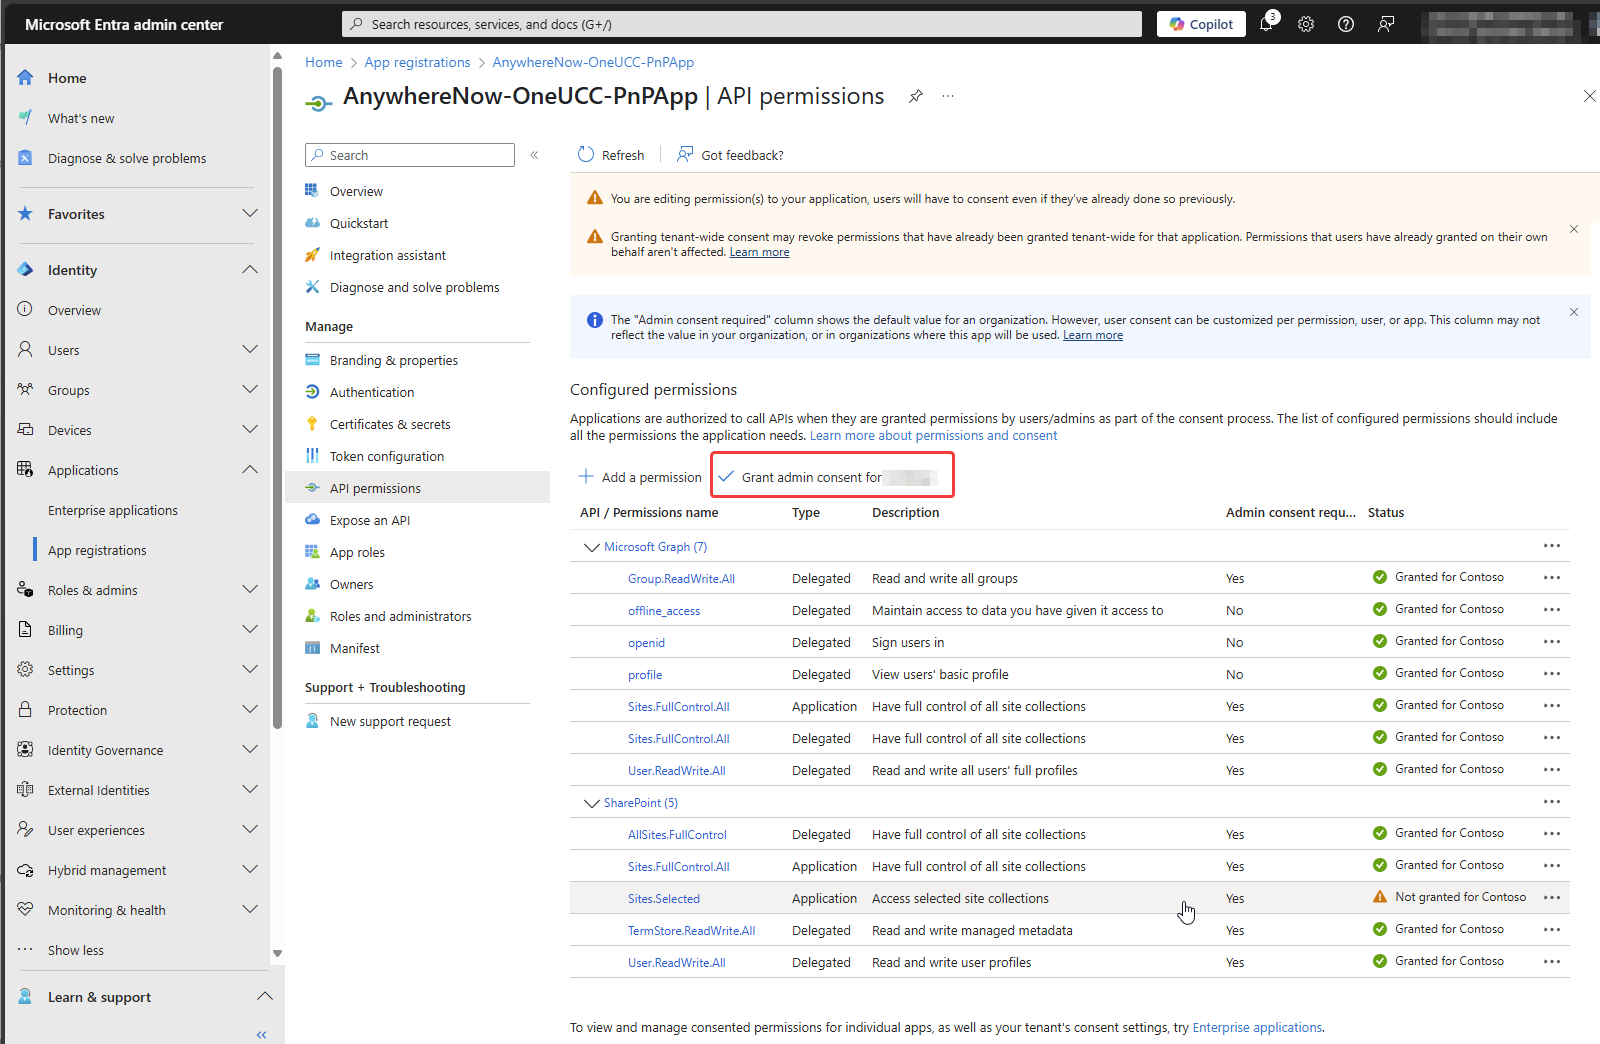
-
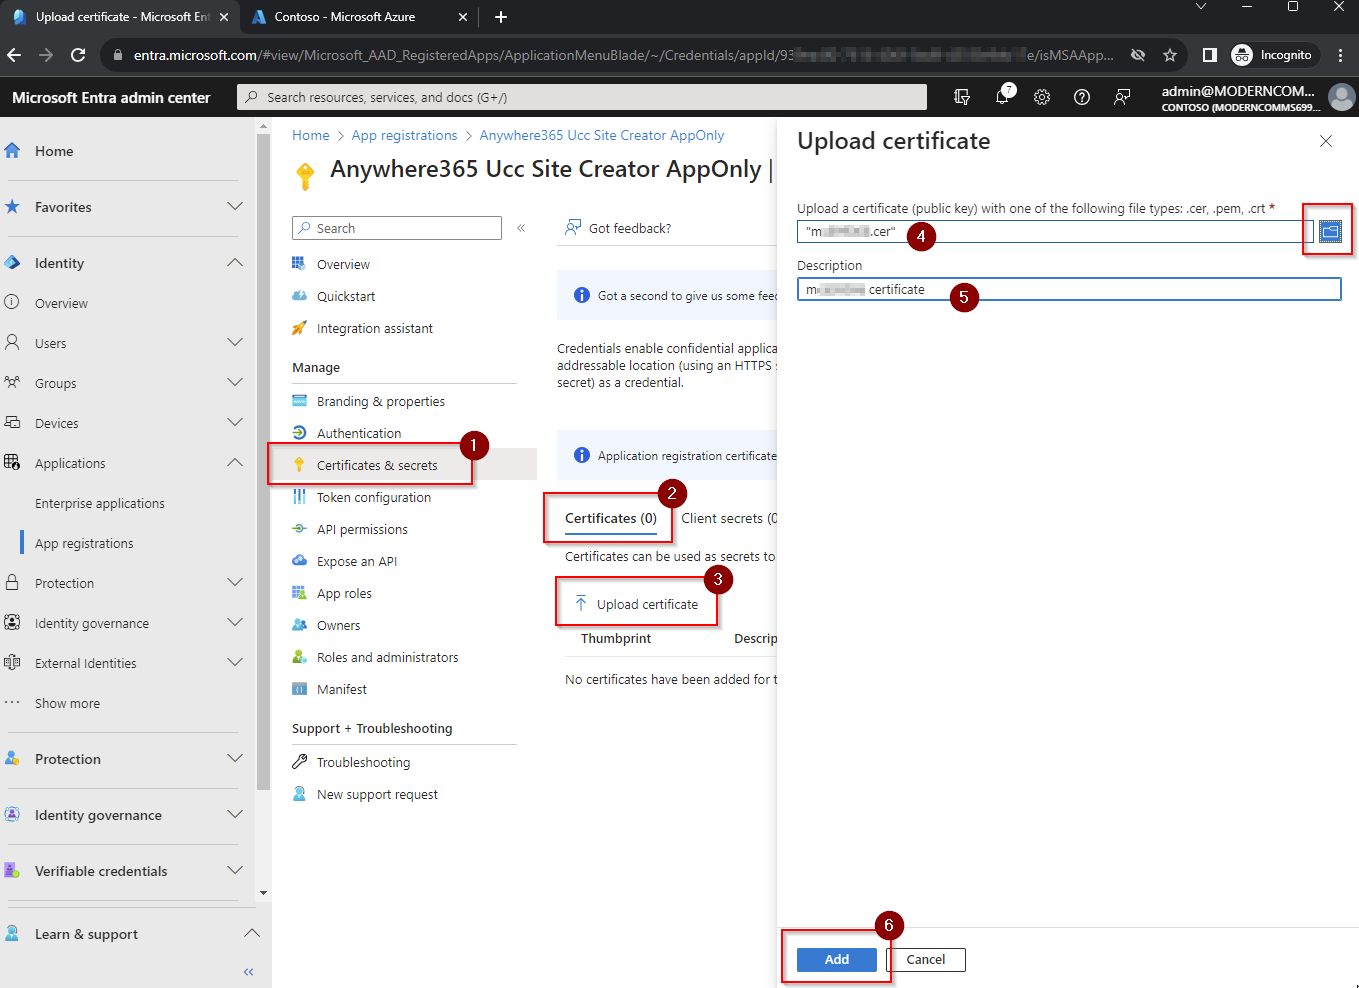
Goto Certificates & secrets -> Certificates -> Upload certificates -> select your local .cer certificate file -> enter Description -> Add
-
Goto Overview to verify and collect your ID's to use in the PnP.PowerShell scripts and commands
-
Remember to copy and safeguard the Application (client) ID
-
Remember to copy and safeguard the Password you entered during certificate creation (.pfx and .cer file).
-
Remember to copy and safeguard the certificate .pfx and .cer file.
-
You should know your Microsoft 365 Directory (tenant) ID
4. Create and Prepare Site using PnP.Powershell
Announcement (September 2024)
PnP PowerShell has changed security restrictions as of September 9th 2024. This affects the Connect-PnPOnline step mentioned below from this moment on when you want to create new sites. For more communication by the PnP team see: https://pnp.github.io/powershell/index.html
This should return an AppId which you can use in the updated Connect-PnPOnline - Interactive step.
Time to execute: approx. 10 min.
-
Step 1: Start PowerShell 7

-
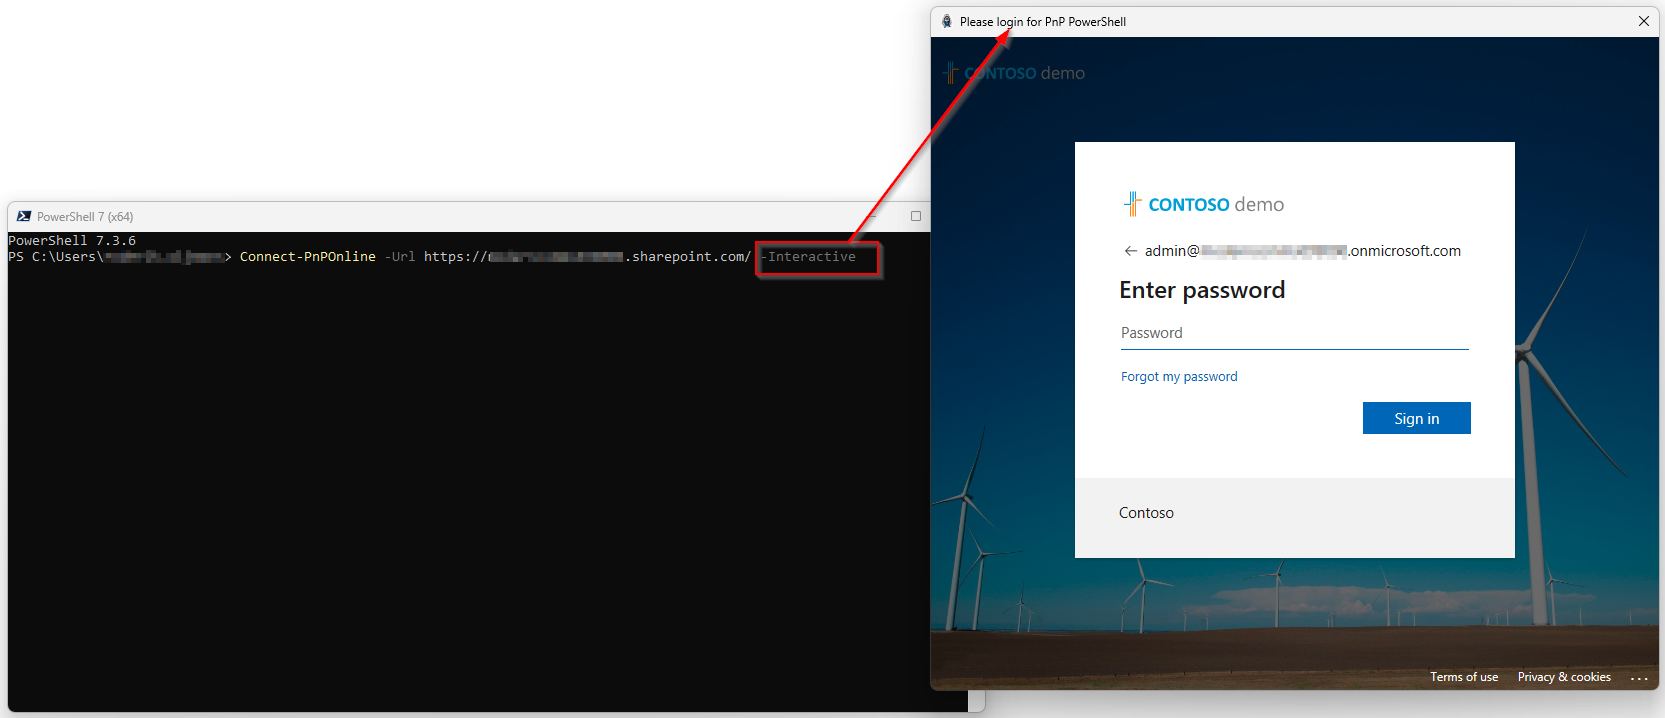
Step 2: Connect to your SharePoint Online tenant
CopyPnP.PowerShellConnect-PnPOnline -Url https://<tenant-name>.sharepoint.com/ -Interactive -ClientId <Your-AnywhereNow-OneUCC-PnPApp-Id>Example:
-
Step 3: Create a SharePoint site (formerly known as site collection) for a UCC
CopyPnP.PowerShellNew-PnPSite -Type TeamSiteWithoutMicrosoft365Group -Title <ucc-name> -Url https://<tenant-name>.sharepoint.com/sites/<ucc-name> -Lcid <4-Digits>Example for creating a site in the default (typically us-english) language:

Example for creating a site in a different language (e.g. german):

Note
1: In these examples a site of type TeamSiteWithoutMicrosoft365Group is selected. Other types are possible like CommunicationSite or a regular TeamSite but they may create additional resources not typically used for a UCC site, like an email address or a Team Group.
2: The (optional) Country Code parameter (-Lcid) defines the localization (language) of this SharePoint site. It cannot be changed afterwards! It should match the localization in which you want to create and present the UCC site to your end-users. (i.e. it should be the same language selected in Step 3: Add UCC Name -> DisplayName -> Language to UCC creator list in the Ucc site )
 List of LCID codes (Languages) supported by Anywhere365 Ucc.Creator
Danish - 1030
Dutch - 1043
English - 1033
French - 1036
German - 1031
Italian - 1040
Norwegian - 1044
Portuguese - 2070
Spanish - 3082
Swedish - 1053
For a list of all PnP parameters see: New-PnPSite.html
-
Step 4: Enable custom scripting on the created UCC site
CopyPnP.PowerShellSet-PnPSite -Identity https://<tenant-name>.sharepoint.com/sites/<ucc-name> -NoScriptSite $falseExample:

-
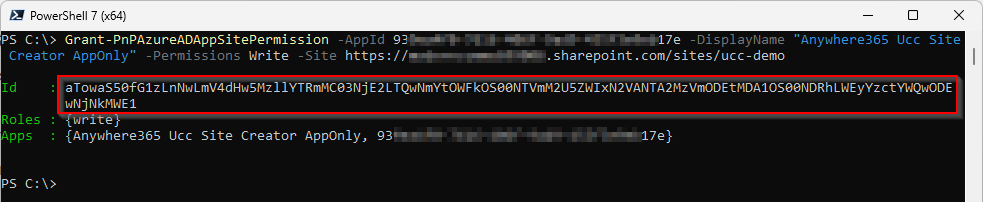
Step 5: Grant write permissions to the site for the App Registration created. (This is needed prior to elevate the permission to FullControl)
The output of this command will provide an ID string needed in the next step.CopyPnP.PowerShellGrant-PnPAzureADAppSitePermission -AppId <Guid> -DisplayName "<String>" -Permissions Write -Site https://<tenant-name>.sharepoint.com/sites/<ucc-name>Example:
-
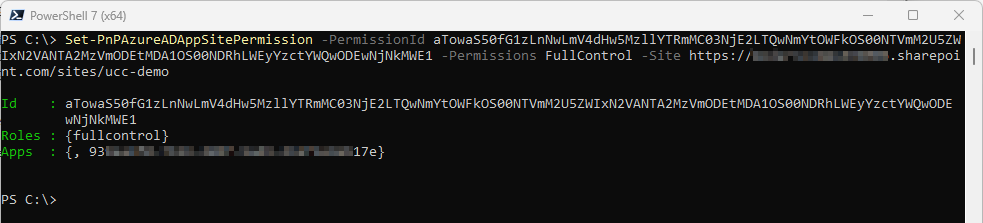
Step 6: Elevate permission of the App-only App for the UCC site to FullControl.
CopyPnP.PowerShellSet-PnPAzureADAppSitePermission -PermissionId <LongString> -Permissions FullControl -Site https://<tenant-name>.sharepoint.com/sites/<ucc-name>Example:
5. Run Ucc.Creator template scripts
Time to execute: approx. 20 min.
-
Step 1: Populate the configuration.xml file of the Ucc.Creator package with
- SiteCollectionUrl
- CertificateAppId
- CertificateTenantId
- CertificatePassword (if encrypted="true", please encrypt with the encryptpassword.ps1 script in the Ucc.Creator package)
- CertificatePath (the local path to where the .pfx file is stored)
Example:

-
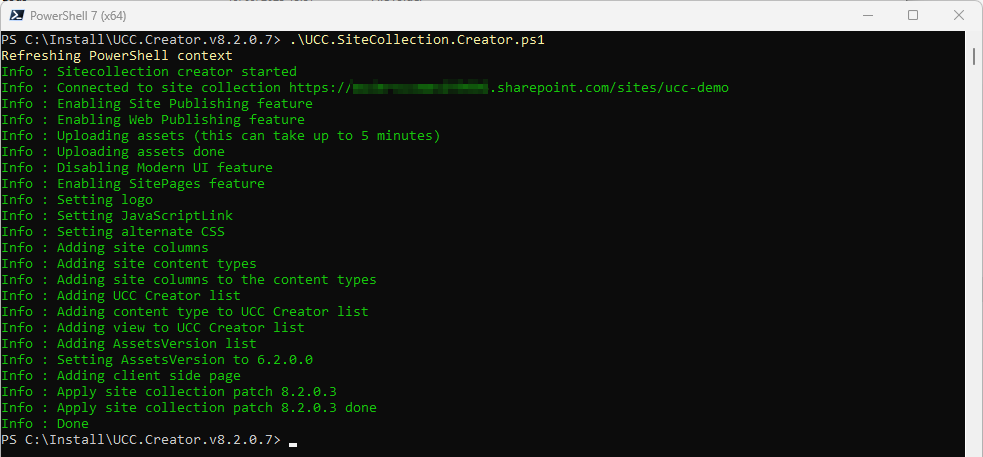
Step 2: Run Ucc.SiteCollection.Creator.ps1 script in PowerShell
Example:
-
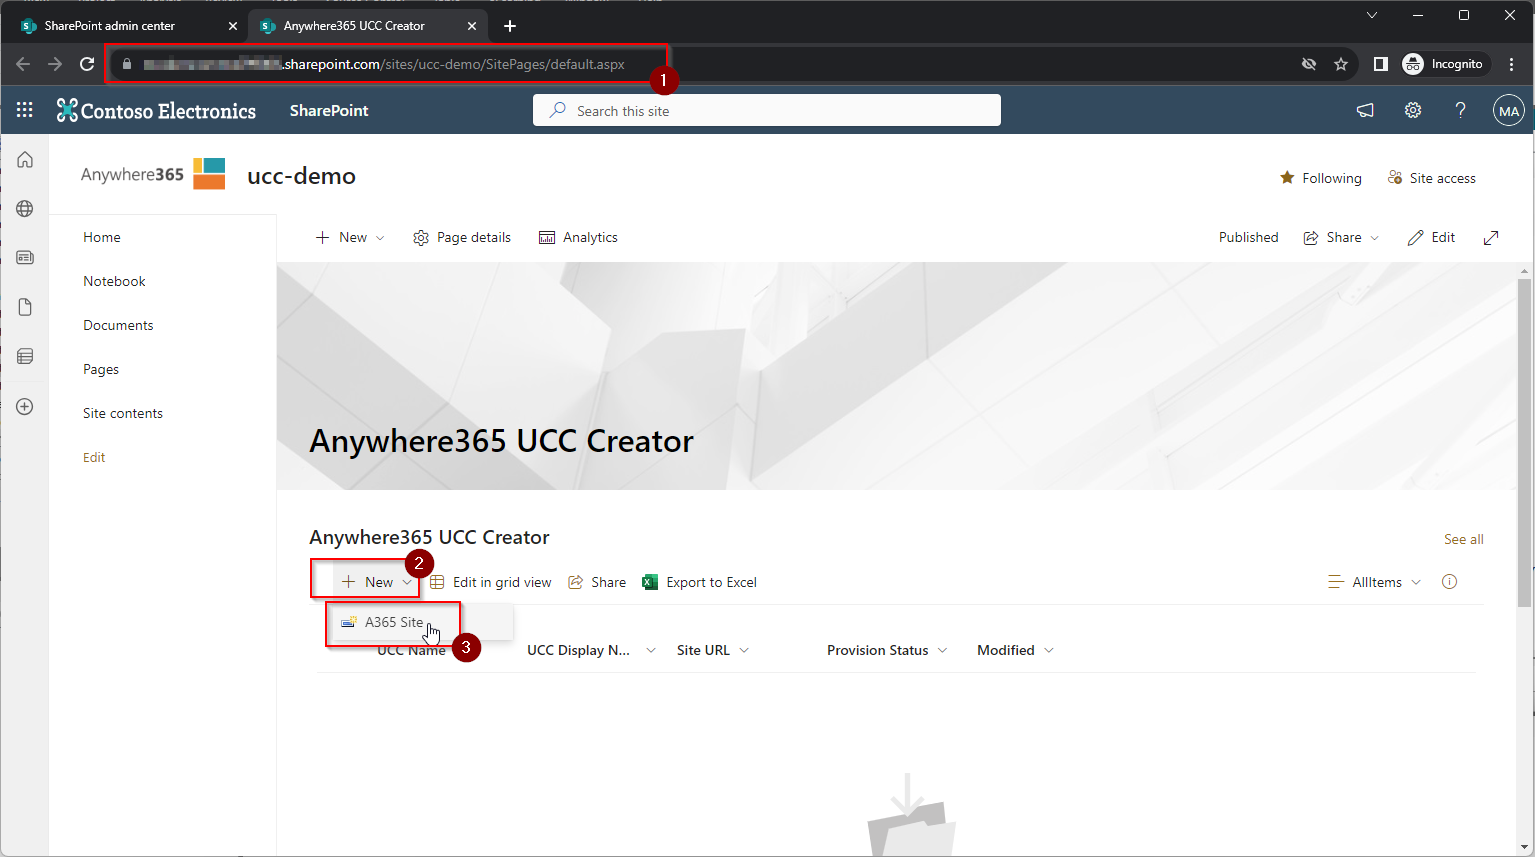
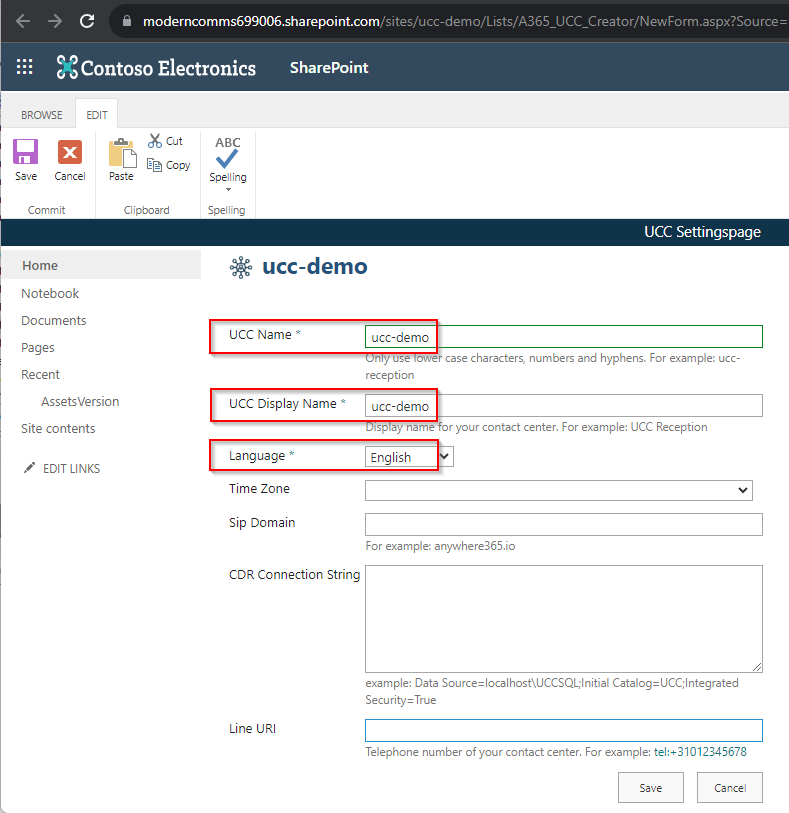
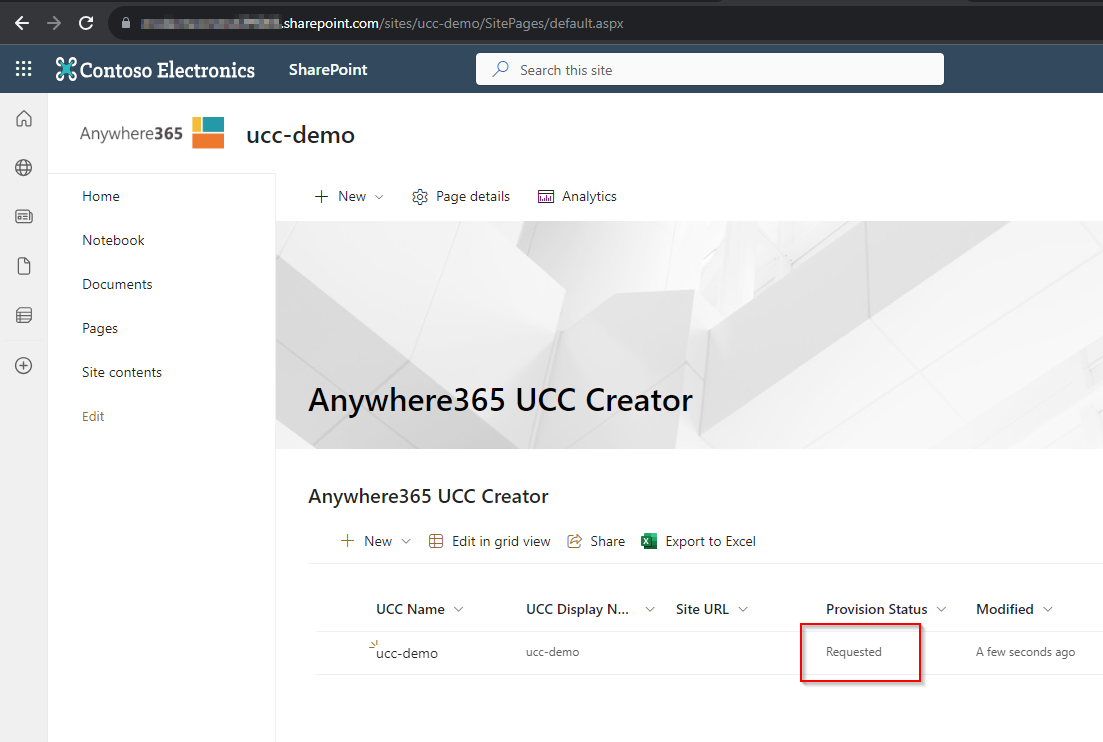
Step 3: Add UCC Name -> DisplayName -> Language to UCC creator list in the Ucc site
(Timezone, CDR Call Detail Records (CDR) are the meta data of a converstation: who talked to whom, at which time, for how long and with which identity among other things (skill, optional classification, etc) which gets stored in your SQL (analytical) database. Database Connectionstring and LineURI are optional)
-
Navigate to the created site https://<tenant-name>.sharepoint.com/sites/<ucc-name>/SitePages/default.aspx
-
-
Step 4: Run Ucc.Creator.ps1 script in PowerShell
Example:
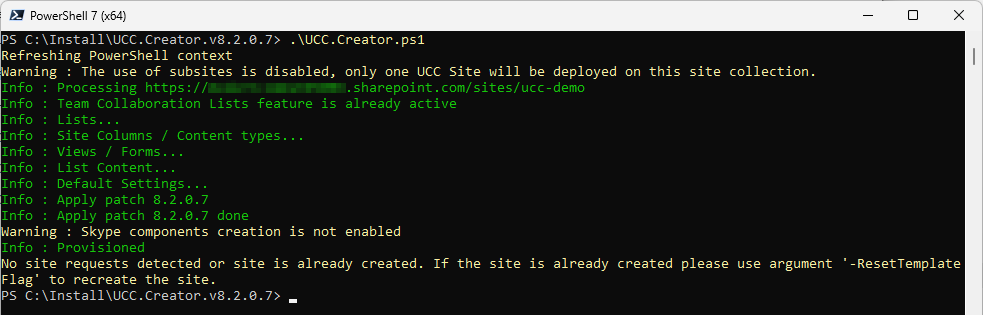
-
The UCC site is now created and populated with all required ucc.creator template assets and is ready for further configuration.
Next Steps for OneUCC Sites?
-
Repeat the steps in heading 4 and 5 for every UCC you want to request on Dialogue Cloud (or when replacing existing UCC (sub)sites) .
-
Grant Dialogue Cloud App-Only access to all your UCC sites, see: AnywhereNow Dialogue Cloud Microsoft Entra ID Enterprise Applications
-
Set the additional permission for Dialogue Cloud on all your UCC Sites using an easy PowerShell script and private App Registration, see Granting permission to Multiple Sites - Powershell Script
-
Add your new UCC sites to OnePortal Formerly known as Partner Portal. A redesigned web portal for managing Dialogue Cloud deployments.:
-
For a new UCC, see: SharePoint Details
-
For replacing a UCC site, see: From Client Id / Client Secret to AppOnly/Certificate (the AnywhereNow Dialogue Cloud Enterprise App)
-
-
(Optional) Other Applications
Read more
If the functionality of Screenrecording is used from within Snapper then Legacy (Azure-ACS for SharePoint Online) ClientId and ClientSecret must still be created per UCC site this is wished for. Two additional actions need to be taken per UCC site:
-
Enable Custom App Authentication, see: Custom App Authentication should be enabled (Step 1-> 2. Global SP-Online Prerequisites -> Custom App Authentication)
-
Create App Credentials , see: AnywhereNow SharePoint UCC Site Creator
(Step 3 -> Option 1)
-
How to Update Sites
- To update a UCC site to a higher version (if and when it becomes available in a bundle), enter the site and certificate details in the configuration.xml file and run Ucc.Update.ps1 script, for every site you need to update.